How to Change Your PIN In Windows 11

Change your Windows 11 PIN in a few quick steps to keep your account secure. The whole job takes about a minute, you don’t need to restart, and the new PIN works the next time you sign in or unlock the PC.
Open Settings with Win+I, go to Accounts Sign-in options, click PIN (Windows Hello), select Change PIN, enter your current PIN, type your new PIN twice, and click OK. Your new PIN works the next time you sign in.
What is a PIN and Why Use It?
A Windows 11 PIN is a short secret code for quick access to your computer. It is part of Windows Hello, a sign-in system that combines biometrics and a PIN and ties them directly to your physical hardware. Hardware-bound credentials give stronger protection than a traditional password. If someone gets physical access to your machine, the PIN helps keep your personal data safe.
A PIN is safer than a password because:
- It’s only for your device. If someone steals your PIN, they can’t use it on another device.
- It stays on your computer. Your PIN isn’t sent over the internet, so hackers can’t intercept it in transit.
- Your device keeps it extra safe. Windows uses a special chip (called TPM) to protect your PIN from being guessed or stolen.
- You can make it as simple or complex as you want. You can include numbers, letters, and symbols.
- It works with biometrics. The PIN is your backup when fingerprint or face recognition doesn’t work.
Learn more about Windows Hello here: Windows Hello – Microsoft Support
How to Change Your PIN in 🪟 Windows 11
You need to be signed in and know your current PIN. If you’ve forgotten it, skip to the tips further down.
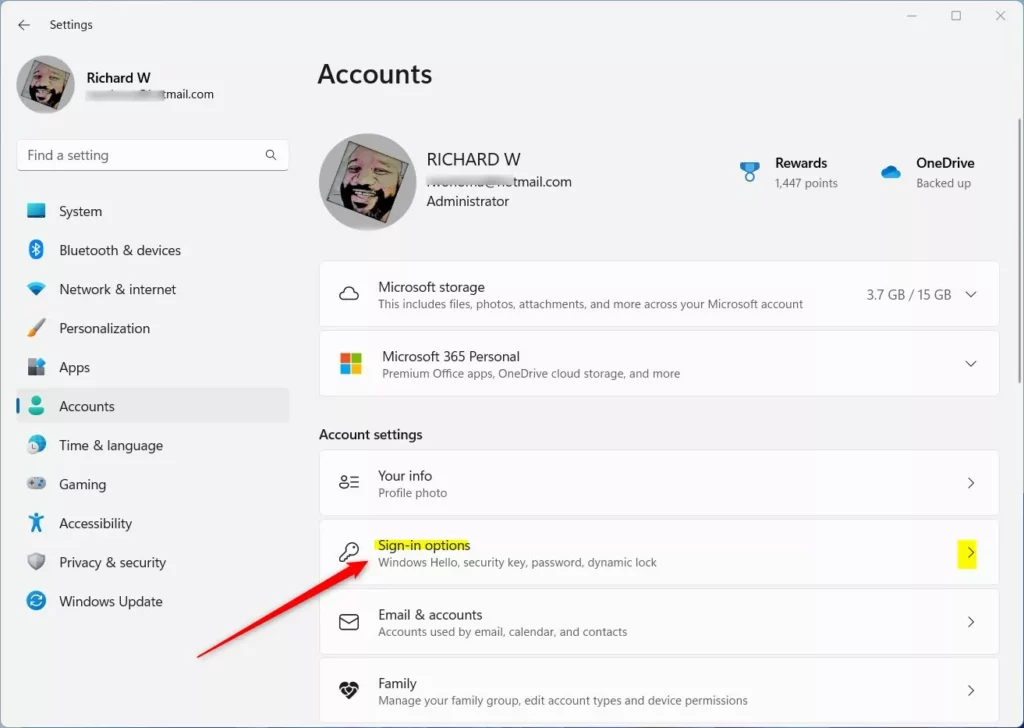
- Open Settings . Press Win + I on your keyboard. The Settings app opens.
- Go to Accounts. Click Accounts in the left menu.
- Choose Sign-in options. On the right side, click Sign-in options. You’ll see a list of ways to sign in.
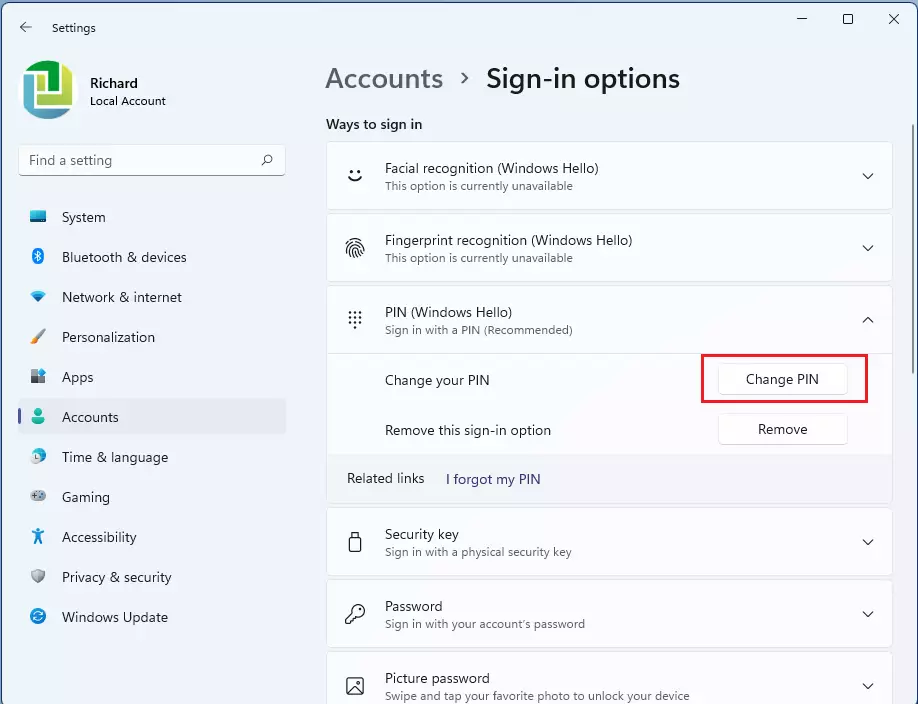
- Find your PIN. Under Ways to sign in, click PIN (Windows Hello) to expand it. The options for that sign-in method appear underneath.
- Click Change PIN. Press the Change PIN button. A dialog box opens asking for your PIN.
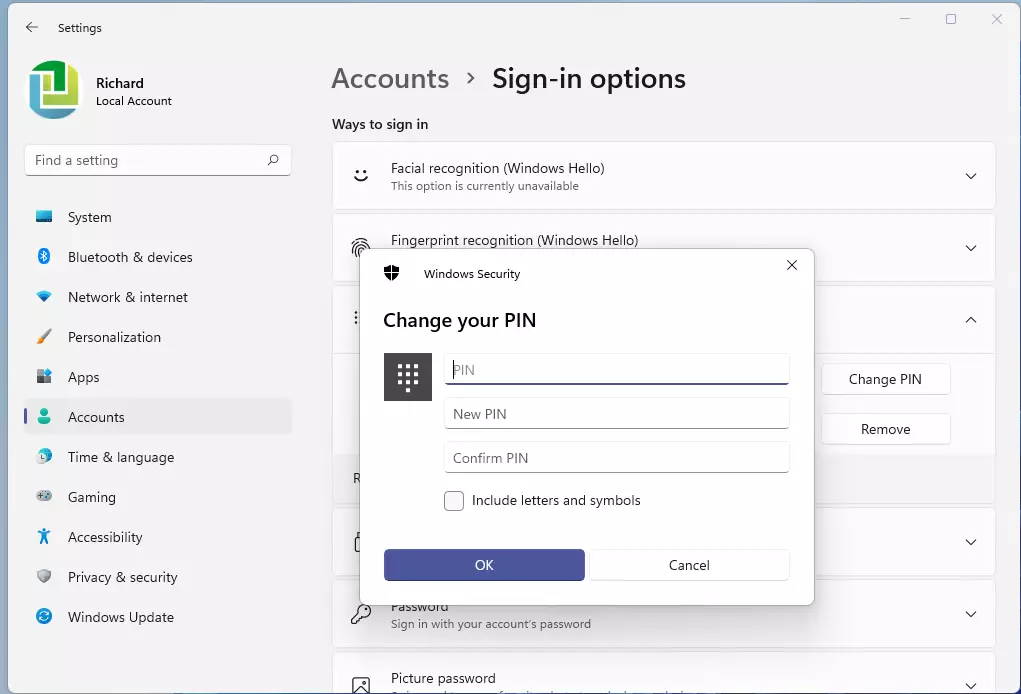
- Enter your current PIN. Windows needs this to confirm it’s really you.
- Type your new PIN. If you want a more complex PIN, tick Include letters and symbols first. Without that box ticked, the PIN is numbers only.
- Confirm your new PIN. Type it again in the confirmation box.
- Click OK. This saves your new PIN, and the dialog closes.
If you prefer to work from memory: press Win+I to open the Settings app, go to Accounts in the left sidebar, and click Sign-in options. Then click PIN (Windows Hello) to reveal the controls for changing it.
If Change PIN is missing or greyed out, you may not have a PIN set up yet. In that case the button reads Set up instead. On a work or school PC, your organization’s policy may also control PIN settings, and you’ll need to ask your IT department.
To check that it worked, lock your PC (Win+L) and sign back in with the new PIN. There is no way to “undo” a PIN change, but you can repeat the same steps at any time to set a different one.
Why Change Your PIN?
- Keep your device safeChanging your PIN regularly adds security.
- Make it easier to rememberChoose a new PIN that you find easier to recall but that is still secure. Avoid obvious choices such as 1234 or your birth year.
- Update your securityIf you think someone else knows your PIN, change it right away.
Quick Tips
- Make your PIN at least 6 characters long, with a mix of numbers, letters, and symbols if possible.
- Never share your PIN with others.
- If you forget your PIN, you can reset it from the sign-in screen by choosing the I forgot my PIN link. You'll need your Microsoft account password to verify your identity. The same link is available in Sign-in options under PIN (Windows Hello) if you are already signed in some other way.
Helpful Links
- How to Change or Reset Your PIN - Microsoft Support
- Windows Sign-in Options - Microsoft Support
- Windows Hello PIN Errors and Troubleshooting
Have a question about this guide?
Answered by AI from this guide. Good questions may be added to this page — please don't include personal details.
Did this guide fix your problem?

About the Author
Richard
Tech Writer, IT Professional
Richard is a writer at Geek Rewind who turns complex IT tasks into clear, step-by-step guides. He draws on years of hands-on experience in system administration and enterprise IT operations, focusing on Windows, Linux and WordPress: the problems people actually run into, and the fixes that work. His server and WordPress guides come from systems he runs himself. Richard builds and maintains the platform behind Geek Rewind, from its Ubuntu servers and Nginx configuration to its custom WordPress plugins. Many new tutorials start with readers' questions, and he's always glad to answer them in the comments.
No comments yet — be the first to share your thoughts!