Manage Screenshot and Screen Recording Privacy Settings in Windows 11

Screenshot and screen recording privacy settings in Windows 11 are found in Settings Privacy & security. Windows has no single switch that blocks all screen capture. Several separate features can capture your screen, and each one has its own setting.
Start by opening that page and checking which apps can capture your screen or use your microphone. Then change where captures are saved, so they don’t sync or copy to places you didn’t intend.
This page covers each of those settings in turn. For each one, it shows what you should see on screen and why an option might be missing or greyed out.
The screenshots and screen recording privacy settings in Windows 11 are in Settings Privacy & security, under App permissions. Open that page, turn off the main Screenshots and screen recording toggle to block capture by apps, and turn off any app in the list that has no reason to capture your screen. Snipping Tool, Xbox Game Bar and Recall each need separate handling.
What Can Capture Your Screen in 🪟 Windows 11
Windows 11 has four built-in capture routes. Snipping Tool (the built-in screenshot and recording app) opens with the Print Screen key or Win+Shift+S. Pressing Windows key + Print Screen saves a full-screen image straight to a folder. Xbox Game Bar records app windows with Win+Alt+R. On Copilot+ PCs, Recall (a feature that takes periodic snapshots of your screen so you can search them later) takes its own snapshots.
Third-party apps such as screen recorders, remote support tools and meeting software can also capture your screen. Windows controls some of these through its privacy pages. The rest are governed by the app’s own settings.
Know which route you are dealing with before you change anything, because the fix differs for each. The sections below follow the same order.
Check the Screenshots and Screen Recording Privacy Page
Recent Windows 11 builds include privacy controls that decide which apps can take screenshots of your windows and displays. Find the page, then review which apps can capture your screen.
Open the Screenshots and Screen Recording Settings
- Open Settings by pressing Windows key + I.

Windows 11 Start menu with Settings gear icon highlighted. - Select Privacy & security in the left pane.

- Scroll down to the App permissions section and look for an entry named Screenshots and screen recording. Select it.
- Review the toggle that lets apps take screenshots of various windows and displays. Turn it Off if you want to block capture by apps in general.
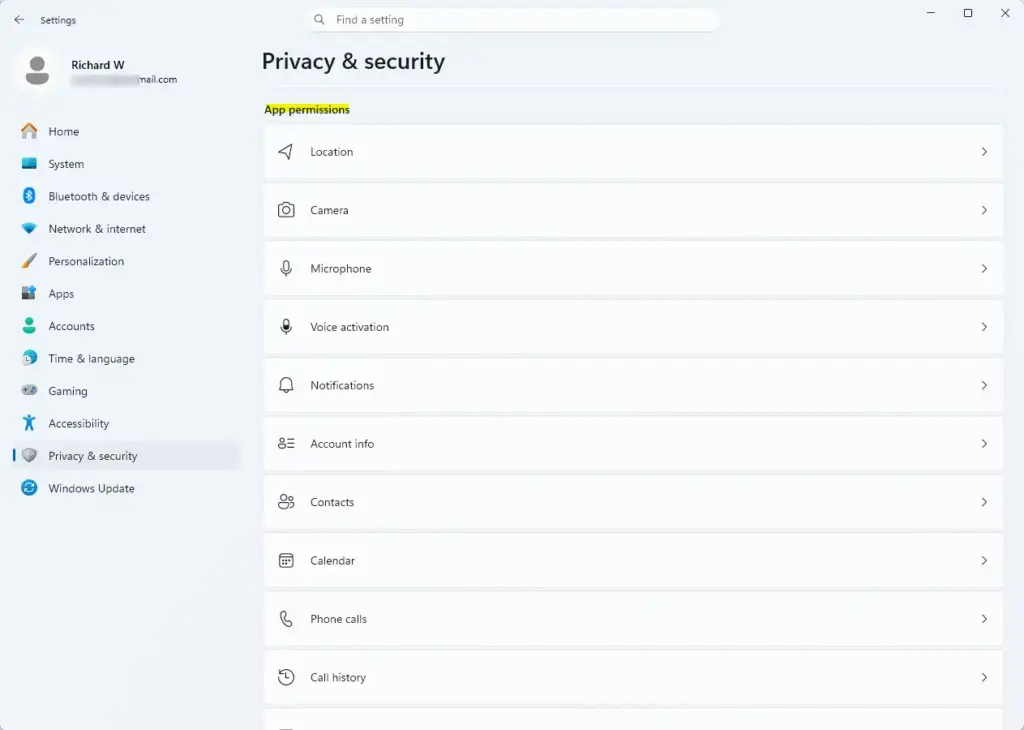
Settings › Privacy & security › App permissions - Scroll to the app list below the toggle, if one is shown. Turn Off any app that has no reason to capture your screen.
After step 3, you should see a page with a main toggle and, on some builds, a list of apps with their own toggles. Changes apply immediately. You don't need to restart or sign out.
If you don't see this page: your build doesn't have it yet. Microsoft has rolled out Privacy & security options in stages, and the exact labels differ between Windows 11 versions. Open Settings Windows Update, select Check for updates, and install what is offered. If the page still doesn't appear, use the other controls in this guide. No registry method for this page has been confirmed, so this guide does not give one.
If the toggles are greyed out: the page shows Some settings are managed by your organization when a work or school policy controls them. Ask your IT administrator (the person who manages your work or school PC) to change them. Your own account can't override a policy.
Review the Screenshot Borders Setting
Windows can draw a coloured border around the screen or window being captured so you know a capture is under way. A setting named Screenshot borders controls whether desktop apps are allowed to capture without that border. Leave the border visible if privacy is your goal, because it is your warning that something is capturing.
- Open Settings > Privacy & security.
- Select Screenshot borders under App permissions, if it appears.
Settings › Privacy & security › App permissions - Read the description next to the toggle on your build and set it so apps can't hide the border.
This page also depends on your Windows 11 version. If you don't see it, skip this step. The border is a courtesy to the user, not a hard block. An app that can capture your screen can still do so with the border off.
Control Microphone and Camera Access for Screen Recordings
A screen recording often includes sound from your microphone. If you don't want voice or room audio recorded, block microphone access first. This step also shows which apps used the microphone recently.
- Open Settings > Privacy & security > Microphone.
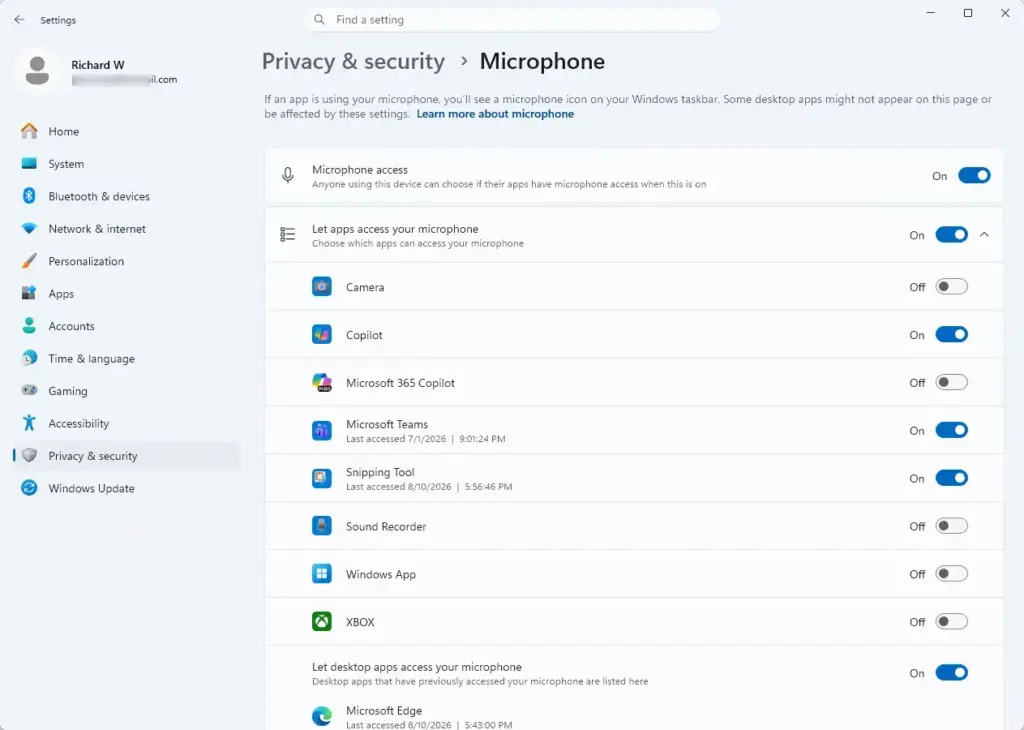
Settings › Privacy & security › Microphone - Check the Microphone access toggle at the top of the page. Turn it Off to block every app.
- Expand Let apps access your microphone to see the app list. Turn Off any app that doesn't need it. Each entry shows when the app last used the microphone.
- Scroll to Let desktop apps access your microphone and turn it Off if you want to block classic desktop programs too.
After step 2, you should see the app list greyed out. Apps that try to use the microphone will record silence or show an error.
Use the same route for the webcam. Go to Settings Privacy & security > Camera. Some recording tools can add a camera overlay to the video.
Desktop apps (traditional programs installed with an installer) are listed separately from Microsoft Store apps. Turning off a Store app in the list does not affect a desktop program. Use the desktop apps toggle for those.
Change Where Screenshots and Recordings Are Saved
Privacy problems with captures often come from where the files end up, not from who took them. By default, screenshots from Windows key + Print Screen and Snipping Tool go to the Screenshots folder inside Pictures. Snipping Tool recordings go to the Screen Recordings folder inside Videos. Game Bar captures go to a Captures folder inside Videos. For a typical account, the first path looks like C:\Users\USERNAME\Pictures\Screenshots.
Cloud sync, clipboard history or a backup tool can each pick up files in those folders. The next sections cover each.
Stop OneDrive From Saving Your Screenshots
OneDrive (Microsoft's cloud storage service) can save every screenshot you take to your online account automatically. Turn this off if your captures may contain private information.
- Select the OneDrive cloud icon in the notification area at the right end of the taskbar. If you don't see it, select the Show hidden icons arrow first.
- Select the Settings gear icon, then select Settings.
- Open Sync and backup.
- Select Advanced settings.
- Turn Off the option named Save screenshots I capture to OneDrive.
After step 4, you should see a list of options for photos, videos and screenshots. On older OneDrive versions, this option sits on a Backup tab instead, so look there if Sync and backup doesn't exist. This only stops new screenshots from uploading. It does not delete screenshots already in your OneDrive.
If your Pictures folder is backed up through OneDrive's folder backup, files saved in Screenshots can still sync with it. Check which folders are backed up on the same Sync and backup page, under Manage backup.
Check Snipping Tool Save Options
Snipping Tool can save a copy of every capture automatically and copy it to the clipboard. These are convenient, but they leave files behind that you didn't choose to keep.
- Open Snipping Tool from the Start menu.
- Select the See more button (three dots) in the top-right corner, then select Settings.
- Review the options for saving screenshots and recordings automatically, copying changes to the clipboard, and asking to save edited screenshots.
- Turn Off anything that saves or copies captures you don't want kept.
The option labels change between Snipping Tool versions, so read each description rather than relying on the name. Snipping Tool updates through the Microsoft Store, so your version may differ from someone else's on the same Windows build.
Turn Off Clipboard History for Copied Screenshots
If you also turn on cloud sync, those items can reach your other devices.
- Open Settings > System > Clipboard.
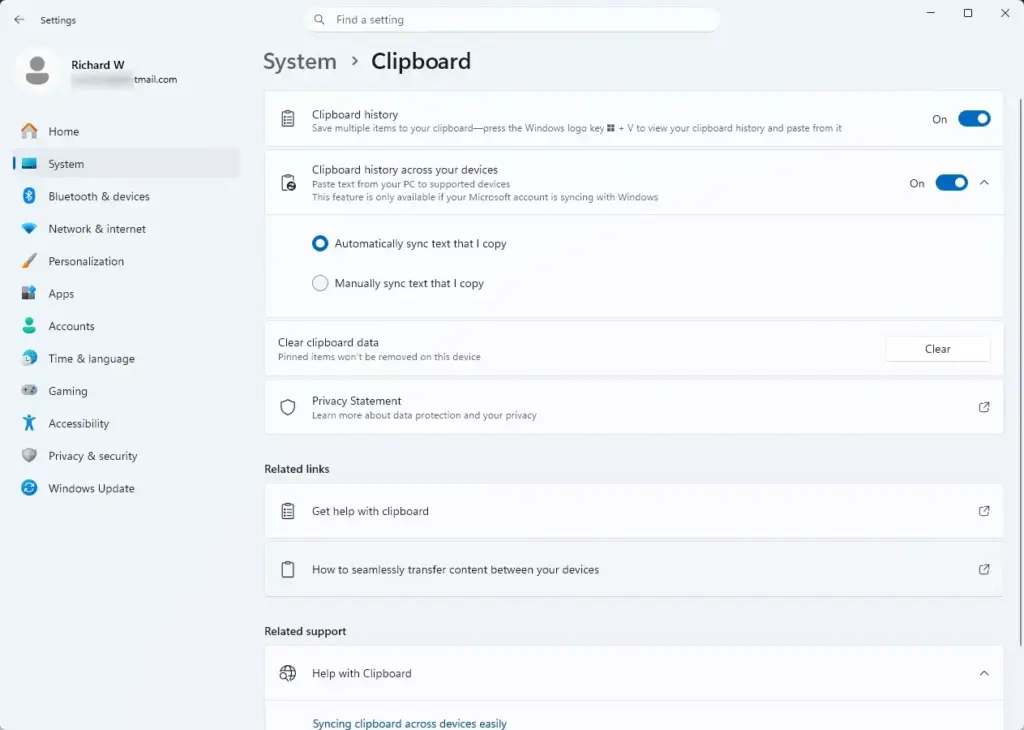
Settings › System › Clipboard - Turn Off Clipboard history.
- Check the Sync across your devices toggle and confirm it is Off.
- Select Clear under Clear clipboard data to remove items already stored.
After step 4, pressing Windows key + V shows an empty list, or asks you to turn the feature back on.
Limit Screen Recording With Xbox Game Bar
Xbox Game Bar (the built-in overlay for gaming features) can record app windows in the foreground. It can also record in the background if you enable that option. Turn off what you don't use.
- Open Settings Gaming Game Bar.
- Turn Off the main toggle if you never use the overlay. The Windows key + G shortcut then stops opening it.
- Go back and open Captures.
- Turn Off any background recording option, such as Record what happened, if your build shows it.
- Review the capture location and audio options on the same page. Change them if they don't match what you want.
The option names in the Gaming section have changed across Windows 11 updates, so match the description if the wording differs. Game Bar records app windows only, not the full desktop or File Explorer. It works differently from a full screen recorder.
Manage Recall Snapshots on Copilot+ PCs
Recall only exists on Copilot+ PCs (newer Windows 11 PCs with a built-in AI chip called an NPU, or neural processing unit). If your PC isn't one, skip this section. On supported PCs, Recall takes snapshots of your screen at intervals. It is optional, and you control whether it saves them.
- Open Settings > Privacy & security > Recall & snapshots.
- Turn Off Save snapshots to stop Recall from taking new ones.
- Use the delete options on the same page to remove snapshots already stored.
The page should show the snapshot toggle at the top. The wording may differ between releases. If the page is missing, your PC or Windows version doesn't include Recall.
Why Some Windows Capture Black or Blank
A capture that comes out black is not always a settings problem. Some apps, such as video streaming services and banking apps, mark their windows as protected. Windows then shows a black rectangle in screenshots and recordings. This is a feature of the app, not something you can switch off in Windows privacy settings. Don't try to work around it in a way the app doesn't allow.
Registry and Managed Devices
Work and school PCs often control app privacy through policy rather than the Settings app. App privacy policies are stored under HKEY_LOCAL_MACHINE\SOFTWARE\Policies\Microsoft\Windows\AppPrivacy. Viewing this key in Registry Editor (the Windows tool for editing the registry, the database of system settings) needs no special rights. Changing it requires administrator privileges, so only an administrator should edit it. Don't edit it unless your IT team tells you to, because a wrong change can lock other privacy toggles.
No confirmed registry value for the screenshot-specific toggles is available, so this guide doesn't list one. [Registry method: to be verified]
On Windows 11 Home, the Local Group Policy Editor is not available. Use the Settings routes above. On Pro, Enterprise and Education, an administrator may already have set policies that grey out your toggles.
Delete Captures You Already Have
Open File Explorer and check the Screenshots folder in Pictures, the Screen Recordings and Captures folders in Videos, and your OneDrive folders. Delete anything sensitive, then empty the Recycle Bin. A deleted file in OneDrive also goes to the OneDrive online recycle bin, so clear it there as well.
If This Didn't Work
To undo any change, return to the same page and turn the toggle back On. Nothing here is permanent, and no restart is needed. Feature updates can add new capture options or change labels, so check Settings Privacy & security again after a major Windows 11 update. If an app still captures your screen after you block it, check that app's own privacy settings, or uninstall it from Settings Apps > Installed apps.
How do I turn off privacy settings in Windows?
Windows has no single switch that turns off all privacy settings. Open Settings, select Privacy & security, then turn off the toggles for each app or feature you want to limit, such as Microphone or Camera. Some options are greyed out because your administrator controls them.
How do I record my screen on 🪟 Windows 11?
Press Windows key + Alt + R to record the app window you are using with Xbox Game Bar. To record the whole screen or a selected area, open Snipping Tool and choose the video recording option. Recordings save to a folder you can choose.
Why are my microphone privacy settings not opening?
The page usually fails to open because Settings is stuck or a policy is blocking it. Restart your PC, then press Windows key + I, select Privacy & security, and click Microphone. If it still won't open, your organization may manage this setting, so check with your IT admin.
What is the easiest way to take a screenshot in 🪟 Windows 11?
Press Windows key + Shift + S to open the Snipping Tool capture bar. Drag over the area you want, and the screenshot is copied to your clipboard. Click the notification that appears to edit or save the image.
Was this guide helpful?

About the Author
Richard
Tech Writer, IT Professional
Richard is a writer at Geek Rewind who turns complex IT tasks into clear, step-by-step guides. He draws on years of hands-on experience in system administration and enterprise IT operations, focusing on Windows, Linux and WordPress: the problems people actually run into, and the fixes that work. His server and WordPress guides come from systems he runs himself. Richard builds and maintains the platform behind Geek Rewind, from its Ubuntu servers and Nginx configuration to its custom WordPress plugins. Many new tutorials start with readers' questions, and he's always glad to answer them in the comments.
No comments yet — be the first to share your thoughts!