Take a Screenshot of a Selected Area in Windows 11

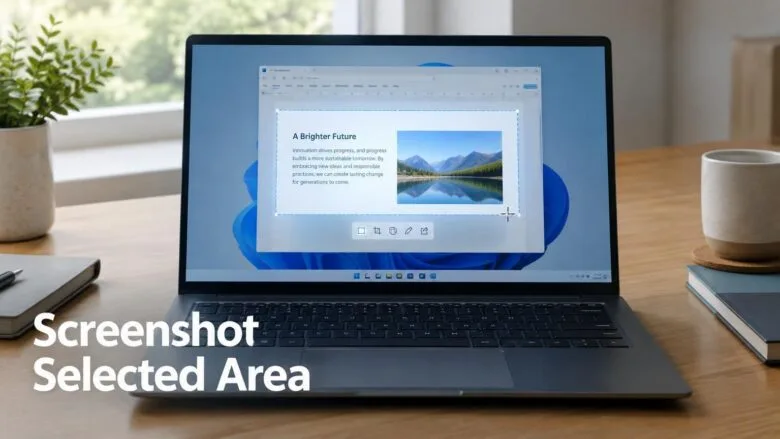
Windows 11 can copy just a part of your screen to the clipboard, the temporary holding space used by copy and paste. Press Win+Shift+S, drag a box around the area you want, and let go of the mouse button. The picture is then ready to paste into an email, chat or document.
This works in every edition of Windows 11, including Home and Pro. None of the methods in this article need administrator rights. The shortcut is the quickest route, but the Snipping Tool app, the Print Screen key, and saving and editing options are covered too. There is also a section on what to check if the shortcut does nothing.
Press Win+Shift+S, then drag a box around the area you want and release the mouse button. Windows 11 copies that selection to the clipboard, the temporary holding space used by copy and paste, so you can press Ctrl+V to paste it into an email, chat or document.
Take a Screenshot of a Selected Area with Win+Shift+S
This is the fastest method. It works from any app and doesn’t need Snipping Tool (the built-in screenshot app) to be open first.
- Bring up whatever you want to capture on screen. Open the menu, dialog box or page and leave it as it is.
- Press Win+Shift+S together. The screen dims and a small toolbar appears at the top centre with the capture modes.
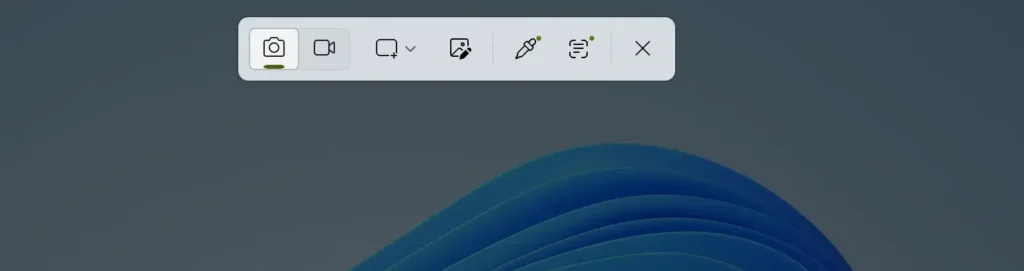
- Check that the Rectangular mode button is selected. It is the default, and the cursor turns into a crosshair.
- Click and hold at one corner of the area you want. Drag to the opposite corner, then release the mouse button. The selected area appears undimmed while you drag.
The capture happens the moment you release the button, and you can’t resize the box afterwards. If you get it wrong, capture again. - Look at the bottom right of the screen. A notification appears saying the snip is saved to the clipboard. Windows has already copied the image at this point.
- Paste the image where you need it with Ctrl+V. It works in Paint, Word, Outlook, Teams, Slack, most web mail and most chat apps.
- To edit or save the capture instead, click the notification. The image opens in Snipping Tool, where you can mark it up and save it (see the section on saving and editing below).
To cancel before you release the mouse button, press Esc. The screen returns to normal and nothing is copied.
Choose a different selection shape
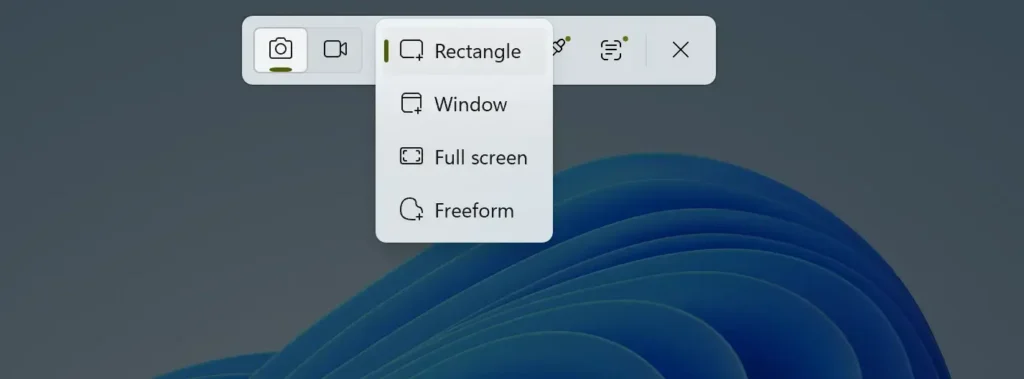
The toolbar at the top of the screen has four modes. Pick one before you drag.
- Rectangular mode captures a rectangle. Use it for most jobs.
- Freeform mode captures whatever shape you draw with the mouse. Release the button to close the shape. The saved image is still a rectangle, and the area outside your outline is left blank.
- Window mode captures one whole window. Hover over a window to highlight it, then click.
- Full screen mode captures the whole screen at once. On a multi-monitor setup, it captures all of your displays.
For a selected area, use Rectangular mode or Freeform mode. The other two are there if you change your mind mid-capture.
What happens on multiple monitors
The dimming overlay covers every connected display. Draw your rectangle on one screen. A single rectangular selection can't be dragged across two displays on every setup, so if you need content from both, use Full screen mode and crop afterwards in Snipping Tool.
Take a Screenshot of a Selected Area with the Snipping Tool App
Use the app when you want a delay before the capture, or when you want the editor open straight away. The delay helps with things that disappear when you click elsewhere, such as a right-click menu or a hover tooltip.
- Click Start, type Snipping Tool, and press Enter. The Snipping Tool window opens.
- Click the mode dropdown in the toolbar and choose Rectangle (or Freeform). The label wording varies slightly between Snipping Tool versions, but the choices match the four modes above.
- To capture something that closes when you click away, open the delay (clock) option in the toolbar and pick a delay of a few seconds. Skip this step if you don't need a delay.
- Click New. The screen dims, as it does with the keyboard shortcut. If you set a delay, you get a countdown first and can open your menu during it.
- Drag across the area you want and release the mouse button. The capture opens in the Snipping Tool window, ready to edit.
The app also copies the capture to the clipboard, so Ctrl + V works here too.
Use the Print Screen Key to Capture a Selected Area
The Print Screen key (often labelled PrtScn or PrtSc) can open the same selection overlay. It depends on one setting. If the key copies your whole screen instead, turn the setting on.
- Open Settings by pressing Windows key + I.

Windows 11 Start menu with Settings gear icon highlighted. - Go to Settings Accessibility Keyboard The Keyboard page opens.
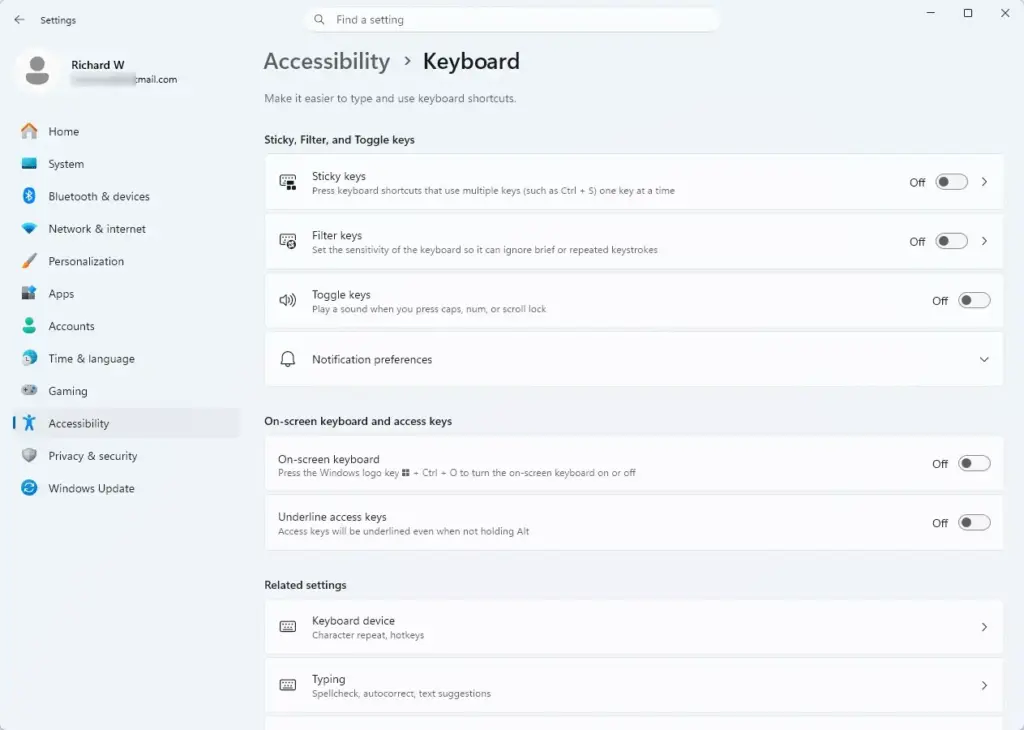
Settings › Accessibility › Keyboard - Find Use the Print screen button to open screen capture and turn the toggle On. The toggle (the on/off switch) slides to the right.
- Press Print Screen. The screen dims and the capture toolbar appears, the same as Windows key + Shift + S.
- Drag across the area you want and release the mouse button.
On a laptop, the key may share a function key. If pressing it does nothing, try Fn + PrtScn. Some keyboards need this.
To go back to the old behaviour, return to the same page and turn the toggle Off. Print Screen then copies the full screen to the clipboard again.
Save, Edit and Find Your Screenshot
Copy something new and the screenshot is gone, so save it if you need it later.
Save the capture from Snipping Tool
- Click the notification that appears after you capture. Snipping Tool opens with your image. If you missed the notification, open Snipping Tool from Start and check whether the image is listed there. If it isn't, paste the image into Paint and save it from there.
- Press Ctrl + S. The Save As dialog opens.
- Choose a folder, type a file name, and pick a file type from the Save as type list. PNG keeps text sharp and suits most screenshots. JPG makes smaller files for photos.
- Click Save. The file is written to the folder you chose.
Mark up the image before you share it
Snipping Tool's toolbar includes a pen, a highlighter and an eraser. Use them to circle the part that matters or hide private details. It also has a crop tool for trimming the edges. Click the tool, then drag on the image. Use Ctrl + Z to undo a mark.
A light highlighter colour can leave the text readable.
Check for automatically saved copies
Recent versions of Snipping Tool can save every capture for you. If that setting is on, look in the Screenshots folder inside your Pictures folder, such as C:\Users\USERNAME\Pictures\Screenshots. This depends on your Snipping Tool version and settings. Open the Snipping Tool settings (the gear icon in the app) to check whether it is turned on.
Windows key + PrtScn is a separate shortcut that captures the full screen and saves the file to the same Screenshots folder. It captures the full screen and saves a file to the same Screenshots folder automatically. It doesn't let you pick an area, so it isn't the right choice for this task.
Windows Key + Shift + S Doesn't Work
If you press the shortcut and the screen doesn't dim, work through these checks in order. None of them need administrator rights unless your PC is managed by an organization.
The screen dims but no notification appears
The capture still worked. Do not disturb or turned-off app notifications can hide the notification. Press Ctrl + V in Paint or any document to confirm the image is on the clipboard. Press Windows key + V to open clipboard history if it is enabled, and the image should be listed there.
Nothing happens at all
- Press Windows key + Shift + S again, holding all three keys together. Some keyboards, particularly gaming keyboards, have a Windows key lock (a setting that turns the Windows key off), so the Windows key ignores presses. Check that the lock isn't on.
- Close other apps that use screenshot shortcuts. Examples include other screenshot tools, remote desktop clients and some cloud storage apps. Two programs can't both own the same shortcut. Try the shortcut again after closing them.
- Open Snipping Tool from Start. If it opens and New works, the app is fine and another program is probably intercepting the shortcut.
- If the app misbehaves, repair it. Go to Settings Apps Installed apps, find Snipping Tool, click the three dots next to it, and choose Advanced options. Click Repair first. Your apps' data is not affected by Repair. If that doesn't help, click Reset. This is harder to undo, because it deletes the app's data and returns its settings to their defaults.
- Update the app. Open Microsoft Store, go to Library, and click Get updates. Snipping Tool is updated through the Store, so an old version can be missing features.
- Restart the PC and try the shortcut again.
The Settings option is missing or greyed out
If Use the Print screen button to open screen capture doesn't appear, or the toggle is greyed out, you are probably on a work or school PC where the setting is managed. Only the IT administrator (the person who looks after computers at your work or school) can change it. Windows key + Shift + S may be blocked on such PCs too.
The capture shows a black rectangle
Some protected content, such as certain streaming video, doesn't appear in screenshots. Windows blocks the capture on purpose, and you get a black area where the video plays. Pausing the video doesn't change this.
If this didn't work
To undo the Print Screen change, return to Settings Accessibility Keyboard and turn Use the Print screen button to open screen capture off. If the shortcut still fails after you repair Snipping Tool, ask your IT administrator whether it is blocked on your PC. A related task to try next is capturing a single window with Window mode, using the same Windows key + Shift + S shortcut.
Have a question about this guide?
Answered by AI from this guide. Good questions may be added to this page — please don't include personal details.
Did this guide fix your problem?

About the Author
Richard
Tech Writer, IT Professional
Richard is a writer at Geek Rewind who turns complex IT tasks into clear, step-by-step guides. He draws on years of hands-on experience in system administration and enterprise IT operations, focusing on Windows, Linux and WordPress: the problems people actually run into, and the fixes that work. His server and WordPress guides come from systems he runs himself. Richard builds and maintains the platform behind Geek Rewind, from its Ubuntu servers and Nginx configuration to its custom WordPress plugins. Many new tutorials start with readers' questions, and he's always glad to answer them in the comments.
No comments yet — be the first to share your thoughts!