How to Enable or Disable Ask to Save Edited Screenshots in Windows 11

The Snipping Tool in Windows 11 can ask whether to save a screenshot after you edit it. This guide shows how to turn that prompt on or off. It takes under a minute and needs no restart.
Open Snipping Tool, click the three dots menu, select Settings, and toggle “Ask to save edited screenshots” on or off. This controls whether the app prompts you to save changes after editing a screenshot.
What Is the Snipping Tool?
Windows 11 includes a built-in screen capture utility called the Snipping Tool. You can use it to capture screenshots, mark them up or redact text, record video with audio, and choose where your captures are saved.
Its settings also let you control microphone input for recordings, turn automatic saving on or off, and change where captures are stored on disk. This guide covers only the prompt that appears after you edit a screenshot.
Where Do Screenshots Get Saved?
By default, captures are saved automatically to the C:\Users\username\Pictures\Screenshots folder on your computer. If you have moved that folder, check the Snipping Tool settings to see where it currently points.
Why Use This Feature?
The Snipping Tool has a toggle named Ask to save edited screenshots. When it is on, the app asks whether you want to save your changes when you close an edited screenshot. When it is off, the app does not ask. Turn it on if you want a safety net against losing edits by accident. Turn it off if the extra prompt slows you down.
This setting belongs to each user account, and you do not need administrator rights to change it. It works the same on Windows 11 Home and Pro.
How to Enable or Disable "Ask to Save Edited Screenshots"
Step 1Open the Snipping Tool
- Click Start, type Snipping Tool, and select the app from the results.
The Snipping Tool window opens. If it is not listed, update it through the Microsoft Store, since the app receives updates there.
Step 2Open the Settings Menu
- Click the three-dot See more button in the top-right corner of the window.
- Select Settings.
The Settings panel opens inside the Snipping Tool and lists options for how captures are handled.
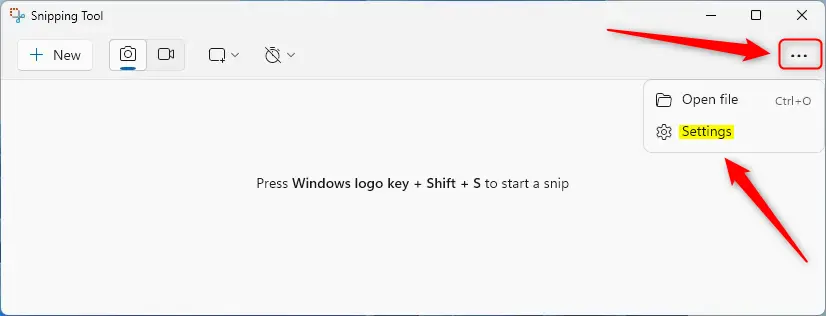
The panel should now be on screen. Its layout can differ slightly between Snipping Tool versions, so the options may be in a different order than in your screenshot.
Step 3Toggle the Setting
- Find Ask to save edited screenshots in the list.
- Click the toggle switch to set it the way you want. On means the app prompts you before closing an edited capture. Off means it does not.
The switch should show its new state straight away. If you cannot find the option, your Snipping Tool is probably out of date, so update it from the Microsoft Store.
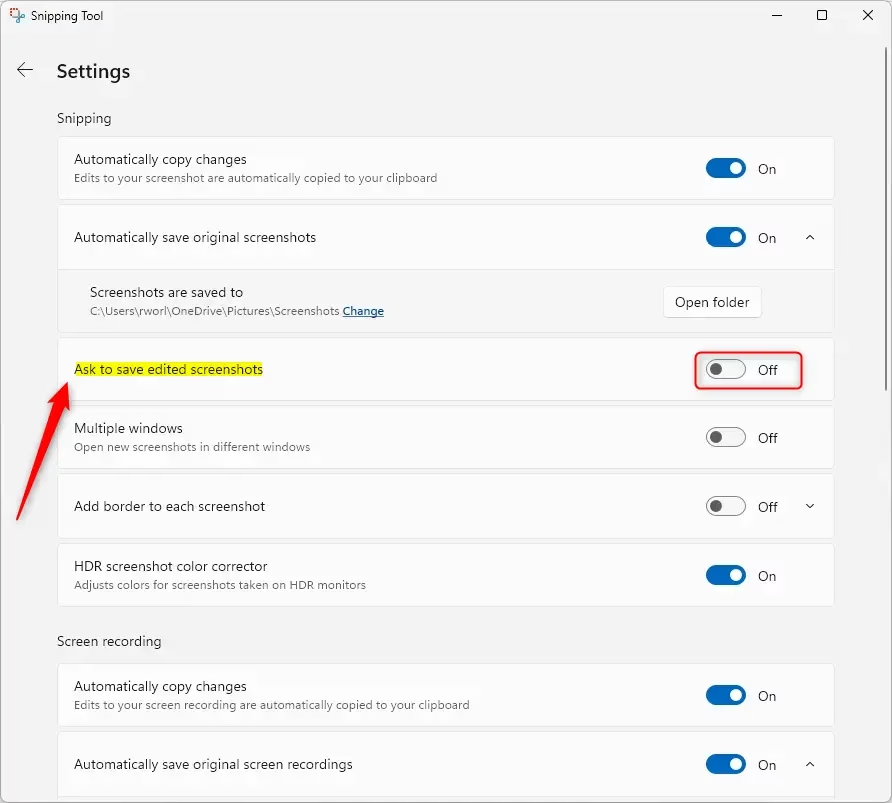
Check that the toggle matches what you intended before you leave this screen.
Step 4Close the App
- Close the Snipping Tool when you are finished.
The change applies immediately. There is no confirmation dialog and no restart. To undo it, open the same Settings panel and flip the toggle back.
Summary
With the prompt on, you get a chance to save or discard edits before the window closes, which helps prevent accidental loss and overwrites. With it off, you get fewer interruptions. In that case, use the Save button yourself whenever you want to keep an edited screenshot. Either way, you can switch back whenever you like.
Have a question about this guide?
Answered by AI from this guide. Good questions may be added to this page — please don't include personal details.
Did this guide fix your problem?

About the Author
Richard
Tech Writer, IT Professional
Richard is a writer at Geek Rewind who turns complex IT tasks into clear, step-by-step guides. He draws on years of hands-on experience in system administration and enterprise IT operations, focusing on Windows, Linux and WordPress: the problems people actually run into, and the fixes that work. His server and WordPress guides come from systems he runs himself. Richard builds and maintains the platform behind Geek Rewind, from its Ubuntu servers and Nginx configuration to its custom WordPress plugins. Many new tutorials start with readers' questions, and he's always glad to answer them in the comments.
No comments yet — be the first to share your thoughts!