How to Change Snipping Tool Screenshot Folder in Windows 11

Open the Snipping Tool, click the three dots in the top-right corner, select Settings, find the Screenshots are saved to box, click Change, browse to your desired folder in File Explorer , and confirm. Your new screenshots save there automatically.
Change Snipping Tool Screenshot Folder in 🪟 Windows 11
You can change the Snipping Tool screenshot folder in Windows 11 so your captures save wherever you like. Keeping all your screenshots in one spot makes them much easier to find and organize later. The Snipping Tool is a built-in Windows program for taking pictures of your screen.
The Snipping Tool is built into Windows. You can use it to capture your whole screen, a single window, or any part of the screen you choose.
You can also hide sensitive text, and control settings for recording your screen, sound, and microphone. For more info, check out these guides:
- Turn screen capture and video recording on or off
- Include or exclude system sound when recording
- Use the microphone while recording
- Turn automatic screenshot saving on or off
If you don’t see the option described below, your app is probably older than that. The Snipping Tool updates through the Microsoft Store, so open the Store, go to Library, and click Get updates. This works the same on Windows 11 Home and Pro.
By default, your screenshots go to:
C:\Users\
You can change this in a few clicks. Here's how:
How to Change the Snipping Tool Screenshot Folder
- Open the Snipping Tool. Type Snipping Tool into the Start menu search and select it. The Snipping Tool window opens.
- Click the three dots (the See more button) in the top-right corner of the app. A menu drops down.
- Select Settings from the menu. The Settings page opens inside the app.
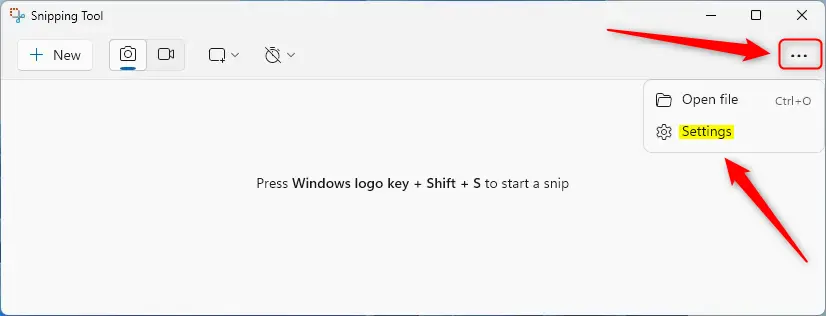
Snipping Tool settings on menu - Find the Screenshots are saved to box. It shows your current save folder. Click the Change link next to it. If you can't find this box, update the app as described above.
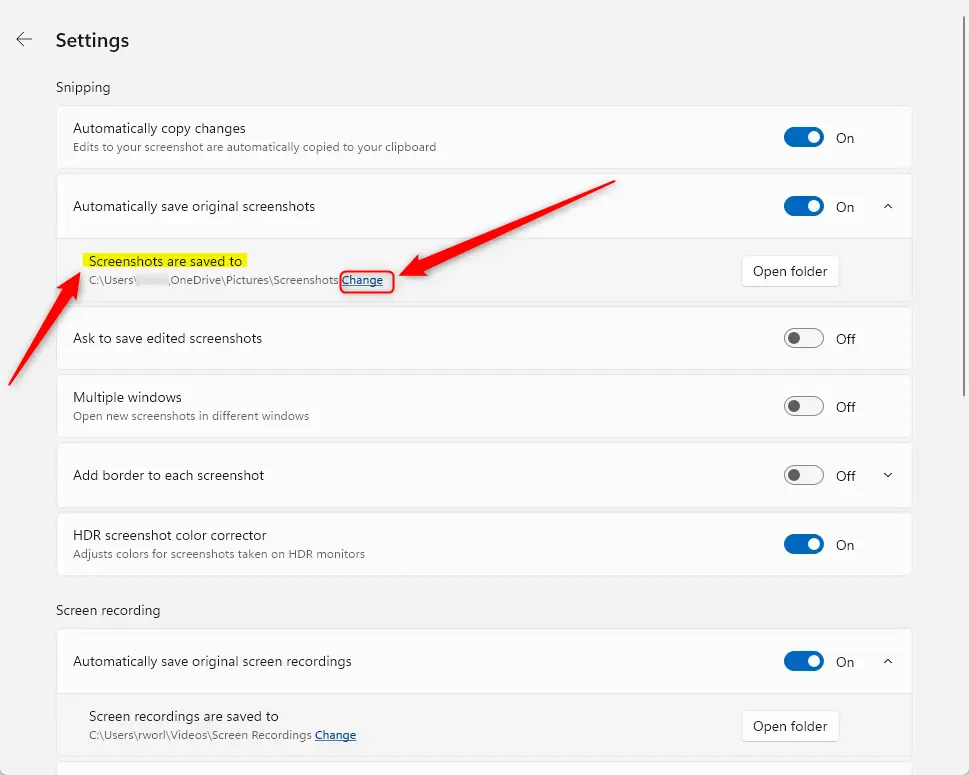
Change link in Snipping Tool settings - Wait for the File Explorer window to open, then browse to the folder where you want your screenshots saved. You can create a new folder here if you haven't made one yet.
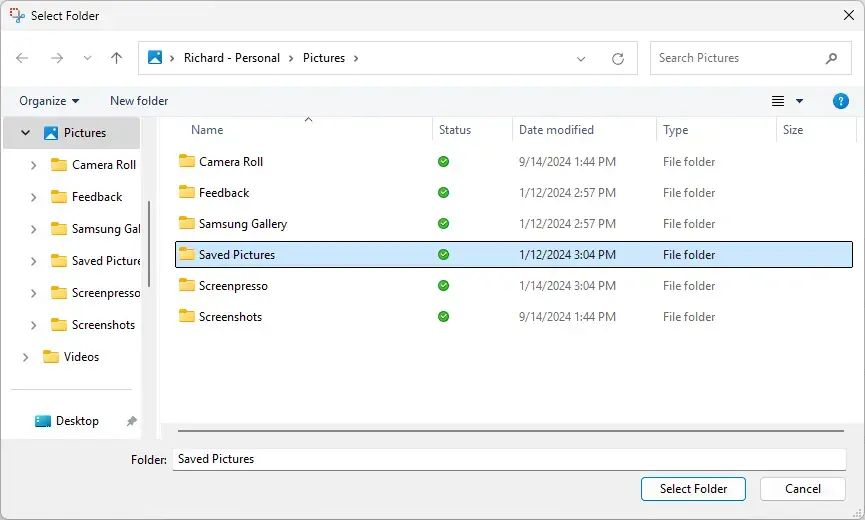
Selecting a new folder in File Explorer - Select the folder and confirm your choice with the button at the bottom of the window. The Screenshots are saved to box should now show your new folder.
- Close the Snipping Tool when you're done. You don't need to restart Windows.
Screenshots you already saved stay in the old folder, so move them by hand if you want them all together. To undo the change, repeat the steps and pick your old folder again, or the default location shown earlier.
If new screenshots aren't being saved to the folder at all, check the Snipping Tool settings for the option that automatically saves original screenshots. When it's off, the tool only copies the capture and shows it in the editor, and you save it yourself.
Why Change the Screenshot Folder?
- Easy to find your screenshots: Pick a folder you use often, or one that syncs with cloud storage such as OneDrive.
- Better organization: Keep different types of screenshots separate, for example work captures in one folder and personal ones in another.
- Quick access: Save time by choosing a folder you check regularly.
- Simple steps: Changing the folder only takes a few clicks.
Choosing a folder you already use, or one that syncs to the cloud, means you spend less time hunting for captures. It also lets you keep different kinds of screenshots apart.
Once you set a custom location, such as a folder you created called "My Screenshots", all new screenshots save there automatically.
Summary
This guide showed how to change the folder where the Snipping Tool saves your screenshots in Windows 11. With a few steps, you can pick a folder that makes your images easier to find and organize. If you ever want the old behavior back, just change the folder again.
Have a question about this guide?
Answered by AI from this guide. Good questions may be added to this page — please don't include personal details.
Did this guide fix your problem?

About the Author
Richard
Tech Writer, IT Professional
Richard is a writer at Geek Rewind who turns complex IT tasks into clear, step-by-step guides. He draws on years of hands-on experience in system administration and enterprise IT operations, focusing on Windows, Linux and WordPress: the problems people actually run into, and the fixes that work. His server and WordPress guides come from systems he runs himself. Richard builds and maintains the platform behind Geek Rewind, from its Ubuntu servers and Nginx configuration to its custom WordPress plugins. Many new tutorials start with readers' questions, and he's always glad to answer them in the comments.
No comments yet — be the first to share your thoughts!