How to Enable System Audio in Snipping Tool on Windows 11
System audio in Windows 11’s Snipping Tool lets you record your computer’s sound along with your screen. This built-in screen capture tool, updated in Windows 11, now includes the ability to capture audio from your applications or system alerts.
This means your screen recordings can include important sounds, making them more useful for tutorials or sharing gameplay. You can turn on this feature directly within the Snipping Tool’s recording settings.
To capture system audio, you just need to ensure you choose the right audio input. This simple step makes sure all your future screen recordings will have the sound you expect.
Open Snipping Tool, click the three dots, go to Settings, and toggle “Include system audio by default” to On. This setting captures your computer’s internal sounds for screen recordings.
How to turn system audio recording on or off
Enabling system audio recording in the Snipping Tool on Windows 11 is done directly within the app’s settings. This lets you capture the sound playing on your computer along with your screen recording. Open Snipping Tool, navigate to Settings, and locate the Screen recording section to toggle this feature on or off.
- Open the Snipping Tool app via the Start menu.
- Click the Settings and more button (three dots) in the top right corner.
- Select Settings from the dropdown menu.

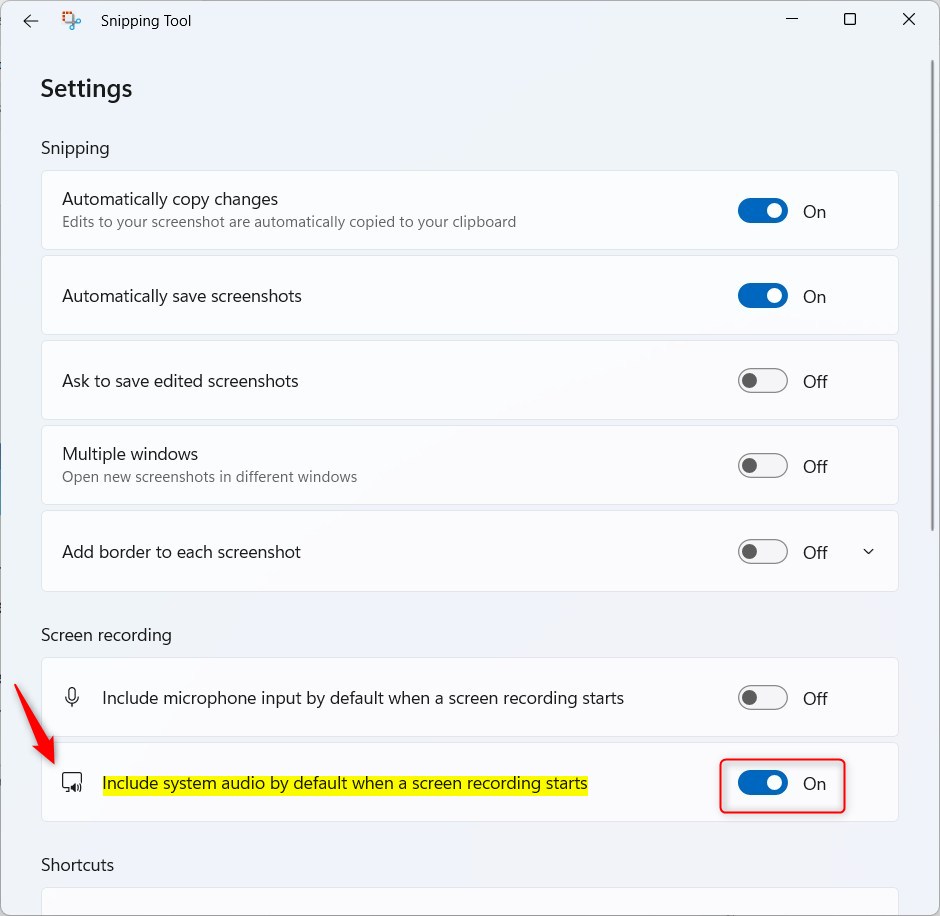
Scroll down to the Screen recording section. Toggle the switch for Include system audio by default when a screen recording starts to On.
Troubleshooting Audio Issues
If your recordings still lack sound, let’s check your Windows 11 Settings. First, make sure your audio drivers are up to date through Device Manager. If you’re using a headset, confirm that your default playback device (where your computer sends audio to, like speakers or headphones) is set correctly in the Sound control panel.
Microphone vs. System Audio
The Snipping Tool treats microphone input and system audio (the sounds played by your computer’s applications and operating system) as separate streams. You can enable both simultaneously. If your microphone is blocking system audio, check your Privacy & Security settings to ensure the Snipping Tool has permission to access your microphone.
Advanced Configuration
If you’re in an office or managed environment, your IT administrator might handle these settings using advanced tools for managing Windows settings like Group Policy Objects (GPOs) or the Registry Editor. You can navigate to 🗝️HKEY_CURRENT_USER\Software\Microsoft\SnippingTool to verify configuration keys. Note: Modifying the registry requires caution.
Summary
Getting system audio to work in the Snipping Tool improves your screen recordings. Adjusting your app settings and ensuring your Windows privacy permissions are correct allows you to capture high-quality audio alongside your video. For more help, visit the official Microsoft support page.
Why does my Snipping Tool video have no sound?
Your Snipping Tool video might have no sound if the setting to include system audio is turned off in the app’s preferences.
Can I recover a screen recording that saved without audio?
Unfortunately, if a recording was saved without audio, the sound data was never captured. You cannot retroactively add system audio to a file that was recorded while the setting was turned off. You must re-record the content with the system audio toggle enabled to capture the sound successfully.
Was this guide helpful?

About the Author
Richard
Tech Writer, IT Professional
Richard, a writer for Geek Rewind, is a tech enthusiast who loves breaking down complex IT topics into simple, easy-to-understand ideas. With years of hands-on experience in system administration and enterprise IT operations, he’s developed a knack for offering practical tips and solutions. Richard aims to make technology more accessible and actionable. He's deeply committed to the Geek Rewind community, always ready to answer questions and engage in discussions.


[…] the Snipping Tool, you can redact text, disable screen capture and recording, including system audio and microphone when recording, disable automatically saving screenshots, and […]
[…] Include or exclude system sound when recording […]