How to Manage Automatic Screen Recording in Snipping Tool

This article shows you how to enable or disable the automatic saving of screen recordings in Windows 11’s Snipping Tool.
Open Snipping Tool, click the three dots, select Settings, then find “Automatically save screen recordings” under the Screen recording section and toggle the switch. This allows you to control whether recordings are saved automatically.
The Snipping Tool is Windows’ built-in screenshot utility, letting you capture your entire screen, a single window, or a custom area.
With the Snipping Tool, you can redact text, disable screen capture and recording (including system audio and microphone), and prevent automatic screenshot saving. It offers many helpful features.
A recent update to the app automatically saves recordings to your Video > Screen Recordings folder. You can turn this off anytime.
While convenient for some users who want their recordings saved automatically, it might not suit others who prefer to manage their files and storage space manually.
Turn on or off automatically saving screen recordings in the Snipping Tool
As mentioned, the Snipping Tool in Windows 11 can automatically save your screen recordings to the Video > Screen Recordings folder.
Here’s how to control that.
First, launch the Snipping Tool.
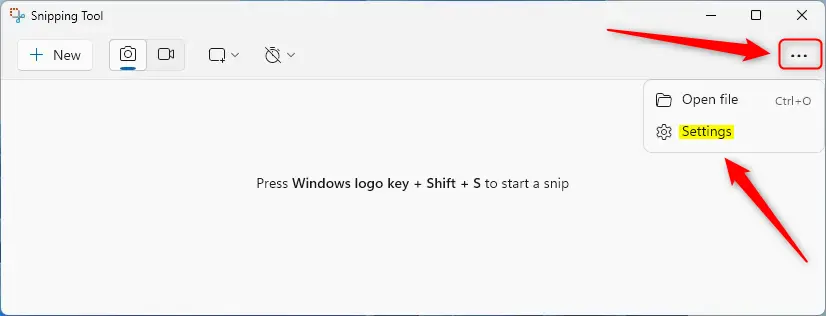
Next, click the See more (three dots) button. Then, choose Settings to open the app’s settings.
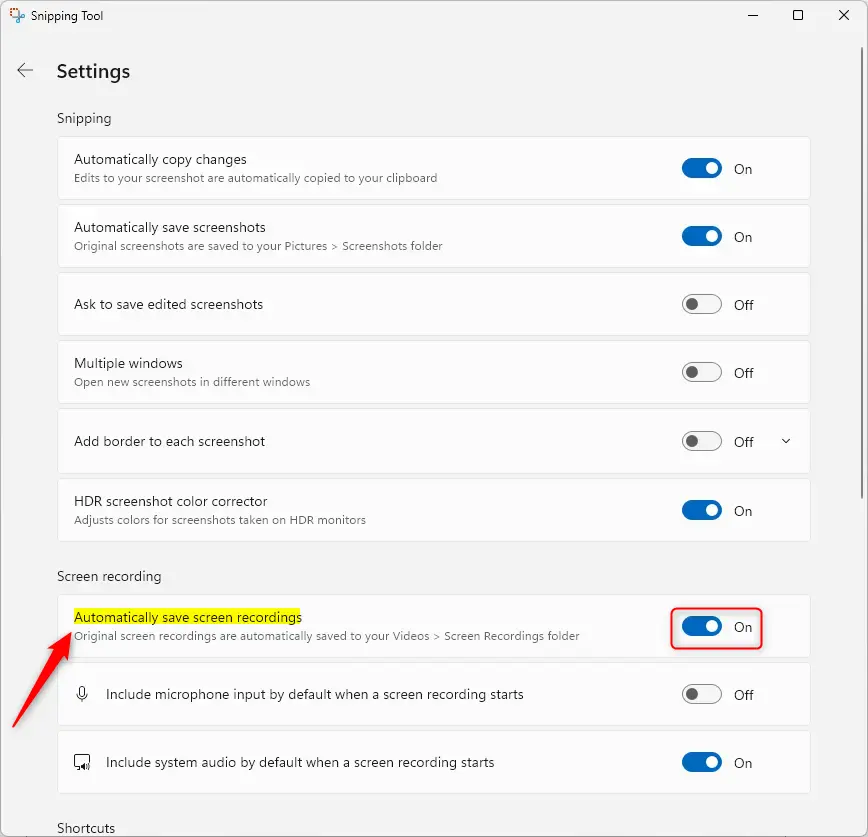
Under the ‘Screen recording‘ section, find the “Automatically save screen recordings” tile. You can toggle the switch to On or Off to enable or disable this setting.
Close the Snipping Tool when you’re finished.
That’s all there is to it!
Conclusion:
So, the Snipping Tool on Windows 11 offers a handy way to automatically save your screen recordings. It’s great if you prefer a hands-off approach to managing your files. But if you like more control over your storage, flipping this setting on or off lets you tailor the experience to your needs.
Was this guide helpful?

About the Author
Richard
Tech Writer, IT Professional
Richard, a writer for Geek Rewind, is a tech enthusiast who loves breaking down complex IT topics into simple, easy-to-understand ideas. With years of hands-on experience in system administration and enterprise IT operations, he’s developed a knack for offering practical tips and solutions. Richard aims to make technology more accessible and actionable. He's deeply committed to the Geek Rewind community, always ready to answer questions and engage in discussions.


No comments yet — be the first to share your thoughts!