How to Enable Multiple Windows in Snipping Tool on Windows 11
Multiple windows in Windows 11’s Snipping Tool lets you open each new screenshot in its own separate window.
This handy feature changes how the Snipping Tool works, allowing you to view and compare multiple snips side-by-side easily.
Before, all your screenshots stacked up in a single tab. Now, each captured image gets its own independent window, making it simpler to work with them.
Imagine you need to compare two different documents on your screen. With this setting, you can see each screenshot clearly in its own space, without them getting mixed up.
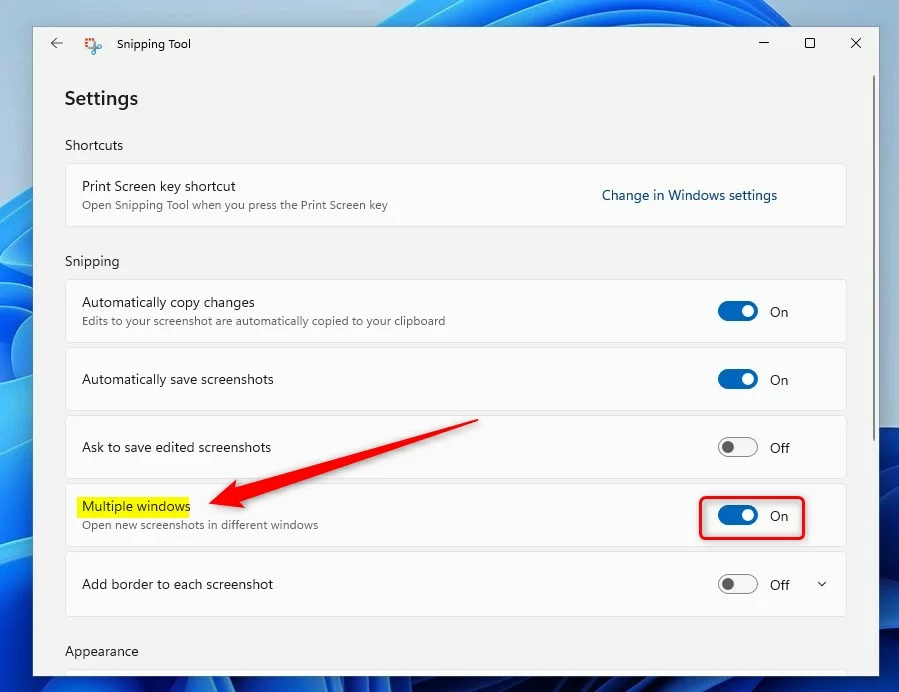
Open Snipping Tool, click the three dots menu, select Settings, and toggle “Multiple windows” to On. This allows each new screenshot to open in its own independent window for easier management.
Why use Snipping Tool multiple windows?
Using Snipping Tool with multiple windows open lets you see and manage several snips at once, significantly speeding up your workflow.
What happens when done?
When you turn on the multiple windows feature in Snipping Tool, each new screenshot opens in its own separate window.
How to enable or disable multiple windows
To turn the Snipping Tool’s multiple windows feature on or off, open the app and navigate to its settings. This allows you to control whether multiple screenshots open in separate windows. Here’s how to find the setting and make your choice.
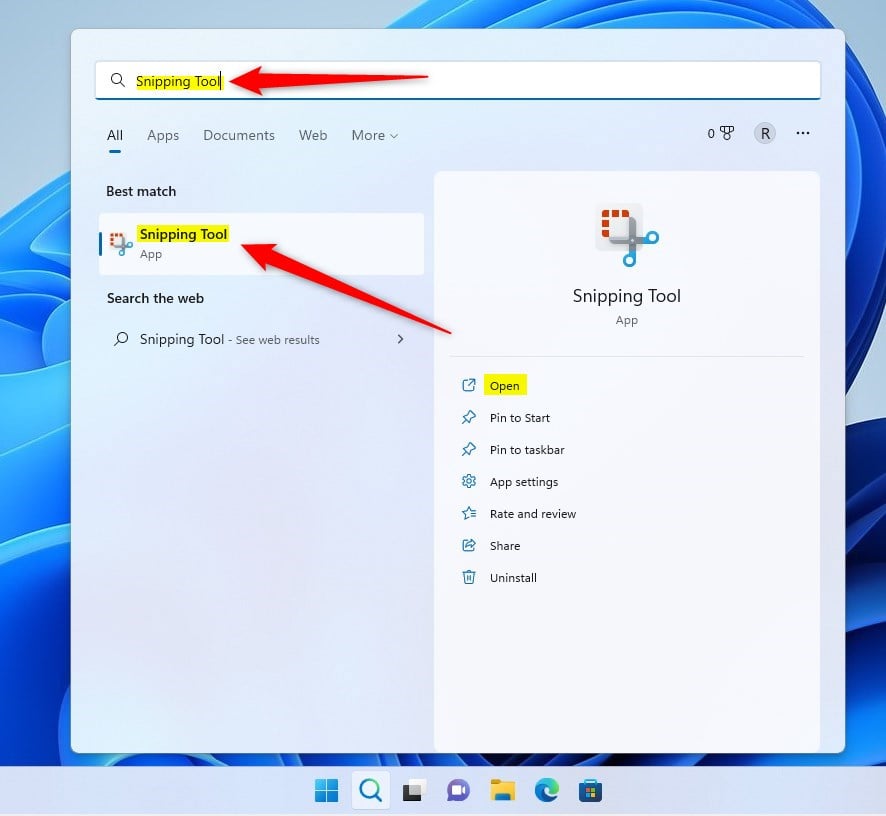
- Open the Start menu and search for Snipping Tool.
- Click on the app to launch it.
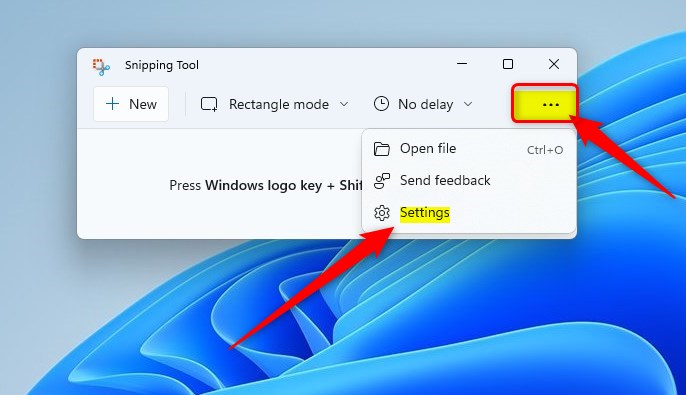
- Click the three horizontal dots (the menu icon) in the top right corner.
- Select Settings from the list.
- Look for the Multiple windows option.
- Toggle the switch to On to allow separate windows, or Off to keep them in one.
Your changes take effect the moment you toggle the switch in the Snipping Tool menu. You can then close the menu and continue taking screenshots. Ensure you have Snipping Tool version 11.2305.30.0 or later, available via the Microsoft Store (the official marketplace for Windows applications), to access the multiple windows feature.
Troubleshooting and Error Handling
If you can’t find the ‘Multiple windows’ option in Snipping Tool, it’s likely because your app needs an update from the Microsoft Store.
Technical Considerations
Running Snipping Tool with multiple windows open uses a bit more computer memory, but this is usually not noticeable on modern PCs.
Related Articles
Summary
You’ve learned how to enable or disable the Snipping Tool’s multiple windows feature to better manage your screenshots.Does this setting affect the Snipping Tool shortcut (⊞ Win+Shift+S)?
No, the shortcut remains the same. The shortcut still triggers the capture overlay. With multiple windows enabled, the new capture opens in a new, separate window instead of replacing the previous one in the existing instance.
Can I open more than two windows simultaneously?
Yes, you can open as many windows as you need. Each time you take a new screenshot while the setting is active, a new instance of the Snipping Tool launches. This is ideal for complex screenshot workflows where you need to reference many images simultaneously.


[…] The Snipping Tool is a built-in screenshot tool in Windows that allows you to capture screenshots of any part of your screen, including full-screen captures, individual windows, or user-defined capture areas. […]
[…] The Snipping Tool is a built-in screenshot tool in Windows that allows you to capture screenshots of any part of your screen, including full-screen captures, individual windows, or user-defined capture areas. […]
[…] The Snipping Tool is a built-in screenshot tool in Windows that lets you capture screenshots of any part of your screen, including full-screen captures, individual windows, or user-defined capture areas. […]
[…] The Snipping Tool is a built-in screenshot tool in Windows that lets you capture screenshots of any part of your screen, including full-screen captures, individual windows, or user-defined capture areas. […]
[…] The Snipping Tool is a built-in screenshot tool in Windows that lets you capture screenshots of any part of your screen, including full-screen captures, individual windows, or user-defined capture areas. […]
[…] The Snipping Tool is a built-in screenshot tool in Windows that lets you capture screenshots of any part of your screen, including full-screen captures, individual windows, or user-defined capture areas. […]
[…] The Snipping Tool is a built-in screenshot tool in Windows that lets you capture screenshots of any part of your screen, including full-screen captures, individual windows, or user-defined capture areas. […]
[…] Snipping Tool is a free program built into Windows 11. It helps you take pictures of your screen, whether it’s […]
[…] Snipping Tool is a built-in app on Windows 11 that helps you take screenshots and record your screen. You can […]
[…] Snipping Tool is a handy program built into Windows. You can use it to take pictures of your whole screen, just […]
[…] Snipping Tool is a tool included with Windows that lets you take pictures of your screen. You can capture the […]
[…] Snipping Tool is a built-in tool in Windows. It lets you take pictures of your whole screen, a single window, or […]
[…] Snipping Tool is a tool built into Windows. It lets you take pictures of your screen. You can capture your whole […]
[…] guide shows you how to control your microphone settings in the Snipping Tool on Windows 11. The Snipping Tool is a built-in app that lets you take screenshots or record videos of your […]