How to Change Snipping Tool Screenshot Folder in Windows 11
Open Snipping Tool, click the three dots, select Settings, and click “Change” next to the “Screenshots are saved to” option. Browse to your desired folder and select it. Your screenshots will now save to this new location.
Change Snipping Tool Screenshot Folder in 🪟 Windows 11
You can change the snipping tool screenshot folder in Windows 11 to save your captured images wherever you like. This helps you keep all your screenshots in one preferred spot, making them much simpler to find and organize later. The Snipping Tool is a built-in Windows program that lets you take pictures of your screen.
The Snipping Tool is a handy program built into Windows. You can use it to take pictures of your whole screen, just one window, or any part of your screen you choose.
- Turn screen capture and video recording on or off
- Include or exclude system sound when recording
- Use the microphone while recording
- Turn automatic screenshot saving on or off
By default, your screenshots go to:
C:\Users\
But you can easily change this! Here’s how:
How to Change the Snipping Tool Screenshot Folder
- Open the Snipping Tool on your Windows 11 PC. You can find it by typing Snipping Tool into the Start menu search.
- Click the three dots (called “See more”) button in the top-right corner of the app.
- Select Settings from the menu.
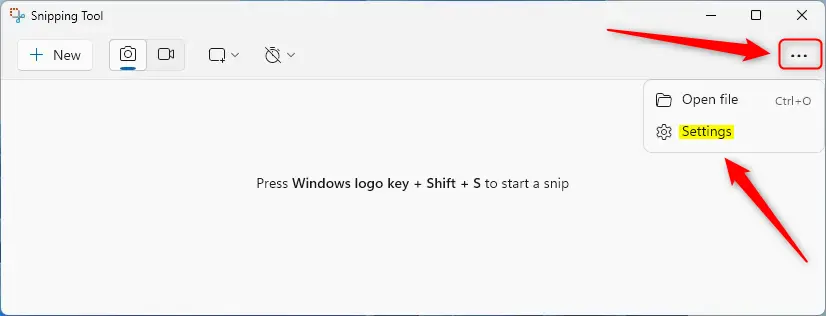
Snipping Tool settings on menu - In the Settings window, find the box that says “Screenshots are saved to”. Click the Change link next to it.

Change link in Snipping Tool settings - A File Explorer window will open. Browse to the folder where you want your screenshots to be saved.

Selecting a new folder in File Explorer - Select the folder and confirm your choice. Close the Snipping Tool when you’re done.
To change the snipping tool screenshot folder, first open the Snipping Tool on your Windows 11 PC by searching for it in the Start menu. Then, click the three dots in the top-right corner and select ‘Settings’. In the Settings window, find the ‘Screenshots are saved to’ option and click the ‘Change’ link next to it to pick your new save location.
Why Change the Screenshot Folder?
- Easy to find your screenshots: Pick a folder you use often or sync with cloud storage.
- Better organization: Keep different types of screenshots separate.
- Quick access: Save time by choosing a folder you check regularly.
- Simple steps: Changing the folder only takes a few clicks.
You might want to change your snipping tool screenshot folder for better organization and quicker access to your images. By choosing a folder you use often or one that syncs with cloud storage, you can easily find your screenshots. This also allows you to keep different types of screenshots separate and saves you time by putting them in a place you check regularly.
Windows 11's Snipping Tool allows users to organize screenshots by specifying a custom folder location. This feature ensures all new screenshots automatically save to the chosen directory, for example, a user-created "My Screenshots" folder.
Summary
This guide explained how to change the folder where the Snipping Tool saves your screenshots in Windows 11. With just a few simple steps, you can select a folder that makes it easier to find and organize your images.
How to find Snipping Tool Screenshots folder?
Or you will find it in this path. And in front of it you will see open folder. And this is where you can find the screenshot.
Was this guide helpful?

About the Author
Richard
Tech Writer, IT Professional
Richard, a writer for Geek Rewind, is a tech enthusiast who loves breaking down complex IT topics into simple, easy-to-understand ideas. With years of hands-on experience in system administration and enterprise IT operations, he’s developed a knack for offering practical tips and solutions. Richard aims to make technology more accessible and actionable. He's deeply committed to the Geek Rewind community, always ready to answer questions and engage in discussions.

No comments yet — be the first to share your thoughts!