How to Redact Sensitive Info in Windows 11 Screenshots
You permanently mask sensitive information in Windows 11 screenshots by using built-in tools before you share these screenshots, preventing accidental data leaks.
Redaction is the process of obscuring or removing identifiable data from an image, ensuring that details like names, addresses, or financial figures are no longer visible.
Failing to redact can lead to accidental leaks of Personally Identifiable Information (PII), which could expose you to identity theft or data breaches. Windows 11’s Snipping Tool now offers basic redaction features, allowing you to cover text with a solid black bar.
Redacting sensitive information in Windows 11 screenshots protects your privacy and maintains security when sharing images. This simple step prevents unauthorized access to private details like account numbers or personal addresses visible in a screenshot.
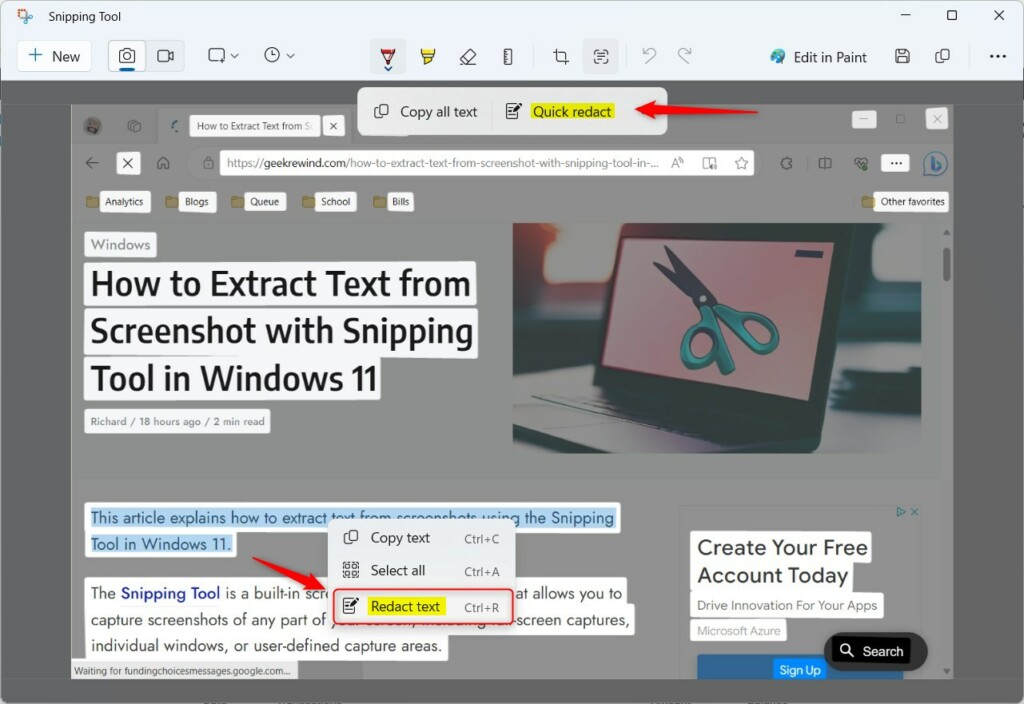
Use the Snipping Tool’s Text Actions feature to redact sensitive information. Click “Quick redact” for automatic masking of emails and phone numbers, or manually highlight and redact other text.
How to Redact Sensitive Info Using Snipping Tool
You can easily redact sensitive information in Windows 11 screenshots using the Snipping Tool to protect private details before sharing. This built-in app lets you quickly blur or cover up text and numbers, making sure only the important parts of your image are visible.
1. Open the Snipping Tool from your Start menu.
2. Take a screenshot of the area you need.

The Text Actions button, located in the top toolbar, uses OCR (Optical Character Recognition) to find text in your image. OCR is a technology that reads text in pictures.
Quick redact automatically finds and hides sensitive items like emails or phone numbers in your screenshots. Clicking Quick redact helps you quickly remove personal details before you share your image.
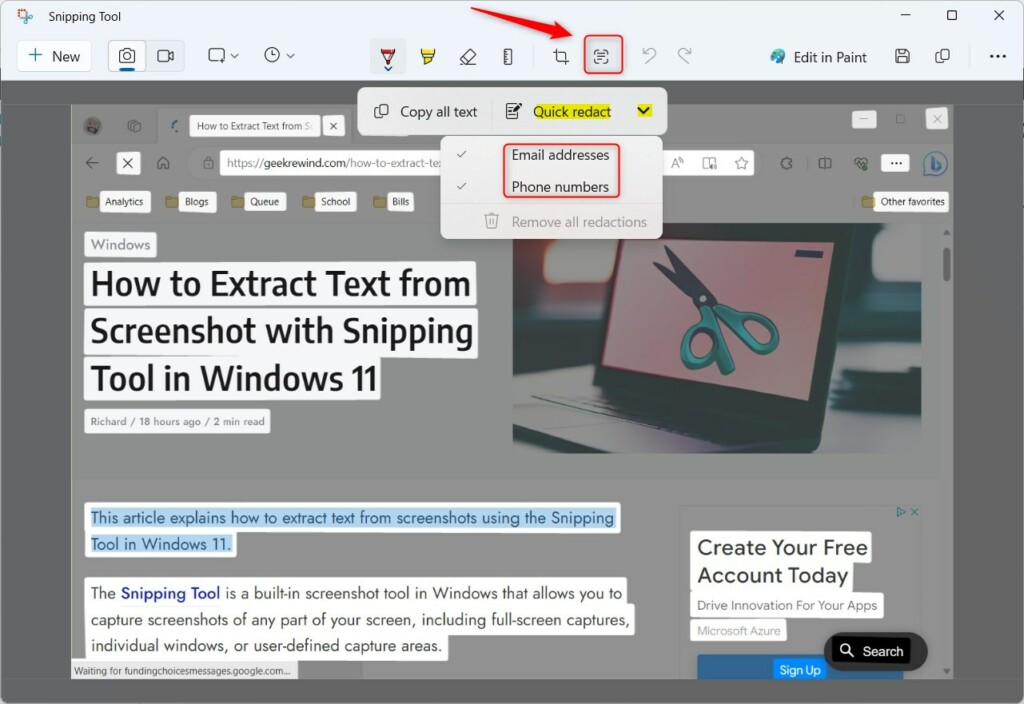
5. To hide other data, highlight the text with your mouse. Right-click the area and select Redact text, or press CTRL + R.
Automated Redaction vs. Manual Masking
Manual image masking provides safer redaction for highly confidential documents, unlike automated redaction which can miss unique data like custom ID numbers. Basic image editors like Paint carry risks, so always double-check your work before sharing any screenshots.
Risks of Basic Image Editors
Be careful when using basic image editors like Paint. Drawing a black box over text often doesn’t remove the underlying data. Someone could potentially increase the brightness or contrast to see what’s underneath. Always use dedicated redaction tools that perform true data scrubbing.
Summary
- Use the Snipping Tool for local, secure redaction.
- Use Quick redact for emails and phone numbers.
- Manually mask sensitive data to ensure nothing is missed.
- Avoid basic editors that do not fully scrub data.
- Always check your file for hidden metadata before sharing.
Reference: Microsoft blogs
Does redacting a screenshot remove the underlying metadata?
No. Redacting text only covers the visual pixels. It does not remove metadata like the date, time, or device name stored in the file. To fully protect your privacy, you should use a metadata stripping tool to remove hidden file information before sharing the image publicly.
Can I undo a redaction after saving the file?
If you save the file as a new image, the redaction becomes permanent. You cannot undo it once the file is closed. Always keep an original, unedited copy of your screenshot in a secure folder if you think you might need the unredacted version later.
Is it safe to use online screenshot redaction tools?
Using online tools is risky because you must upload your private images to a third-party server. If the site is not secure, your sensitive data could be intercepted. It is much safer to use built-in tools like the Windows Snipping Tool, which processes your images locally on your computer.
Was this guide helpful?

About the Author
Richard
Tech Writer, IT Professional
Richard, a writer for Geek Rewind, is a tech enthusiast who loves breaking down complex IT topics into simple, easy-to-understand ideas. With years of hands-on experience in system administration and enterprise IT operations, he’s developed a knack for offering practical tips and solutions. Richard aims to make technology more accessible and actionable. He's deeply committed to the Geek Rewind community, always ready to answer questions and engage in discussions.


[…] can also do things like hide sensitive text, and control settings for recording your screen, sound, and microphone. For more info, check out […]
[…] can also do things like blur or hide text on your screenshots or turn off screen capture and recording. It even lets you choose whether to […]
[…] the Snipping Tool, you can redact text, disable screen capture and recording, including system audio and microphone when recording, […]