How to Enable HDR Screenshot Color Corrector in Snipping Tool

The HDR Screenshot Color Corrector in Windows 11’s Snipping Tool makes your screenshots show colors correctly, especially if you have an HDR screen.
This tool automatically fixes the colors in your screenshots so they look right on any monitor, whether it’s a normal one or an HDR display.
Microsoft added this fix because many screenshots used to have weird color changes, particularly when capturing HDR content. This corrector stops those color shifts, ensuring your captures are accurate.
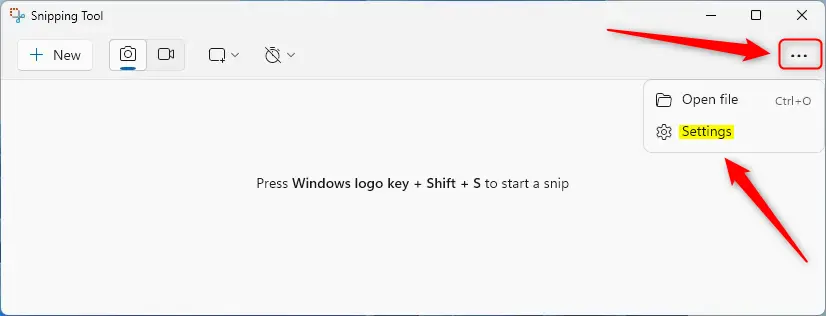
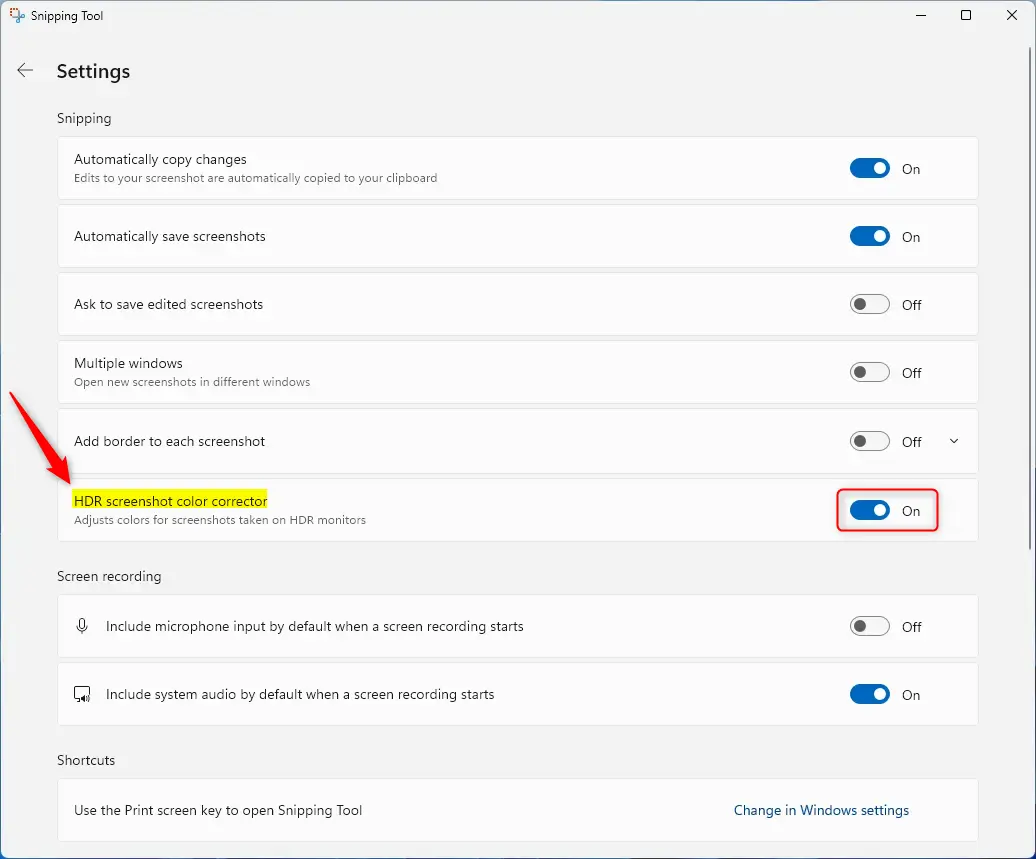
Open Snipping Tool, click the three dots menu in the top right, select Settings, and toggle the “HDR screenshot color corrector” switch. This ensures your screenshots accurately represent colors on HDR displays.
What Is the Snipping Tool?
The Snipping Tool is Windows’ built-in screenshot utility. It captures any part of your screen – from full screens to specific windows or areas.
It also offers features like redacting text and managing recording options.
Why Should You Know About the HDR Color Corrector?
The HDR Screenshot Color Corrector ensures your screenshots capture colors accurately, especially if you use a high-end HDR screen. This tool makes sure the colors you see on your screen are the exact colors saved in your screenshot. This corrector maintains visual fidelity, ensuring your captured images look true to life and preventing color shifts.
An HDR monitor shows bright, vivid colors. This screenshot color corrector feature makes your screenshots accurately represent the colors visible on your HDR monitor. The screenshot colors will precisely match the colors you see on your screen.
The HDR Screenshot Color Corrector should be turned off if your monitor does not support HDR. You may also want to turn it off if you prefer to manually adjust colors. Disabling the HDR Screenshot Color Corrector can make the Snipping Tool run faster on older or slower computers.
How to Turn the HDR Color Corrector On or Off
- Open the Snipping Tool on your computer.
- Click the three dots button (See more) in the top right corner.
- Select Settings from the menu.
- Look for the “HDR screenshot color corrector” option on the Settings screen.
- Toggle the switch button to turn it On or Off based on what you want.
- Close the Snipping Tool when you’re done.
The HDR Screenshot Color Corrector can be toggled on or off within the Snipping Tool’s settings. First, open the Snipping Tool, then click the three dots for ‘See more’ in the top right. From the menu, choose ‘Settings’ and find the ‘HDR screenshot color corrector’ option. Toggle the switch to enable or disable the feature as needed.
Summary
Windows 11’s Snipping Tool now has an HDR screenshot color corrector that helps make your screenshots match what you see on an HDR monitor.
How to fix screenshots being bright with HDR?
Search HDR to bring up the option menu. Or go to your desktop, right-click, and navigate to display settings. We are going to turn off HDR.
Why does HDR mess up screenshots?
HDR screenshots and recordings can appear washed out, too bright, too dark, or oddly colored. This happens because the image is created for a display with higher brightness and a wider color range, but the capture is typically saved, shared, or viewed using an SDR (Standard Dynamic Range) process.
How to take proper HDR screenshots?
Taking proper HDR screenshots is possible using the Windows Game Bar shortcut, ⊞ Win+G, which lets you capture your screen with HDR settings enabled.
Was this guide helpful?

About the Author
Richard
Tech Writer, IT Professional
Richard, a writer for Geek Rewind, is a tech enthusiast who loves breaking down complex IT topics into simple, easy-to-understand ideas. With years of hands-on experience in system administration and enterprise IT operations, he’s developed a knack for offering practical tips and solutions. Richard aims to make technology more accessible and actionable. He's deeply committed to the Geek Rewind community, always ready to answer questions and engage in discussions.

[…] a built-in screenshot tool in Windows that allows you to capture screenshots of any part of your screen, including full-screen captures, individual windows, or user-defined capture […]