

This article explains how to enable or disable the new HDR Screenshot color corrector in the Snipping Tool on Windows 11.
The Snipping Tool is a built-in screenshot tool in Windows that allows you to capture screenshots of any part of your screen, including full-screen captures, individual windows, or user-defined capture areas.
With the Snipping Tool, you can redact text, disable screen capture and recording, including system audio and microphone when recording, disable automatically saving screenshots, and more.
Starting with version 11.2403.8.0, Microsoft added an HDR screenshot color corrector feature that automatically adjusts the colors of screenshots taken on HDR monitors.
Enabling the HDR screenshot color corrector in the Snipping Tool can be helpful if you have an HDR monitor and want your screenshots to accurately reflect the colors on your screen. However, if you don’t have an HDR monitor or prefer to manually adjust the color correction of your screenshots, you may want to disable this feature.
Additionally, disabling this feature may help improve the performance of the Snipping Tool on older or less powerful hardware.
Turn the HDR screenshot color corrector on or off in the Snipping Tool
As mentioned, users can enable or disable a newly added feature to the Snipping Tool app that automatically adjusts the colors of screenshots taken on HDR monitors.
Here’s how to do it.
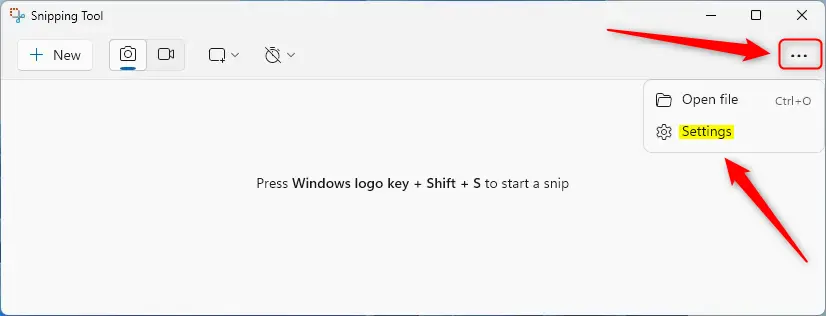
First, open the Snipping Tool.
Then, click the See more (three dots) button and select Settings.
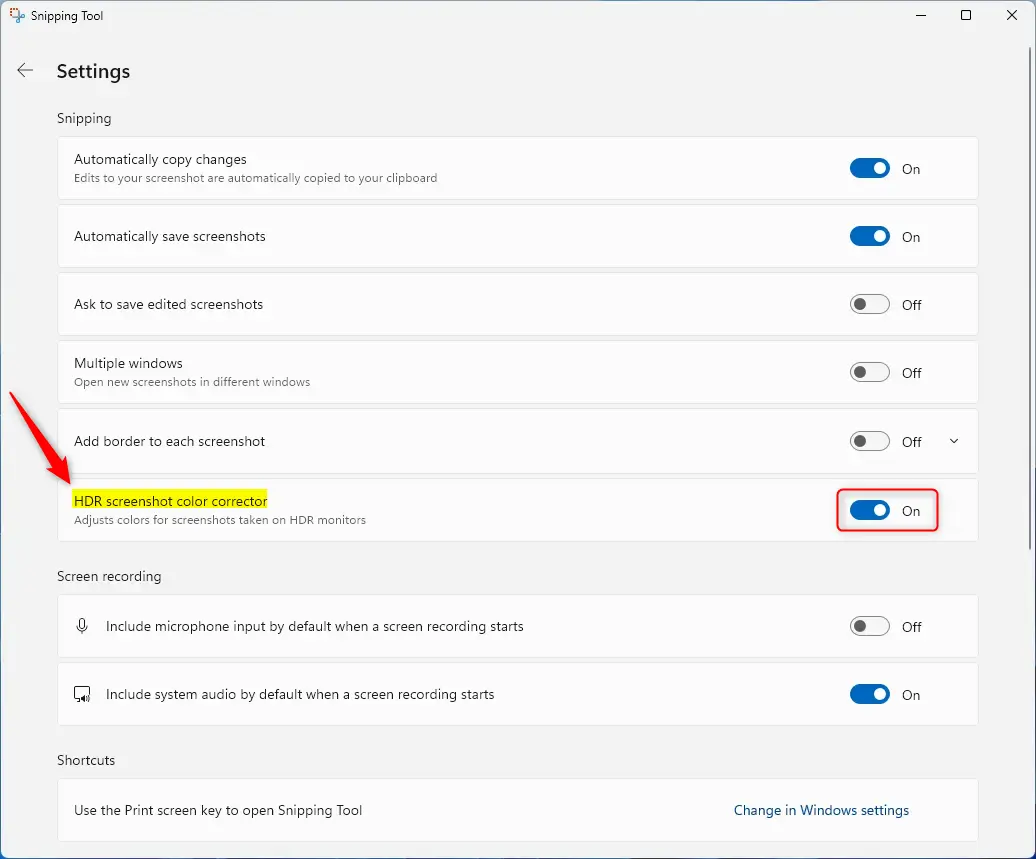
Select the “HDR screenshot color corrector” tile on the Settings pane. Then, toggle the switch button to the On or Off position to enable or disable this feature in the app.
Close the app when you are done.
That should do it!
Conclusion:
- The Snipping Tool in Windows 11 provides a range of screenshot capture and editing capabilities.
- The latest version introduces the HDR screenshot color corrector for adjusting colors on HDR monitors.
- Users can easily enable or disable this feature through the Settings pane of the Snipping Tool.
- Enabling the HDR screenshot color corrector ensures accurate color representation on HDR monitors, while disabling it may improve performance on older hardware.
- This guide has provided clear steps for toggling the HDR screenshot color corrector, empowering users to customize their screenshot experience based on their monitor and hardware setup.


Leave a Reply to How to Manage Automatic Screen Recording in Snipping Tool – Geek Rewind Cancel reply