How to Enable or Disable Title Bar Window Shake in Windows 11

Open Settings , go to System Multitasking, find Title bar window shake, and toggle the switch On or Off. The change takes effect immediately without restarting. To use Aero Shake, click and hold a window’s title bar and shake it side to side to minimize all other windows.
What is Aero Shake?
While you drag the title bar back and forth, every other open window minimizes to the taskbar . You get a clean screen with only the window you are working in.
Microsoft first introduced this trick, called Aero Shake, in Windows 7. It is handy when you have a dozen windows open and want to focus on one, without minimizing each of the others by hand. The minimized windows are not closed, so nothing is lost.
How to Use Aero Shake
Before you change any settings, try it once to see how it behaves:
- Click and hold the top bar (title bar) of the window you want to keep open. Keep the mouse button held down.
- Move your mouse quickly back and forth a few times (this is the “shake”). Short, fast movements work better than slow, wide ones.
- Check the screen. All other windows should now be minimized to the taskbar , and only the window you are holding stays open.
- To bring those windows back, grab the same window’s title bar and shake it again.
Windows 11 often ships with it off, so the steps below show how to turn it on.
How to Turn On or Off Aero Shake in 🪟 Windows 11
In Windows 11, Aero Shake is managed from the main Settings app . The setting is called Title bar window shake. Use it to turn the feature on if you want the shortcut, or off if you keep minimizing windows by accident while dragging them around. The change takes effect straight away and does not need a restart. It is also the same on Windows 11 Home and Pro.
Step 1Open Windows Settings
You can open Settings in either of two ways:
- Click the Start menu (the Windows icon at the bottom left) and select Settings.
- Or press
Windows key + Ion your keyboard to open Settings quickly.
Either way, the Settings window should open with a list of categories down the left side.
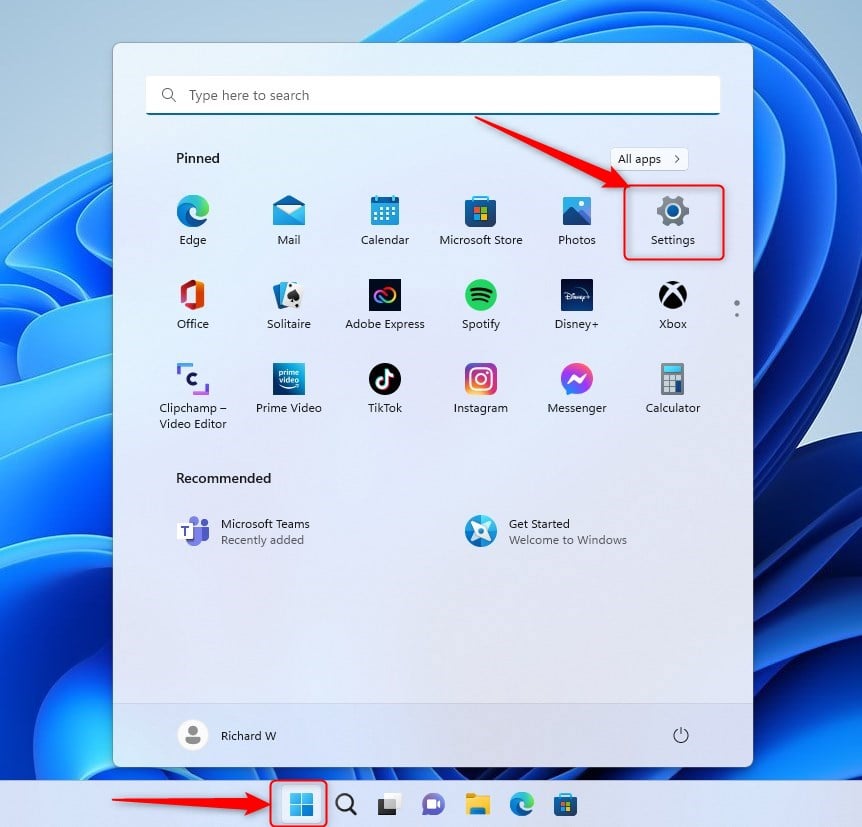
The screenshot above shows the Settings window as it should look when it first opens.
Step 2Go to System Settings
- On the left side of the Settings window, click System.
The System options should now appear on the right.
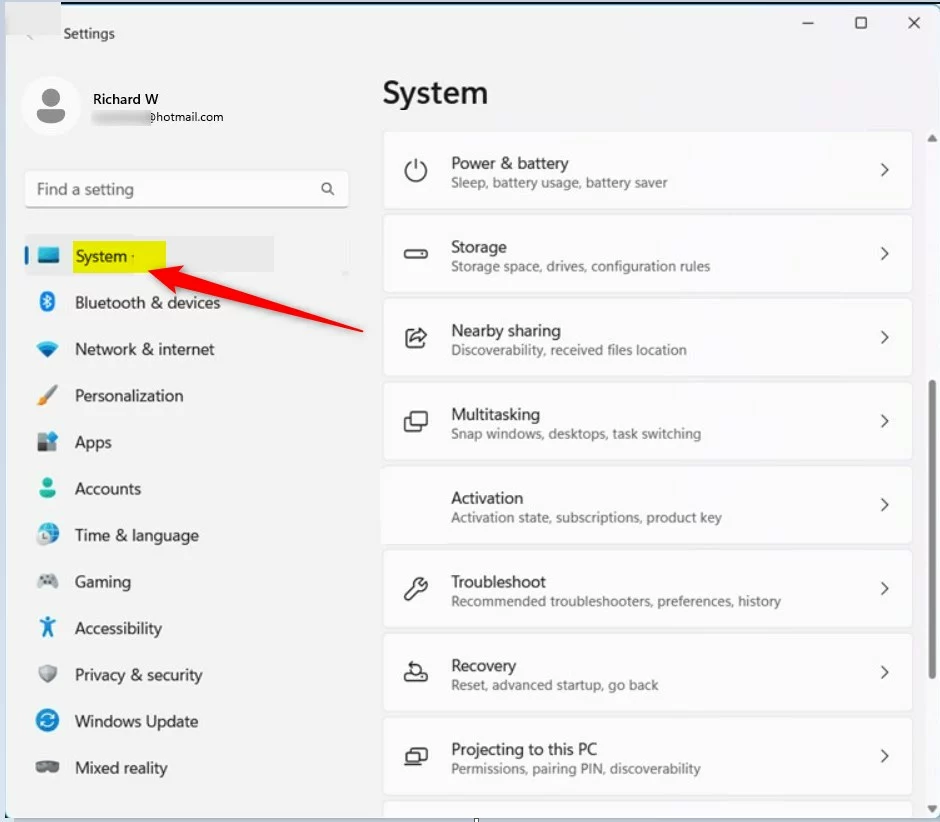
With System selected, the right pane lists display, sound, notifications and other system options.
Step 3Open Multitasking Settings
- On the right side, scroll down if needed, and click the Multitasking section to open it.
The Multitasking page should open. It holds the options for snapping windows, desktops and Alt+Tab, as well as the title bar shake setting.
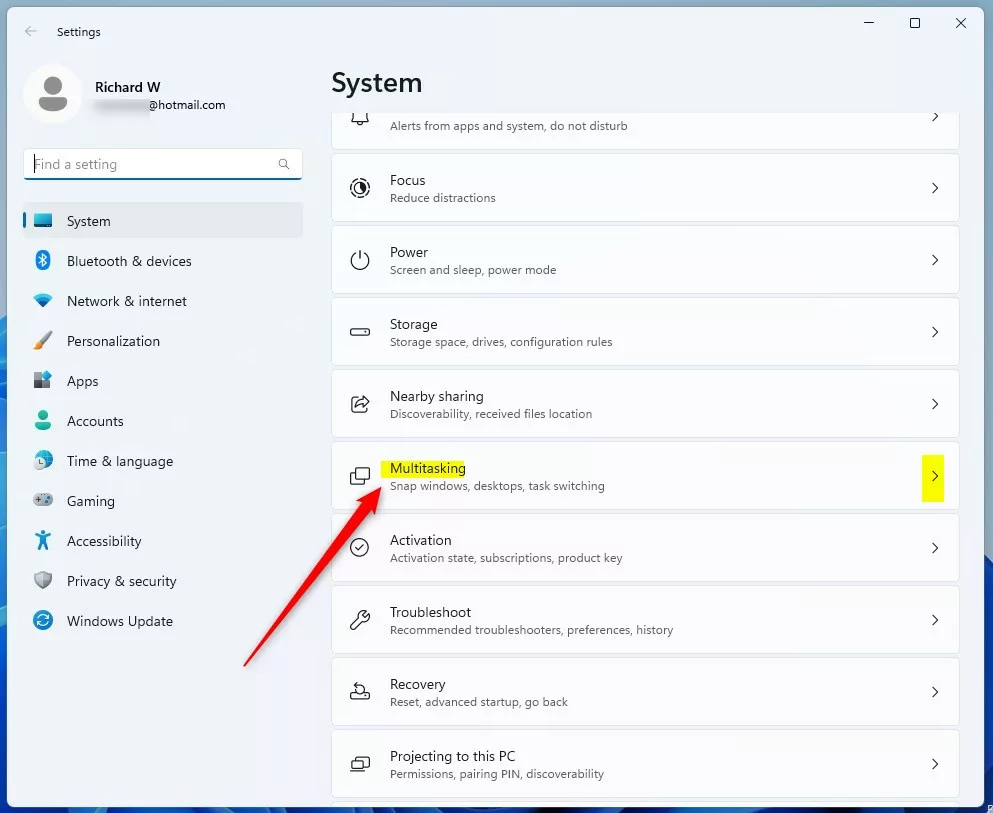
This is the Multitasking page. The shake setting sits near the bottom of the page, below the snap options.
Step 4Enable or Disable Aero Shake
Now turn the feature on or off from System Multitasking:
- Find the Title bar window shake setting. You may need to scroll down.
- Click the switch to change it.
- Turn the switch On to enable Aero Shake.
- Turn the switch Off to disable Aero Shake.
The label next to the switch should change to On or Off. To undo the change at any time, come back to this page and flip the switch again.
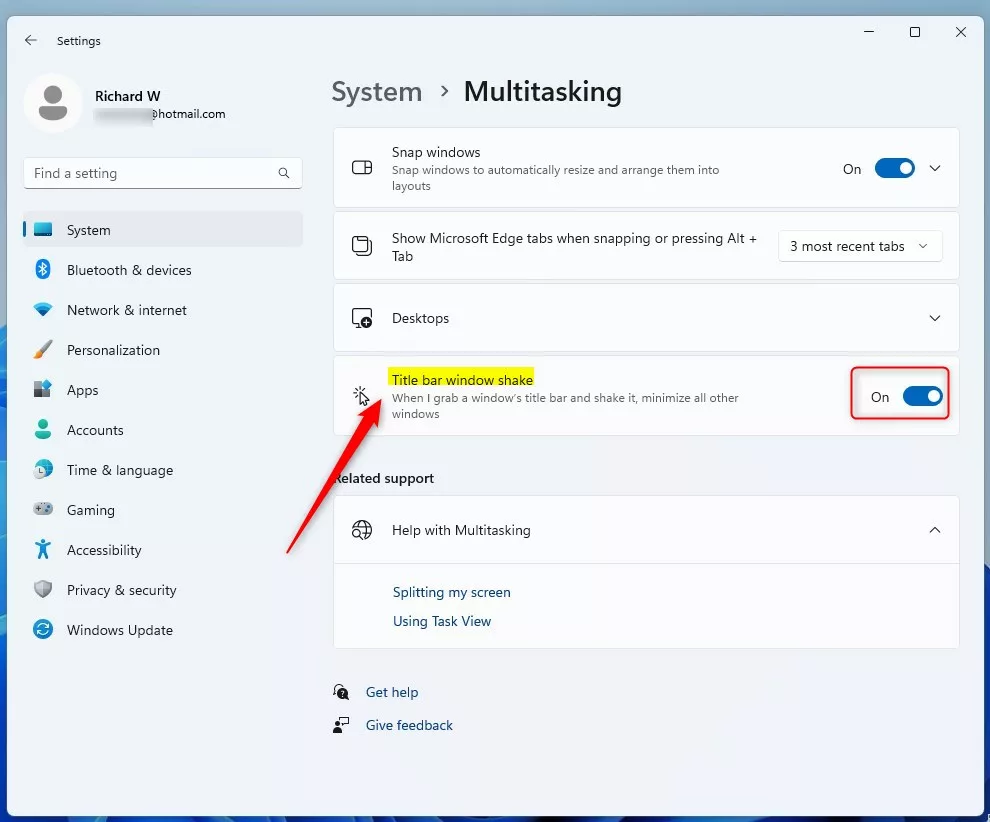
The screenshot above shows the switch in its new position.
Close the Settings app. The change is saved automatically, so there is nothing to confirm. To test it, open two or three windows, then grab the title bar of one and shake it. If Aero Shake is on, the others minimize. If it is off, nothing should happen.
Summary
Aero Shake offers a speedy way to declutter a crowded desktop by hiding every app except the one in active use. Head into System Multitasking within the main Settings app whenever you need to turn the feature on or off.- Aero Shake helps you quickly minimize all windows except the one you want to focus on.
- To use it, click and hold a window's title bar and shake it with your mouse.
- Turn Aero Shake on or off through the Settings app under System Multitasking.
- This feature is easy to enable and disable, so you can choose what works best for you.
- For more Windows 11 tips, visit Geek Rewind.
Was this guide helpful?

About the Author
Richard
Tech Writer, IT Professional
Richard is a writer at Geek Rewind who turns complex IT tasks into clear, step-by-step guides. He draws on years of hands-on experience in system administration and enterprise IT operations, focusing on Windows, Linux and WordPress: the problems people actually run into, and the fixes that work. His server and WordPress guides come from systems he runs himself. Richard builds and maintains the platform behind Geek Rewind, from its Ubuntu servers and Nginx configuration to its custom WordPress plugins. Many new tutorials start with readers' questions, and he's always glad to answer them in the comments.


No comments yet — be the first to share your thoughts!