How to Uninstall Windows Updates in Windows 11

- 3 ways to do it
- Includes a restart or sign-out
Uninstalling a Windows 11 update removes a recent patch that is causing crashes, bugs, or performance drops. Microsoft releases updates regularly to fix security holes, but a bad one occasionally slips through and breaks something that worked the day before. Rolling it back is often the quickest way to get a stable PC again.
There are three ways to do it, depending on whether Windows still starts. If you can reach the desktop, use the Settings app. It takes about five clicks: open Settings, go to Windows Update, open Update history, and choose the uninstall option. The Control Panel method gives the same result. If Windows won’t boot, use the Advanced Startup menu.
Before you start, note the KB number of the update you want to remove, for example KB5000000. You’ll see it in the update list, and you’ll need it if you want to block or look up that update later.
Open Settings, click Windows Update, select Update history, then click Uninstall updates. Find the update by its KB number and install date, select it, click Uninstall, and restart your PC. If Windows won’t start, use Advanced Startup instead.
Method 1Use the Settings App
The Settings app is the fastest method when a recent patch causes crashes or hardware problems and you can still sign in. Follow these steps.
- Press Win+I to open Settings . Or click the Start button (the Windows logo at the bottom of the screen) and select Settings from the pinned apps. The Settings window opens.
- In the left pane, click Windows Update . The right side shows your update status and any pending updates.
- Click Update history. You’ll see your installed updates grouped by type, such as Quality Updates and Driver Updates, with install dates.
- Scroll to the bottom and click Uninstall updates under Related settings. On current Windows 11 builds, this opens the Installed Updates list from Control Panel .
- Find the update you want to remove and click it. Check the KB number and install date against the Update history page so you pick the right one.
- Click Uninstall at the top of the list, then confirm when Windows asks.
- Restart your computer if you’re prompted. Some updates are only fully removed after a restart.
Some updates, such as certain servicing stack updates, are permanent. In that case, try the Advanced Startup method below.
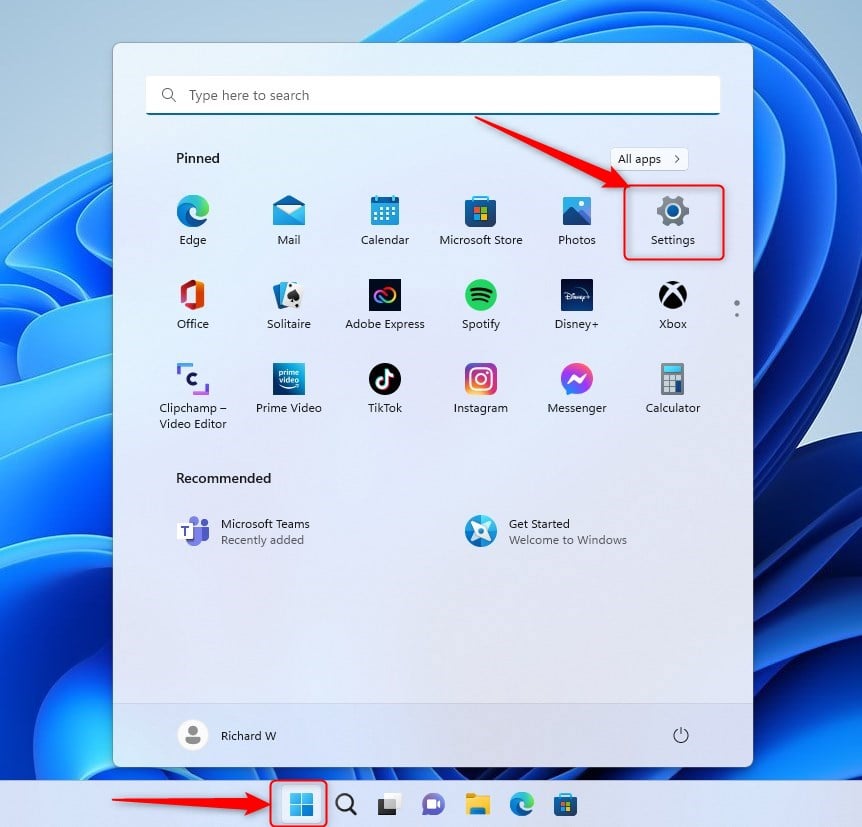
Open the Settings app from the Start menu. You’ll see the Settings home page with the navigation list on the left.
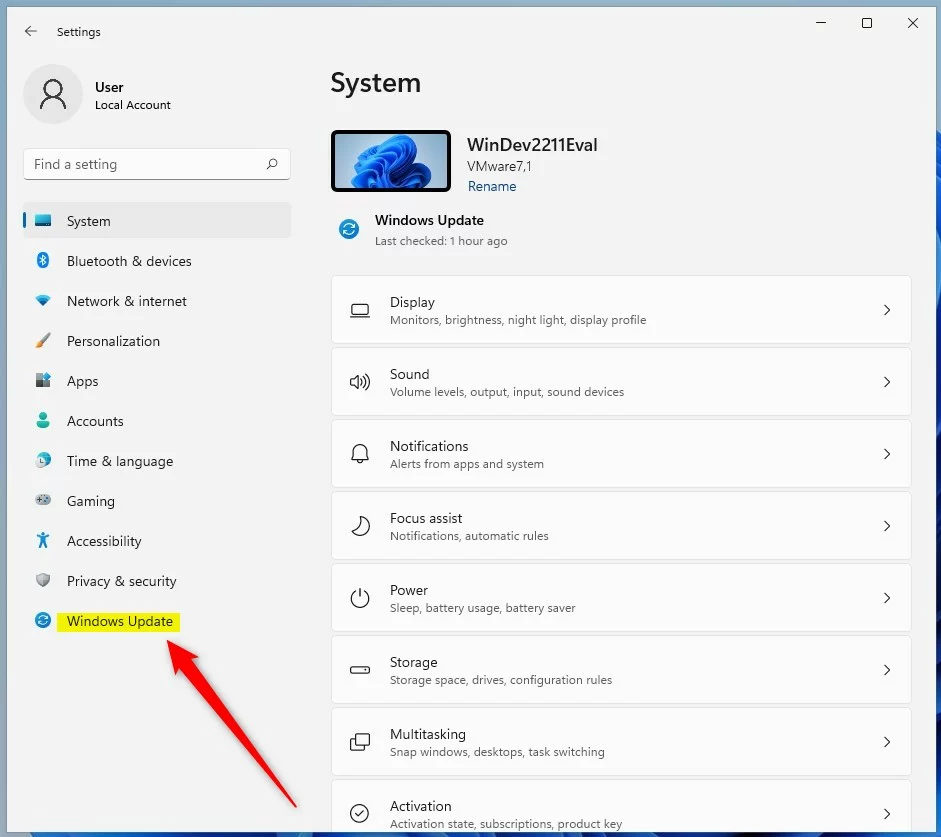
Click Windows Update in the left pane. The right side now shows the update status page.
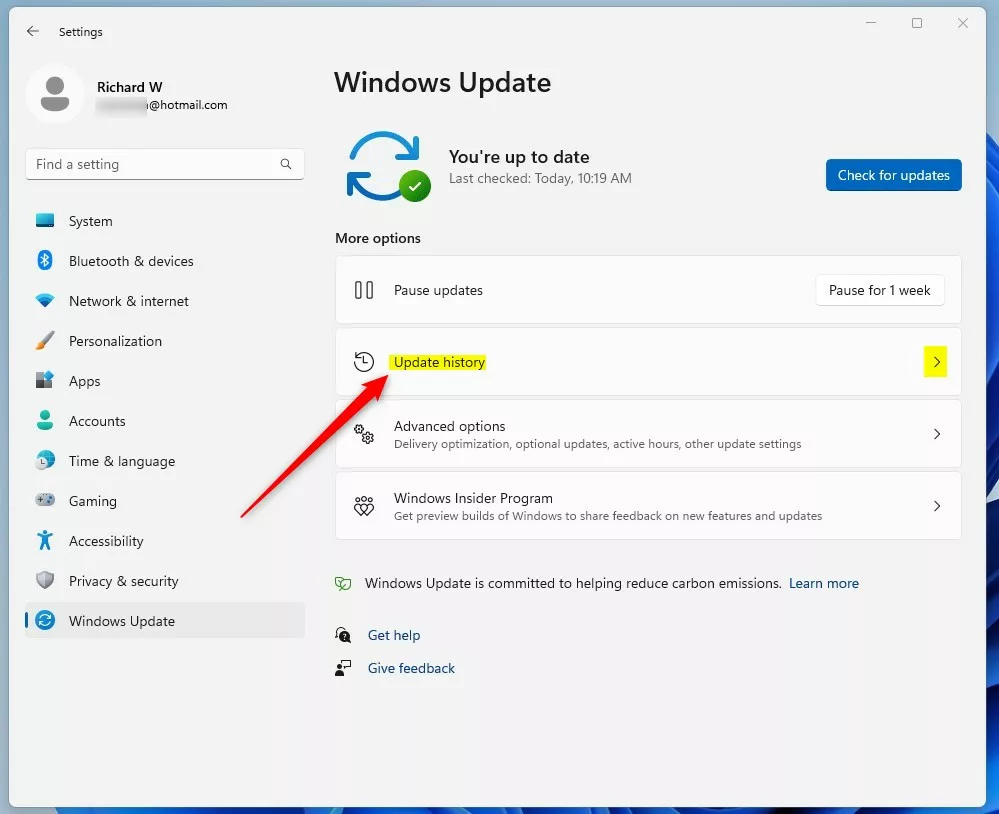
Click Update history to see everything Windows has installed recently.
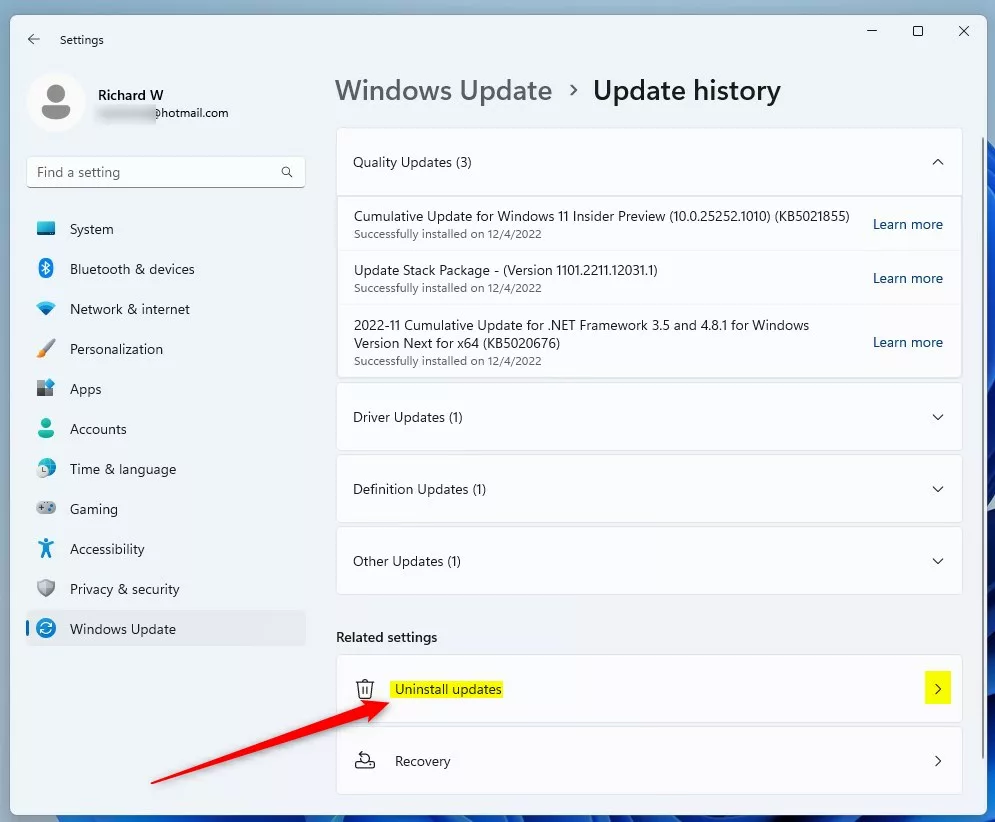
Click Uninstall updates to open the list of updates you can remove.
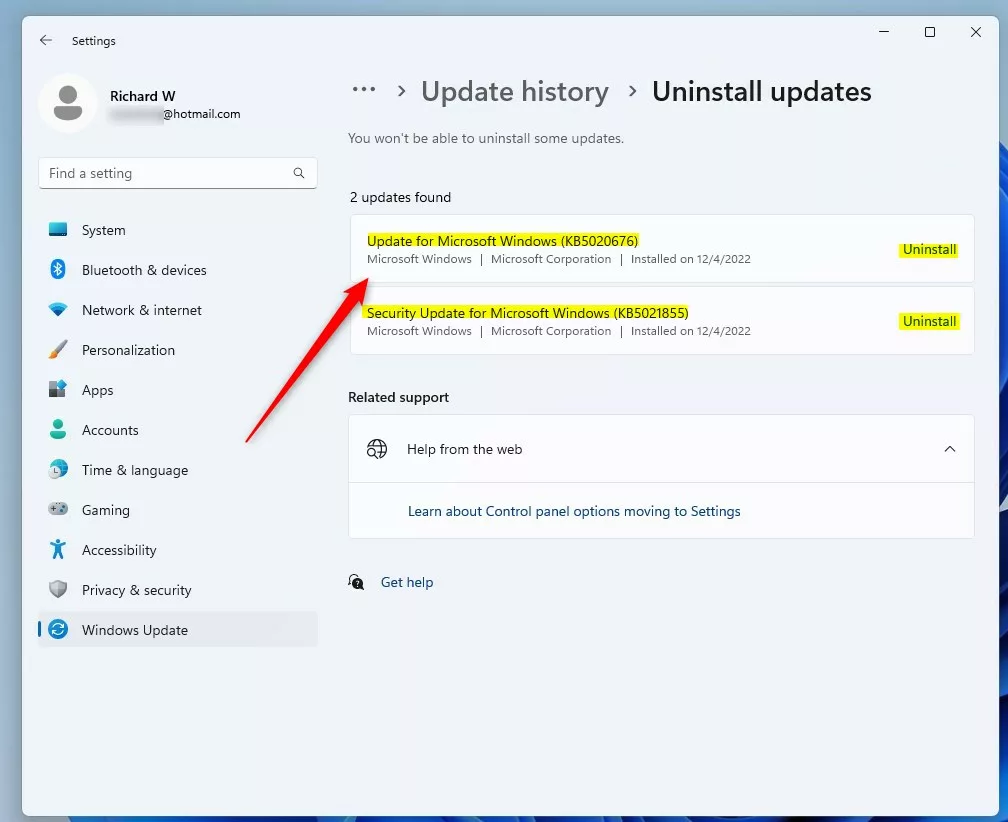
Select the update, then click Uninstall. Windows removes it, and you may need to restart.
Method 2Use the Control Panel
The Control Panel is the classic route. It shows a full list of installed updates with their KB numbers and install dates, which makes it easy to spot the one that arrived just before your problems began. It works the same on Windows 11 Home and Pro.
- Open Control Panel . Type “Control Panel” in the Start menu search and click the result.
- Click Programs, then click Programs and Features. If your Control Panel is in icon view, click Programs and Features directly.
- In the left pane, click View installed updates. A list of updates appears, mostly under the heading Microsoft Windows.
- Click the Installed On column header to sort by date, so the newest updates are at the top.
- Select the update you want to remove, then click Uninstall in the toolbar above the list. Confirm if Windows asks.
- Restart your PC if prompted.
If Uninstall doesn’t appear when you select an update, Windows doesn’t allow it to be removed here.
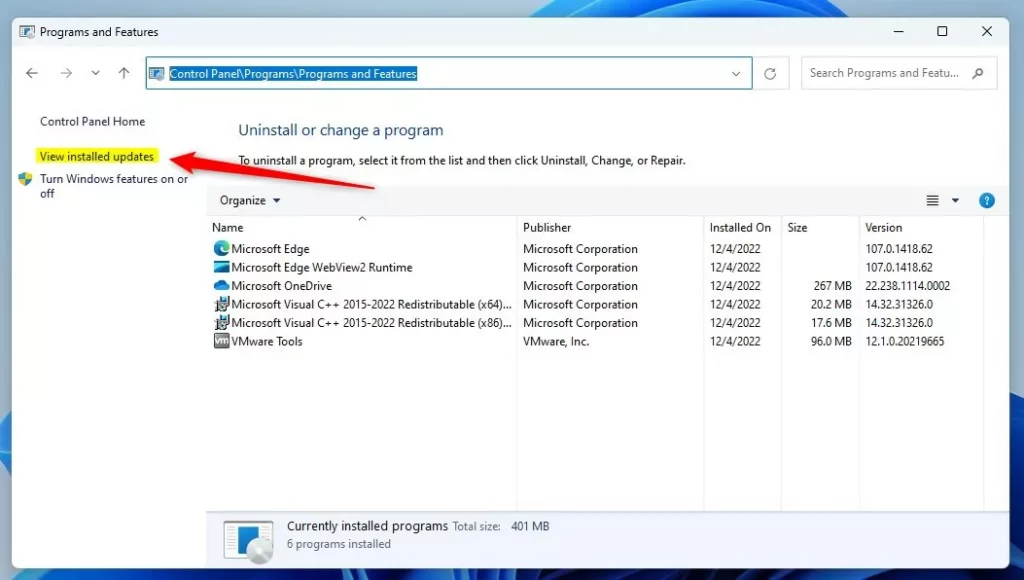
This is what the View installed updates page looks like in Control Panel. Your list will show the updates on your own PC.
Method 3Use Advanced Startup (If You Can’t Log In)
This menu is part of the Windows Recovery Environment, so it works even when the normal system is broken.
- Turn off your PC completely.
- Turn it back on. As soon as Windows starts loading (you see the logo or spinning dots), press and hold the power button to force a shutdown. Repeat this 2-3 times. On the next start, Windows should show “Preparing Automatic Repair” and then the Advanced Startup screen. If you can reach the sign-in screen, you can also hold Shift while clicking Power Restart. You can also boot from a Windows recovery USB, or follow this guide: How to Boot to Advanced Startup in Windows 11.
- On the Advanced Startup screen, click Troubleshoot.
- Click Advanced options.
- Select Uninstall Updates.
- Choose either Uninstall latest quality update or Uninstall latest feature update, depending on which update caused the problem. Windows may ask you to pick an account and enter its password first. If the drive is protected with BitLocker, have your recovery key ready.
- Confirm the uninstall when prompted, wait for it to finish, and then restart your PC.
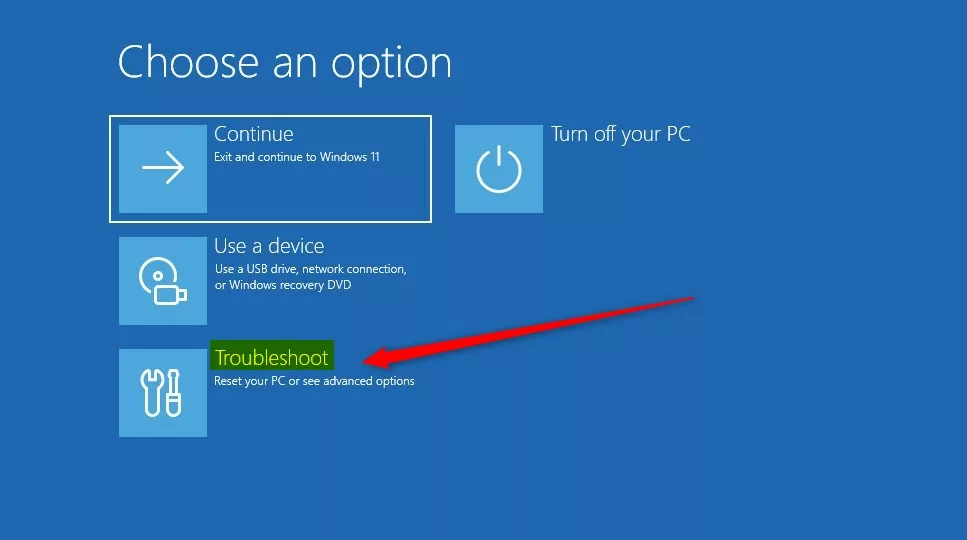
On the Advanced Startup screen, select Troubleshoot.
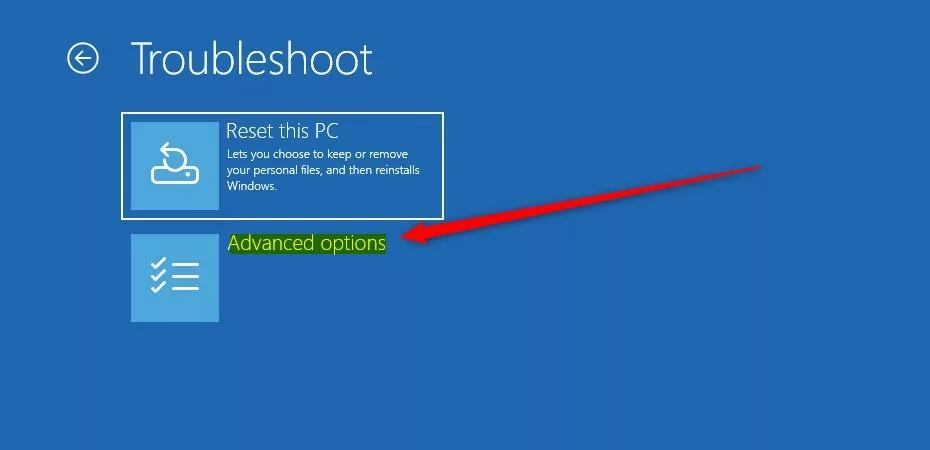
On the next screen, select Advanced options.
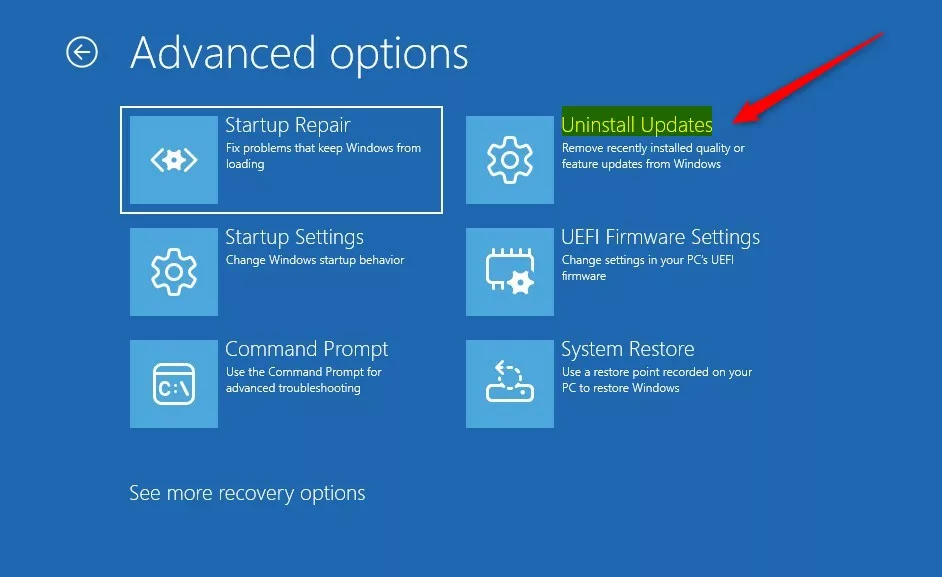
In the Advanced options list, select Uninstall Updates.
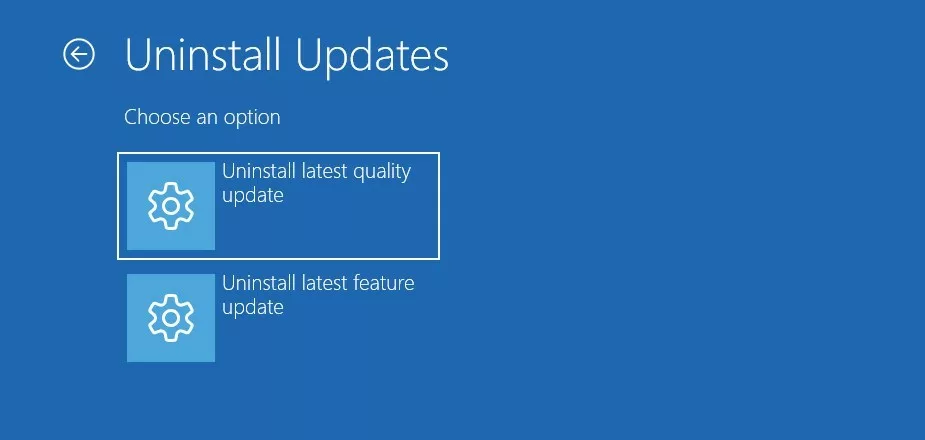
Choose which type of update to uninstall.
What are Quality and Feature Updates?
Feature updates are the big version upgrades with design and feature changes. They now arrive about once a year, where they used to come twice a year. Quality updates are the smaller, regular patches that fix security issues and bugs. Rolling back a feature update is only possible for a limited time after the upgrade, usually 10 days, because Windows removes the files it needs to go back.
If a problem started after a routine monthly update, choose the latest quality update first. It typically resolves erratic hardware behavior, and it is the less disruptive of the two options.
Windows will try to install the same update again on its own. Once you're back on the desktop, go to Settings Windows Update and use the pause option to hold off updates for a while. Then check whether Microsoft has released a fix before you resume.
Summary
You can uninstall Windows updates using the Settings app, the classic Control Panel, or the Advanced Startup menu if your PC refuses to boot. Only remove patches when you know an update causes system instability, as these packages contain important security fixes for your computer.- You can uninstall Windows updates using the Settings app, Control Panel, or Advanced Startup menu.
- Be careful when uninstalling updates. It's best to only do this if you're sure the update is causing trouble.
- If you're unsure, ask someone experienced or a professional for help.
- Keep your computer backed up to avoid losing important files if something goes wrong.
- Following these steps will help you fix update problems and get your Windows 11 PC working properly again.
Have a question about this guide?
Answered by AI from this guide. Good questions may be added to this page — please don't include personal details.
Did this guide fix your problem?

About the Author
Richard
Tech Writer, IT Professional
Richard is a writer at Geek Rewind who turns complex IT tasks into clear, step-by-step guides. He draws on years of hands-on experience in system administration and enterprise IT operations, focusing on Windows, Linux and WordPress: the problems people actually run into, and the fixes that work. His server and WordPress guides come from systems he runs himself. Richard builds and maintains the platform behind Geek Rewind, from its Ubuntu servers and Nginx configuration to its custom WordPress plugins. Many new tutorials start with readers' questions, and he's always glad to answer them in the comments.
No comments yet — be the first to share your thoughts!