How to Schedule Windows Update Restarts in Windows 11


Scheduling Windows update restarts in Windows 11 stops your PC from rebooting in the middle of your work. Windows 11 lets you pick an exact restart time, and you can also pause updates for up to 35 days, so your computer only reboots when you are ready.
Set your active hours or choose a custom restart time before an update catches you off guard. Both settings are in the Settings app and take about a minute to change.
Open Settings , go to Windows Update , click Advanced options, then Schedule restart. Choose your preferred day and time, and click Schedule restart to save. Your PC will reboot at that time to complete the update installation.
How to Schedule a Restart for Windows Update in 🪟 Windows 11
The quickest way to stop restarts during your workday is to set Active hours. Open Settings , go to Windows Update , click Advanced options, and adjust Active hours. This tells Windows when you normally use the PC, so it avoids restarting then.
If an update is already waiting for a restart, you can pick the exact time instead. Follow these steps:
- Watch for the restart prompt when Windows finishes installing updates. It may let you pick a restart time right there. You will see a message like this:
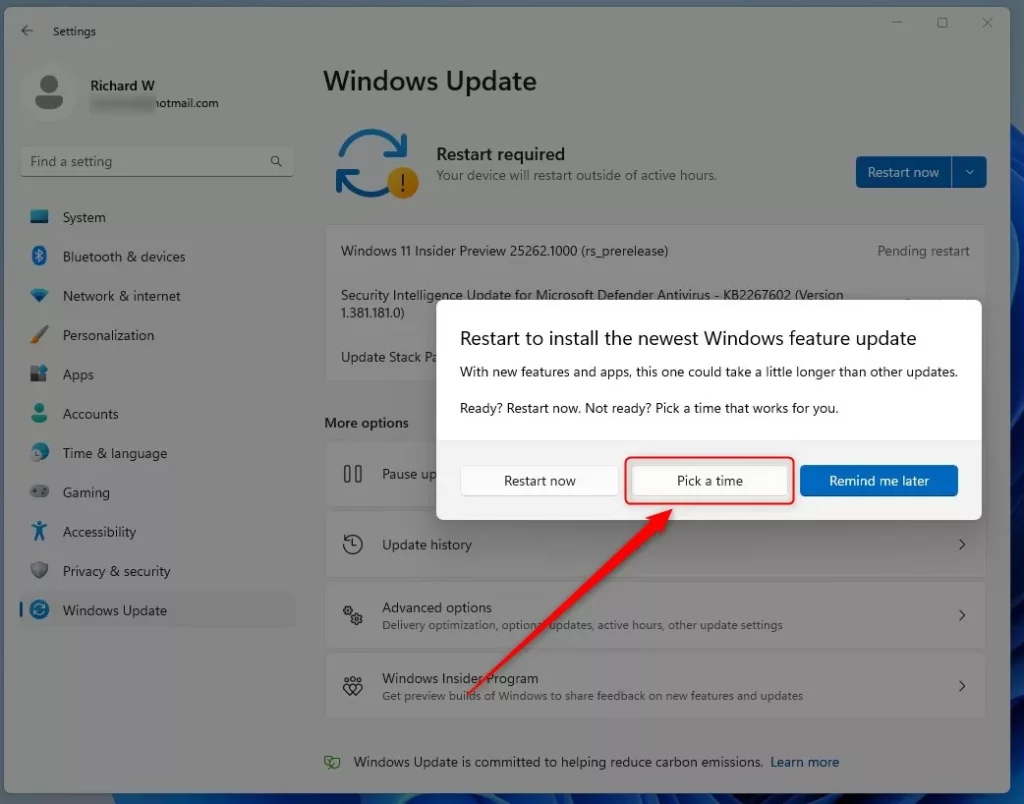
Choose a convenient time to restart your PC after updates. - If you missed that message or want to change your restart time, click the Start menu (the Windows icon in the bottom-left corner), then click Settings. The Settings window opens.
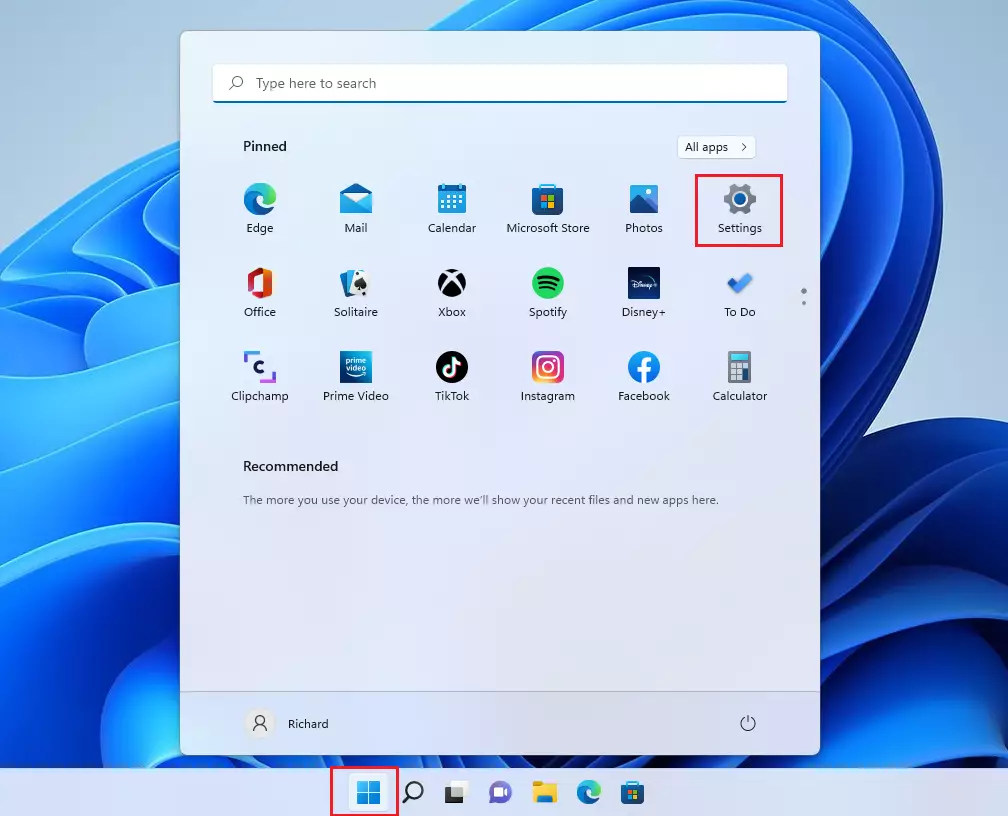
Open the Settings from the Start menu . - Click Windows Update on the left side. The update status page opens on the right.
- Click Schedule restart. This option only appears when an update has been installed and is waiting for a restart. If you do not see it, there is nothing pending, so check back after the next update installs.
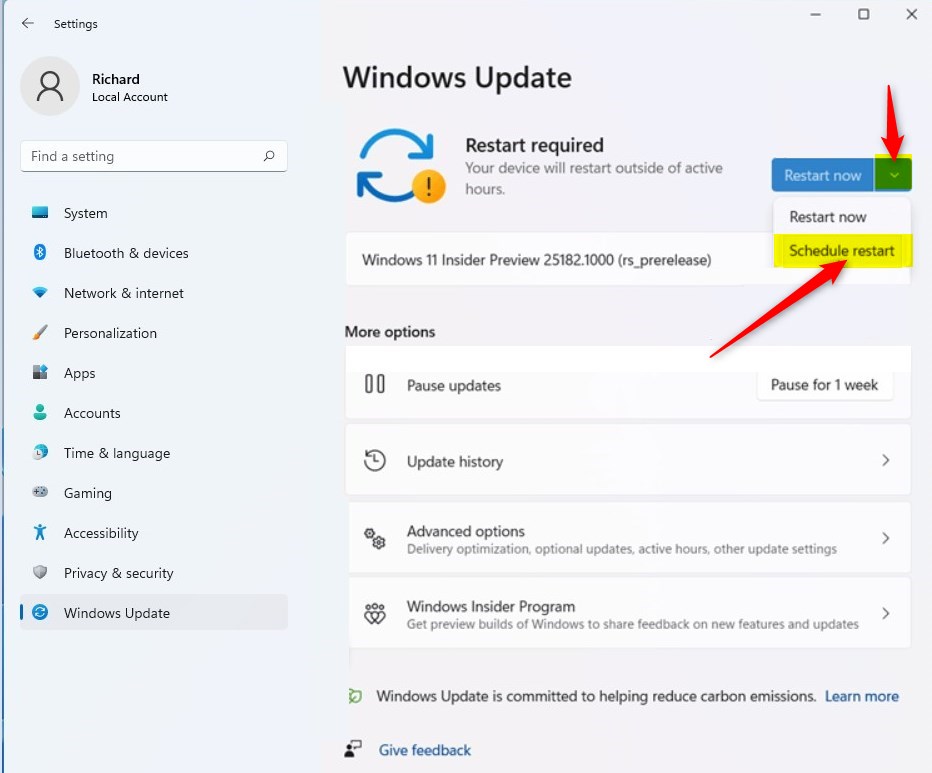
Find and click “Schedule restart”. - Choose the day and time when you want your computer to restart. Pick a time when you won’t be using the PC, such as overnight or during lunch. Leave the PC on and plugged in at that time, or the restart will not happen as planned.
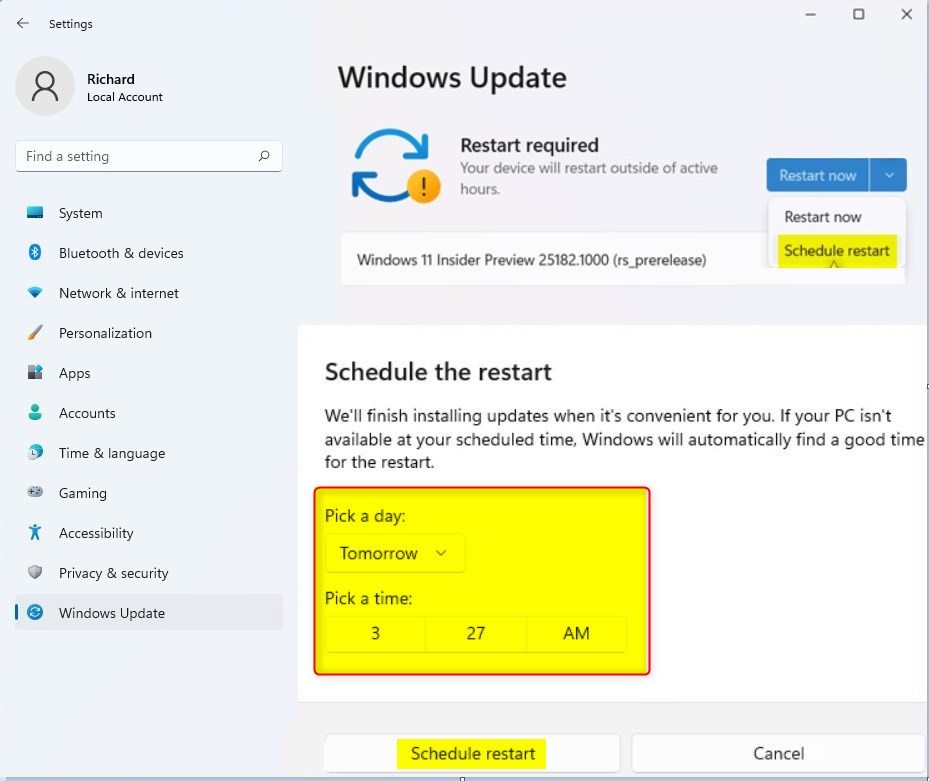
Select your preferred day and time for restart. - Click Schedule restart to save your choice. Windows now shows the restart time you picked on the Windows Update page.
That’s it! Your computer will restart at the time you picked to finish installing updates. To change your mind, go back to Settings Windows Update and pick a new time.
To set Active hours, go to Settings Windows Update Advanced options Active hours You can choose Automatically to let Windows learn your usage, or Manually to enter your own start and end times. If you need more time, go to Settings Windows Update and use the Pause updates drop-down to delay updates for up to 35 days. Once the pause ends, Windows has to install the pending updates before you can pause again.
Settings App vs. Group Policy vs. Registry
- The Settings app is the easiest and safest for most users, offering basic control over active hours and restart times.
- Group Policy Editor provides more granular control for IT administrators on Pro, Enterprise, and Education editions, allowing for forced deadlines and specific restart policies.
- The Windows Registry offers the most flexibility and can be used on all editions, but it carries the highest risk of system errors if not edited carefully.
File > Export in the Registry Editor and saving a copy. Incorrect changes to the registry can cause serious system problems, including preventing Windows from starting.You can manage restart schedules in Windows 11 through the Settings app, the Group Policy Editor, or the Windows Registry. The Settings app suits everyday users who want quick control over active hours. The Group Policy Editor and the Registry give administrators and Pro edition users finer control.
If you are on Windows 11 Home, which has no Group Policy Editor, you can change the same behavior in the Windows Registry. Proceed with caution, as incorrect registry edits can cause system instability. Before you start, create a restore point or export the key you are about to change so you can undo your edits.
- Press
Windows key + R, typeregedit, and press Enter. If Windows asks for permission, click Yes. The Registry Editor opens. - Navigate to
HKEY_LOCAL_MACHINE\SOFTWARE\Policies\Microsoft\Windows\WindowsUpdate. - If
WindowsUpdatedoes not exist, right-click onWindows, selectNew>Key, and name itWindowsUpdate. - Right-click on
WindowsUpdate, selectNew>Key, and name itAU. - Right-click on the
AUkey, selectNew>DWORD (32-bit) Value. A new value appears in the right pane with its name ready to edit. - Name the new value
AUOptions. - Double-click
AUOptions. Set theValue databased on the following:2: Auto download and notify for install.3: Auto download and schedule the install.4: Auto download and install, and restart automatically at the scheduled time.5: Auto download and install, and restart automatically without warning.
- To control active hours via registry, create a
DWORD (32-bit) ValuenamedActiveHoursStartand set its value to the hour you want active hours to begin (e.g.,8for 8 AM). Create anotherDWORD (32-bit) ValuenamedActiveHoursEndand set its value to the hour active hours end (e.g.,17for 5 PM). - You can also add a
DWORD (32-bit) ValuenamedSetActiveHoursand set it to1to use Windows Update for Business. - Restart your computer for these changes to take effect.
To undo the registry changes, delete the values you created, or restore the key you exported, and restart the PC.
Using Group Policy Editor (for Pro, Enterprise, Education editions)
If you have Windows 11 Pro, Enterprise, or Education, you can use the Group Policy Editor for more advanced control.
- Press
Windows key + R, typegpedit.msc, and press Enter. The Group Policy Editor opens. - Navigate to
Computer Configuration>Administrative Templates>Windows Components>Windows Update. The policy list appears in the right pane. - Find and double-click on
Configure Automatic Updates. A settings window opens. - Select
Enabled. Then, underOptions, choose a setting like2 - Auto download and notify for installor3 - Auto download and schedule the install. - Crucially, look for settings related to restart behavior. You can configure options like
Always automatically restart at the scheduled timeorNo auto-restart with logged on users for scheduled automatic updates installations. - You can also find settings to
Specify deadline for automatic updates and restarts. This forces an update installation and restart after a set number of days, overriding active hours if needed. This is a powerful option for ensuring updates are applied promptly across managed devices.
Always test these settings on a non-critical machine first. To undo a policy, open it again and set it back to Not Configured.
Latest Update
For Windows 11 versions 22H2 and later, you can also set a specific restart time. If you don't, Windows will attempt to restart outside of your active hours.
Why Scheduling Restarts is Helpful
- Windows updates keep your computer safe and running smoothly, so scheduling restarts is better than avoiding updates.
- Scheduling restarts lets you choose a time that won’t interrupt your work or play.
- It helps prevent sudden restarts when you’re busy using your computer.
- The steps above give you control over when your PC restarts. Use Settings for everyday control, and use Group Policy or the Registry when you need more.
Scheduling your Windows Update restarts prevents your computer from suddenly rebooting in the middle of an important task or game. Instead of letting Windows restart at random times, you decide when your PC installs updates and reboots.
Understanding how Windows Update restarts are managed is key to maintaining system security without disrupting your workflow. The Settings app offers simple controls. Group Policy and the Registry give IT professionals the tools to enforce update policies across an organization, so critical updates are applied even if users try to postpone them.
Have a question about this guide?
Answered by AI from this guide. Good questions may be added to this page — please don't include personal details.
Did this guide fix your problem?

About the Author
Richard
Tech Writer, IT Professional
Richard is a writer at Geek Rewind who turns complex IT tasks into clear, step-by-step guides. He draws on years of hands-on experience in system administration and enterprise IT operations, focusing on Windows, Linux and WordPress: the problems people actually run into, and the fixes that work. His server and WordPress guides come from systems he runs himself. Richard builds and maintains the platform behind Geek Rewind, from its Ubuntu servers and Nginx configuration to its custom WordPress plugins. Many new tutorials start with readers' questions, and he's always glad to answer them in the comments.
No comments yet — be the first to share your thoughts!