How to Change Date in Windows 11

Changing the date in Windows 11 lets you fix an incorrect system clock. A wrong date breaks website certificates (you get “connection is not private” errors), throws off app schedules and backups, and stamps files with the wrong times. Windows gives you four ways to change it: the Date & time page in the Settings app, the classic Control Panel , Command Prompt, and PowerShell.
Changing the system time normally needs an administrator account. If your PC is joined to a domain or restricted by a network policy, the date controls may be greyed out, or the clock may reset itself later. In that case, ask your IT department to change it.
Open Settings , go to Time & language Date & time, turn off Set time automatically, click Change, pick the new month, day and year from the drop-down lists, then click Change to save it.
What is a Calendar Date?
Option 1Change Date Using Windows Settings
- Press Win+I on your keyboard to open Settings .
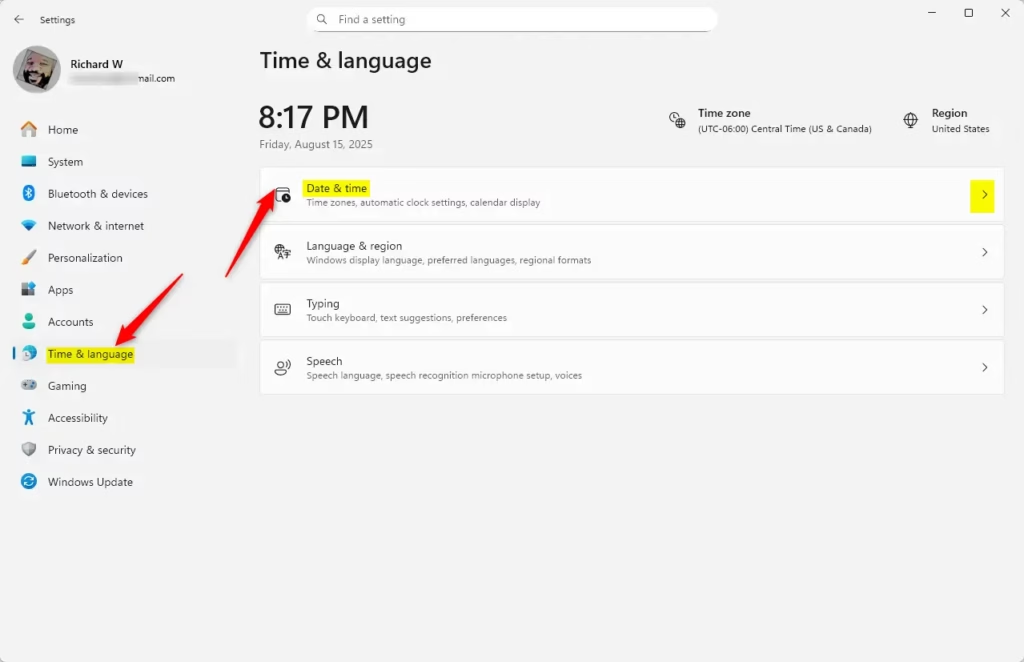
- In the left menu, click Time & language. Then click Date & time on the right. You should see the current time, your time zone and a list of options.
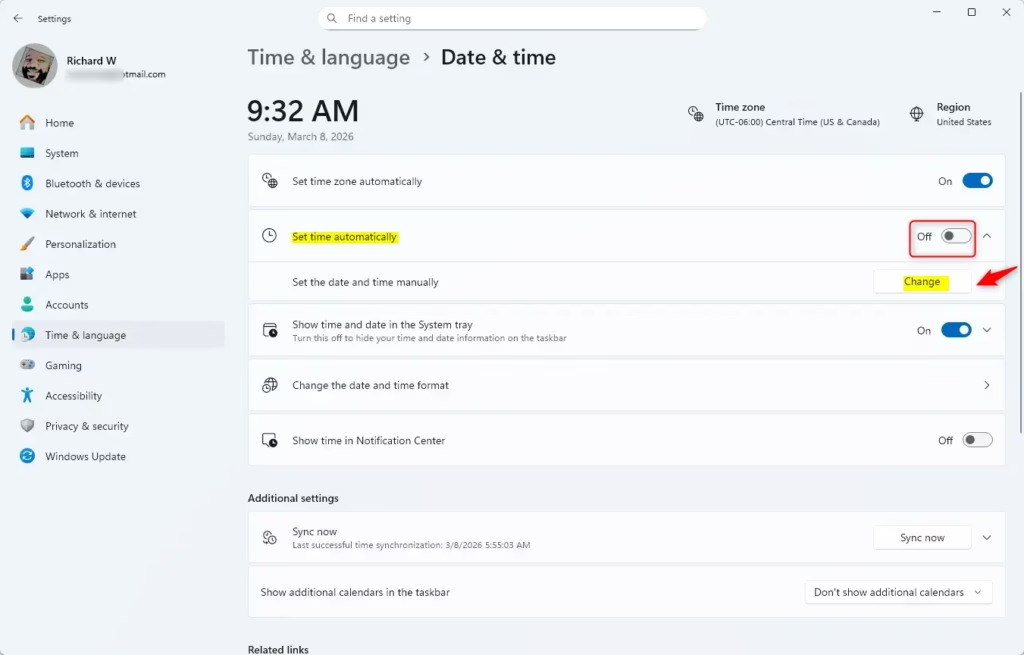
- Turn off Set time automatically by clicking the switch. It should now read Off. If you skip this step, the Change button stays greyed out and you cannot enter a date.
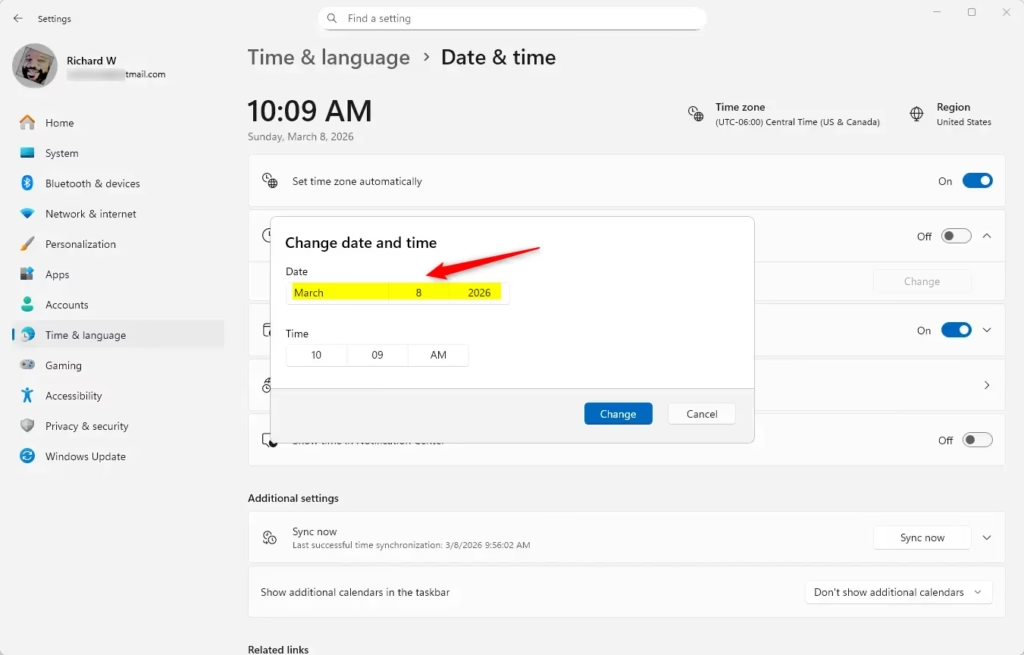
- Click the Change button under Set the date and time manually. A small Change date and time window opens.
- Pick the month, day and year you want from the drop-down lists. Adjust the time too if it is wrong, then click Change to save it.
- Check the date shown on the page, or in the taskbar clock, to confirm it took effect. Then close the Settings window.
Open Settings by pressing the Win and I together, go to Time & language, and choose Date & time. You must turn off the automatic time switch before you can set a new date manually.
To undo the change, go back to the same page and turn Set time automatically back on. You can also click Sync now under Additional settings to pull the correct time from the internet. This works on both Home and Pro editions. Leaving automatic time off is not a good idea for long, because the clock will slowly drift.
Option 2Change Date Using Control Panel
- Open the Control Panel . Type Control Panel in the search box on the taskbar , then click the result.
- Check the View by setting in the top right corner. Set it to Small icons or Large icons so every tool is listed. In Category view, the date tools are tucked away under Clock and Region.
- Click Date and Time. A window opens with a few tabs, and the Date and Time tab is shown first.
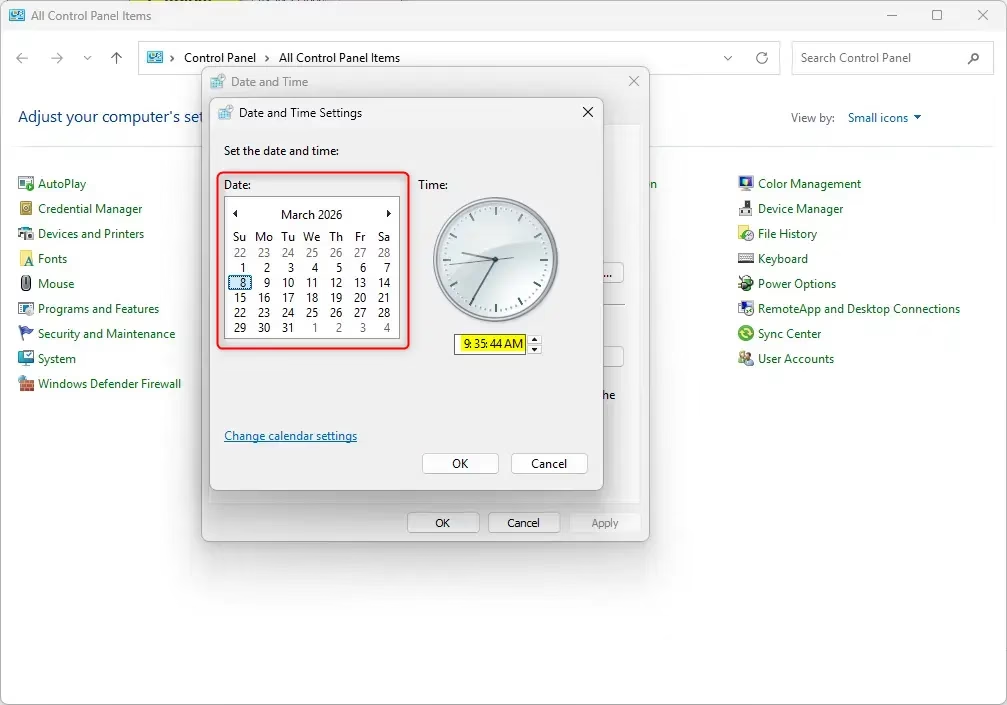
- Click the Change date and time… button. This button has a shield icon, so Windows may show a User Account Control prompt. Click Yes, or enter administrator credentials if asked. A calendar and clock appear.
- Click the correct date on the calendar and click OK. Use the arrows beside the month name to move to another month or year.
- Click OK again to close the Date and Time window.
- Check the taskbar clock to confirm the new date, then close the Control Panel .
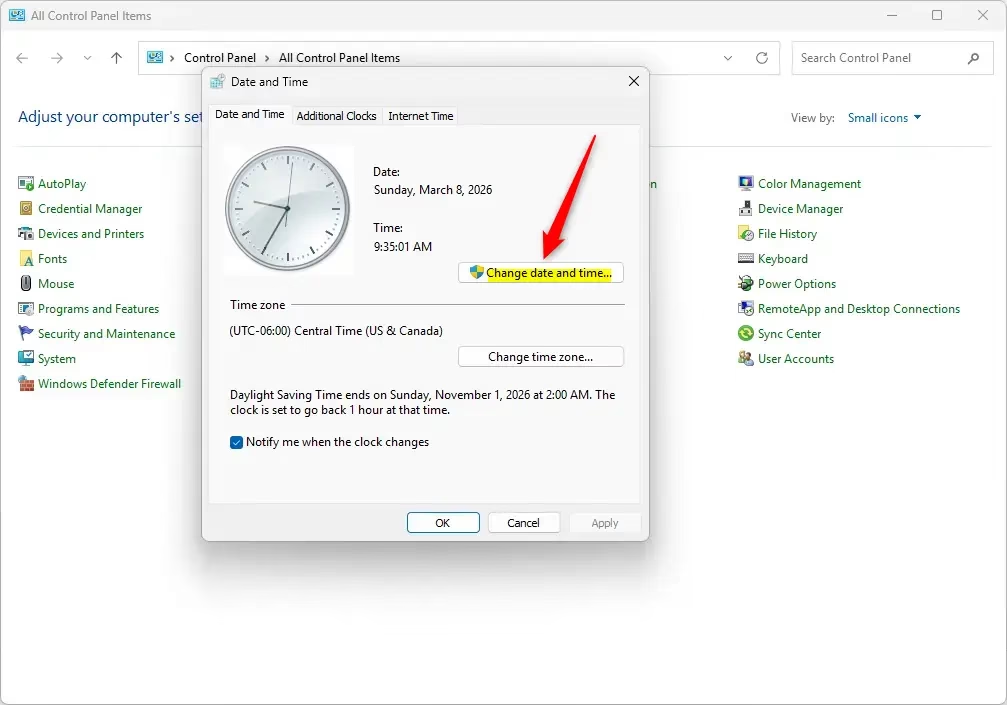
You can change date Windows 11 settings using the classic Control Panel . Search for Control Panel from your taskbar , open the Date and Time tool, and click the change button. This method works well if you prefer traditional Windows menus over the newer app interface.
Windows can check an internet time server in the background and overwrite the date you just set. If your date keeps reverting, open the Internet Time tab in the same window to see how syncing is set up. You can also turn off Set time automatically in the Settings app, as described above.
To undo a change, open the same window and set the correct date again. Alternatively, switch automatic time back on in Settings and click Sync now.
Option 3Change Date Using Command Prompt
You can change date Windows 11 configurations quickly by running a text command in Command Prompt. Open Windows Terminal with administrator rights, switch to Command Prompt if needed, and type the date command. This lets you bypass the visual menus entirely.
- ⚠️ Admin Required: Right-click the Start button and choose Windows Terminal (Admin). On some builds the entry is labelled Terminal (Admin). Click Yes on the User Account Control prompt. If it opens PowerShell by default, click the dropdown arrow (next to the + tab) and select Command Prompt.
- Type the command below and press Enter:
date MM/DD/YYYY - Replace MM with the month number (like 06 for June), DD with the day number, and YYYY with the year.
- For example, to set the date to June 19, 2024, type:
date 06/19/2024 - If you get no error message, the date has been changed. If you see "A required privilege is not held by the client", the window is not running as administrator. Reopen it using step 1. If you see an invalid date message, check the order of the month and day against your regional settings.
- Close the terminal when done.
As with the other methods, automatic time syncing can overwrite the date later. Turn Set time automatically back on in Settings if you want Windows to correct the clock again.
Option 4Change Date Using PowerShell
You can change date Windows 11 systems by running a cmdlet in PowerShell. Open Windows Terminal as an administrator and execute the set-date command with your target month, day, and year. This method is helpful for IT tasks and automated scripts.
- ⚠️ Admin Required: Right-click the Start button and open Windows Terminal (Admin). Click Yes on the User Account Control prompt. If it opens Command Prompt by default, click the dropdown arrow and pick Windows PowerShell.
- Type the command below and press Enter:
Set-Date -Date "MM/DD/YYYY" - Fill in MM, DD, and YYYY with the month, day, and year you want.
- Example for June 19, 2024:
Set-Date -Date "06/19/2024" - PowerShell prints the new date and time when the command succeeds. A red error about permissions means the window is not elevated, so reopen it as administrator.
- Close the terminal when finished.
Because this is a single line, you can drop it into a script to set the date on several PCs. Remember that a machine with automatic time still turned on may sync back to the correct time afterwards.
Summary
You now have four ways to change the date in Windows 11, from graphical menus to command-line tools. The Settings app is the easiest for most people, and Control Panel suits those who prefer the older layout. Command Prompt and PowerShell are quicker for admins and scripts. Whichever you use, turn Set time automatically back on when you are done, unless you have a reason to keep the clock manual.
Was this guide helpful?

About the Author
Richard
Tech Writer, IT Professional
Richard is a writer at Geek Rewind who turns complex IT tasks into clear, step-by-step guides. He draws on years of hands-on experience in system administration and enterprise IT operations, focusing on Windows, Linux and WordPress: the problems people actually run into, and the fixes that work. His server and WordPress guides come from systems he runs himself. Richard builds and maintains the platform behind Geek Rewind, from its Ubuntu servers and Nginx configuration to its custom WordPress plugins. Many new tutorials start with readers' questions, and he's always glad to answer them in the comments.


No comments yet — be the first to share your thoughts!