How to Enable or Disable Set Time Automatically in Windows 11


The “Set time automatically” feature in Windows 11 updates your system clock from internet time servers, which keeps your computer time accurate to within milliseconds. A clock that is even two minutes off can block secure websites, break secure sign-ins, and stop email from working properly.
Windows 11 turns this setting on by default, but you can switch it on or off at any time in the Date & time settings. This guide covers the Settings app method, the manual Sync now option, and the Registry Editor method for when Settings is not enough. It also explains what to check if the clock keeps drifting.
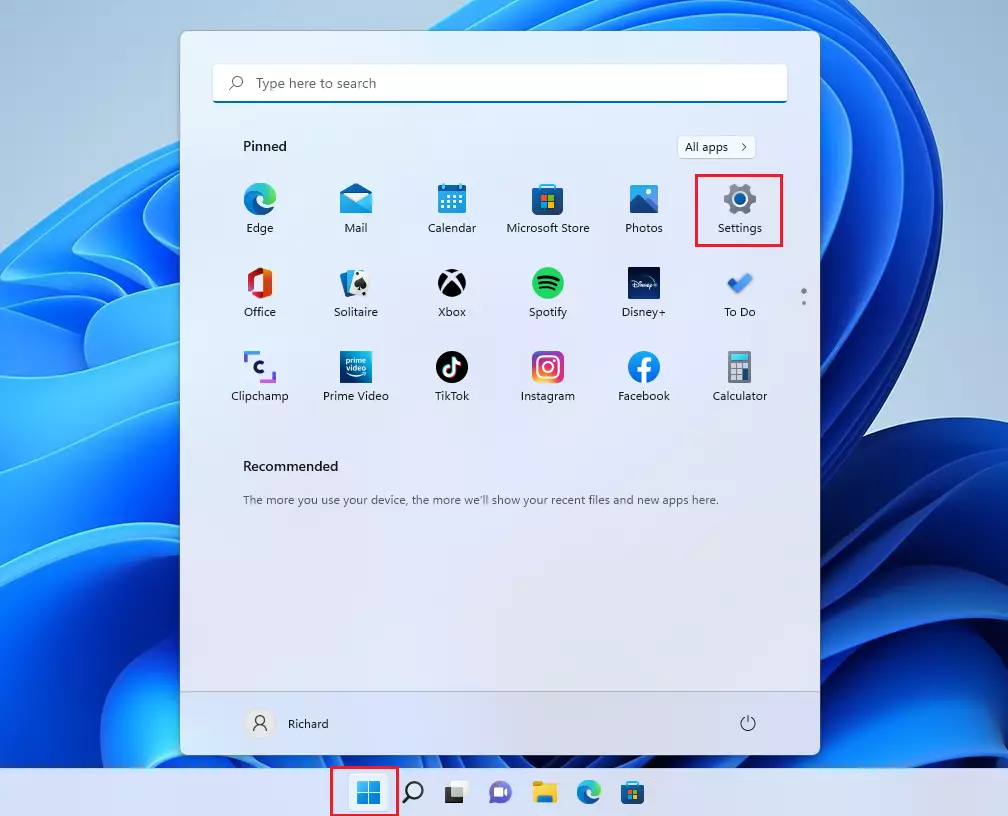
Open Windows Settings by pressing Win+I. Navigate to Time & language Date & time. Toggle ‘Set time automatically’ to On or Off to manage automatic time synchronization.
Why use this feature?
The ‘Set time automatically’ feature lets your computer sync its clock with an official Microsoft Time Server. It relies on the Windows Time Service (a background program that synchronises your system clock with external time servers). That service keeps your computer clock matched to official time sources worldwide.
When the toggle is on, Windows checks in with the time server regularly and corrects any drift without you doing anything. When it is off, the clock runs on its own and slowly drifts until you change it by hand.
What happens when done?
The “Set time automatically” feature in Windows 11 allows your computer to adjust its own time. It works alongside the time zone and daylight saving time (DST) settings, so the clock also follows those changes. Correct time prevents problems with expired web certificates and wrong file creation dates.
Turn it off only if you have a reason, such as testing software that depends on a specific date, or working on a network that has no access to time servers. In most other cases, leave it on.
How to turn ‘Set time automatically’ on or off
You change this setting in the Windows Settings app. The steps are the same on Windows 11 Home and Pro.
- Press Win+I on your keyboard.
- Check that the Settings window opens, with the list of categories on the left.
You can also right-click the Start button and choose Settings if the shortcut does not work.
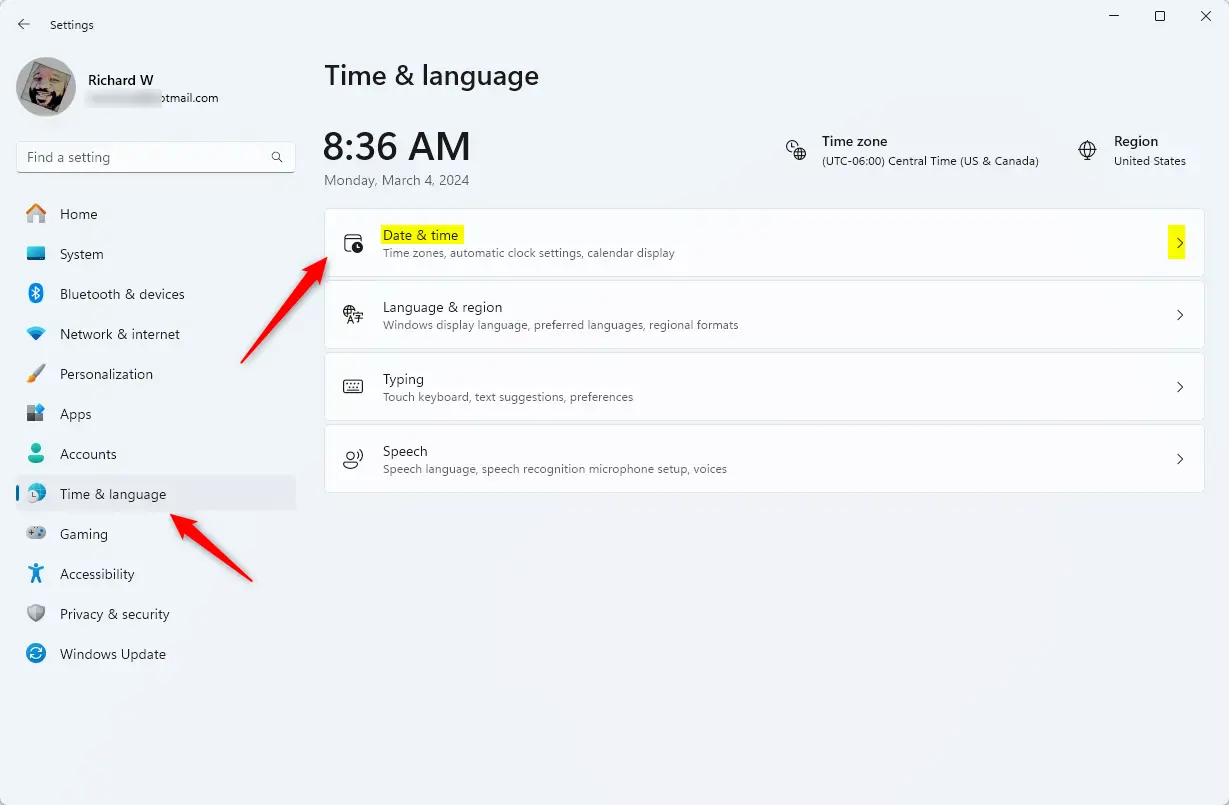
- Click Time & language in the left-hand list.
- Select Date & time on the right.
You should now see the current time, the time zone options, and the ‘Set time automatically’ toggle near the top of the page. The path is Settings Time & language Date & time
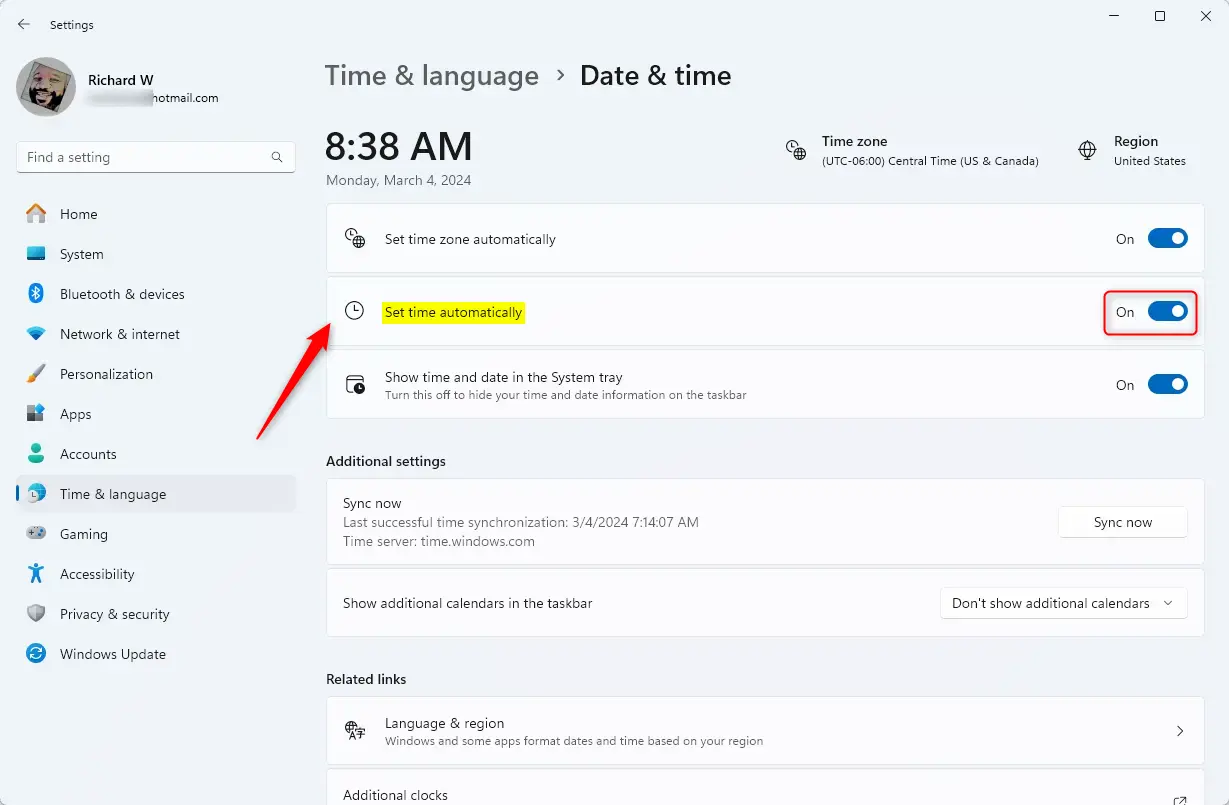
- Find the ‘Set time automatically’ toggle.
- Click it to turn it On or Off.
When the toggle is on, Windows takes over the clock and the manual date and time option is greyed out. When you turn it off, a Change button appears next to the manual date and time option, and you can set the clock yourself. To undo the change, click the toggle again. You do not need to restart your computer.
If the toggle is greyed out and you cannot click it, see the last question at the end of this guide.
Troubleshooting Time Synchronization
If your clock is wrong, you can force a sync instead of waiting for the next automatic one. Your computer needs an internet connection for this to work.
- Open Settings Time & language Date & time
- In the Date & time menu, scroll down to ‘Additional settings’.
- Click the Sync now button.
Windows pulls the latest time from the internet, and the clock at the top of the page should correct itself within a few seconds. If the time is still wrong, check your time zone setting next, because a wrong zone looks just like a wrong clock.
Advanced Registry Configuration
You can configure the set time automatically Windows 11 settings through the Registry Editor when the Settings app does not work. Open Registry Editor with administrator privileges and go to Computer\🗝️HKEY_LOCAL_MACHINE\
Editing the registry can cause system problems if you change the wrong value. Back up the key first: right-click it in Registry Editor, choose Export, and save the file somewhere safe. Double-clicking that file later restores the old values.
- Click Start and search for Registry Editor.
- Right-click it and choose Run as administrator. Click Yes if User Account Control asks for permission.
- Navigate to the following path:
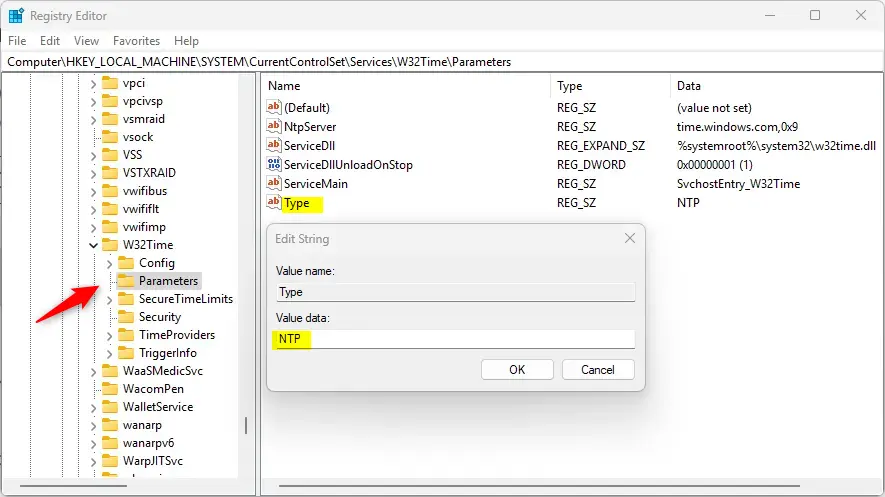
When you select the Parameters key, the right-hand pane lists its values. The ‘Type’ registry entry controls automatic time syncing in Windows.
- Double-click the Type entry.
- In the Value data box, enter ‘NTP’ to enable automatic syncing, or ‘NoSync’ to disable it.
- Click OK.
- Restart your computer. The registry changes do not take effect until you do.
To undo the change, set the value back to what it was before (usually NTP on a home PC) and restart again. If your PC is joined to a work or school domain, the Type value may be set to something else, such as NT5DS. In that case, leave it alone and ask your administrator, because the domain controller manages the time there.
Summary
Your Windows 11 clock usually shows the wrong time when the background service that manages time updates stops running, or when your network blocks the Network Time Protocol (a networking protocol for clock synchronisation). An accurate clock prevents issues with secure websites and apps. You can fix most clock drift by restarting the time service or checking your internet connection.
The questions below cover the two problems I see most often.
Why is my Windows 11 clock showing the wrong time?
Your clock may be wrong if the Windows Time Service is stopped or if your internet connection is blocking the NTP server. Check your time zone settings first. Then click the Sync now button in the Date & time settings menu to force an update from the server.
If Sync now reports an error, check that the PC is online and that a VPN or firewall is not blocking time traffic. Also check that the Windows Time service is running in the Services app, and start it if it is stopped.
What should I do if the 'Set time automatically' toggle is greyed out?
If the toggle is greyed out, your computer might be managed by an organization or a group policy. You may need to contact your system administrator. Alternatively, make sure you are signed in with an account that has administrative rights, because changing system-wide time settings needs them.
On a work or school PC, a greyed-out toggle is usually intentional, so do not try to work around it with the registry. Ask your IT team to change the policy instead.
Have a question about this guide?
Answered by AI from this guide. Good questions may be added to this page — please don't include personal details.
Did this guide fix your problem?

About the Author
Richard
Tech Writer, IT Professional
Richard is a writer at Geek Rewind who turns complex IT tasks into clear, step-by-step guides. He draws on years of hands-on experience in system administration and enterprise IT operations, focusing on Windows, Linux and WordPress: the problems people actually run into, and the fixes that work. His server and WordPress guides come from systems he runs himself. Richard builds and maintains the platform behind Geek Rewind, from its Ubuntu servers and Nginx configuration to its custom WordPress plugins. Many new tutorials start with readers' questions, and he's always glad to answer them in the comments.
[…] local shops, give you directions, and provide accurate weather updates. It also helps features like auto-setting the time zone and finding my device work the way they […]