How to Change Internet Time Server in Windows 11


Internet time sync in Windows 11 lets your computer clock match an official time source using NTP (Network Time Protocol, a system that keeps clocks accurate over a network) through UDP port 123. Hardware problems, a weak CMOS battery or a slow, overloaded server often make PC clocks fall behind or run fast.
Switching to a reliable public time server fixes sync errors so your clock stays accurate to the second. By default, Windows 11 syncs with time.windows.com. That server works for most people, but it can time out on some networks. If you see sync errors, a different server is the first thing to try.
Open Control Panel Clock and Region Set the time and date > Internet Time tab > Change settings. Select a server from the drop-down list or type a custom NTP server address, click Update now, then click OK. The change takes effect immediately without restarting.
Prerequisites
Without an administrator account, Windows blocks any attempt to change time server configurations. If you are signed in with a standard account, Windows will ask for administrator credentials at the prompt. If you don’t have them, ask whoever manages the PC.
Also check that your firewall or router allows outbound UDP port 123. If it is blocked, no server will work, however you configure it. Computers joined to a work or school domain usually take their time from the domain controller, so the Internet Time settings may be unavailable or ignored there.
Change the Time Server via Control Panel
You can change the internet time server in the classic Control Panel if your Windows clock keeps drifting out of sync. This built-in dialog lets you pick a server from a drop-down list or type in a custom address manually. It works the same way on Windows 11 Home and Pro, and no restart is needed.
- Open the Control Panel . The Control Panel window opens, showing categories or icons.
- Navigate to Clock and Region. If your Control Panel shows icons instead of categories, switch View by to Category first.
- Click on Set the time and date. The Date and Time dialog opens.

- Click the Internet Time tab. It shows which server the PC uses now and when it last synchronized.
- Click the Change settings button (Requires Admin). Approve the User Account Control prompt if one appears. The Internet Time Settings window opens. If Change settings is greyed out, you are not signed in as an administrator, or the PC is managed by a domain or policy.

- Make sure Synchronize with an Internet time server is ticked. Select a server from the list or type a new one, then click Update now. A successful sync shows a message with the time and date of the last sync. Click OK to save the setting. If you get a timeout error, try a different server from the list and click Update now again.
To go back to the default, reopen the same window and choose time.windows.com again.

Force Time Sync via Command Line
Forcing an instant sync through the command line fixes persistent time drift immediately. The built-in w32tm.exe tool handles this synchronization. It is handy when the clock is visibly wrong and you don't want to wait for the next scheduled sync. It uses whichever server is currently configured, so change the server first if you want to use a new one.
- Press the Windows key, type cmd, right-click it, and select Run as administrator. Click Yes on the User Account Control prompt. A Command Prompt window opens, and its title bar says Administrator.
- Type the following command and press Enter:
w32tm /resyncAfter a moment, the command reports that it sent the resync command and completed successfully. If you get an error saying the Windows Time service is not running, start the Windows Time service in Services and run the command again.
Advanced Configuration via Registry Editor
You can add custom time servers to the drop-down list in Windows 11 by editing the Registry Editor. This advanced method lets you use any specific NTP server address when the standard Control Panel list does not have the option you need. It works on both Home and Pro.
Before you start, open Registry Editor and choose File Export to save a backup. To undo a mistake later, double-click the backup file and confirm the merge.
- Open Registry Editor (Requires Admin). Press the Windows key, type regedit, press Enter, and click Yes on the User Account Control prompt.
- Navigate to:
HKEY_LOCAL_MACHINE\SOFTWARE\Microsoft\Windows\CurrentVersion\DateTime\ServersThis is the key that holds the list of servers shown in the Control Panel drop-down. The right pane shows the existing entries. - Right-click in the right pane to create a new String Value, name it with a number, and enter your server address. Pick the next unused number after the existing entries. The new value appears in the right pane with your server address as its data.
- Navigate to:
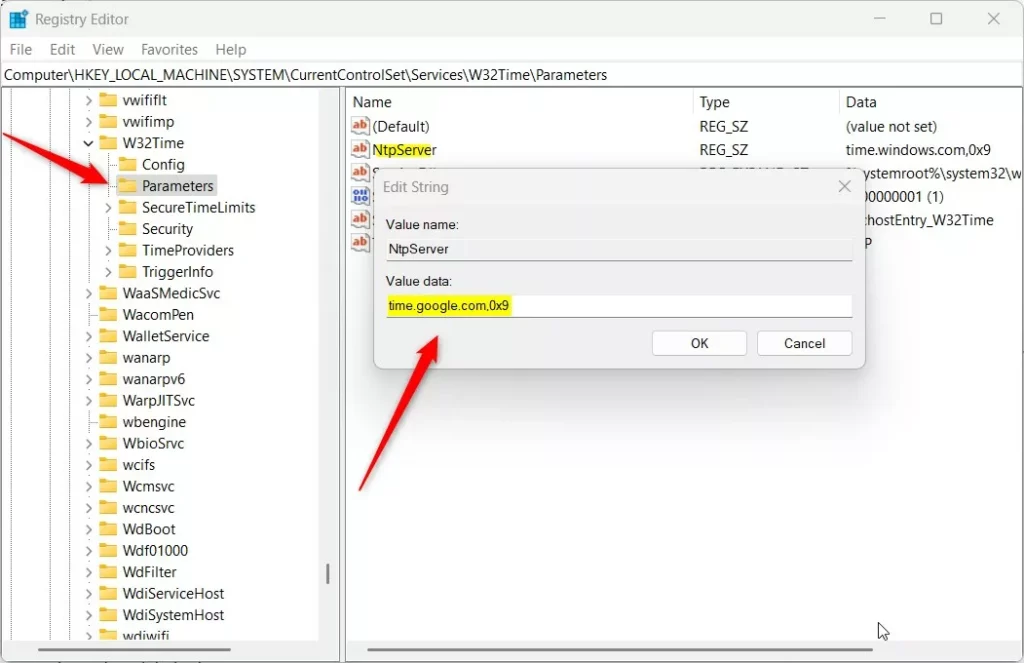
HKEY_LOCAL_MACHINE\SYSTEM\CurrentControlSet\Services\w32time\ParametersThis key holds the server the Windows Time service actually uses. - Modify the NtpServer value to your server name followed by
,0x9. To do this, double-click NtpServer, replace the text in Value data, and click OK.
The Windows Time service reads this value when it starts, so restart the Windows Time service in Services, or restart the PC. Then open the Internet Time tab as described in the Control Panel method. Your new server should appear in the list, and Update now should work with it.
Summary
Accurate system clocks maintain event log integrity and certificate validity. Wrong time can also break sign-ins, HTTPS sites and Kerberos authentication. Implementing these synchronization methods through Control Panel, the command line or Registry Editor resolves persistent time discrepancies. Start with the Control Panel method, force a sync with the command line to check it worked, and use the registry only when you need a server that is not in the list.
Was this guide helpful?

About the Author
Richard
Tech Writer, IT Professional
Richard is a writer at Geek Rewind who turns complex IT tasks into clear, step-by-step guides. He draws on years of hands-on experience in system administration and enterprise IT operations, focusing on Windows, Linux and WordPress: the problems people actually run into, and the fixes that work. His server and WordPress guides come from systems he runs himself. Richard builds and maintains the platform behind Geek Rewind, from its Ubuntu servers and Nginx configuration to its custom WordPress plugins. Many new tutorials start with readers' questions, and he's always glad to answer them in the comments.




No comments yet — be the first to share your thoughts!