

Preloading the New Tab page in Microsoft Edge loads background data so new tabs open instantly when you click them. This background process uses extra system resources to keep the page ready in memory, which can slow down older computers with limited RAM.
You can turn this feature on or off through the Edge settings menu or by editing the Windows Registry (a database for system and app settings). Disabling the preload setting stops Edge from running background tasks, while enabling it keeps your new tabs loading without delay.
Enable or disable the preload New Tab page feature in Edge by going to Settings Start, home, and new tabs and toggling the “Preload your new tab page” switch. This setting affects only your user account.
Option 1Control Preloading from Edge Settings (For Your Account Only)
This is the quickest way to manage New Tab page preloading. It only affects your user account and doesn’t require special permissions.
Open Microsoft Edge
Launch Microsoft Edge (look for the blue and green swirl icon).
Access the Menu
Access the “Settings and more” menu by clicking the three dots in the top-right corner of the Edge window.
Navigate to Settings
From the menu that appears, find and click “Settings.” It’s usually near the bottom.

Find the New Tab Page Settings
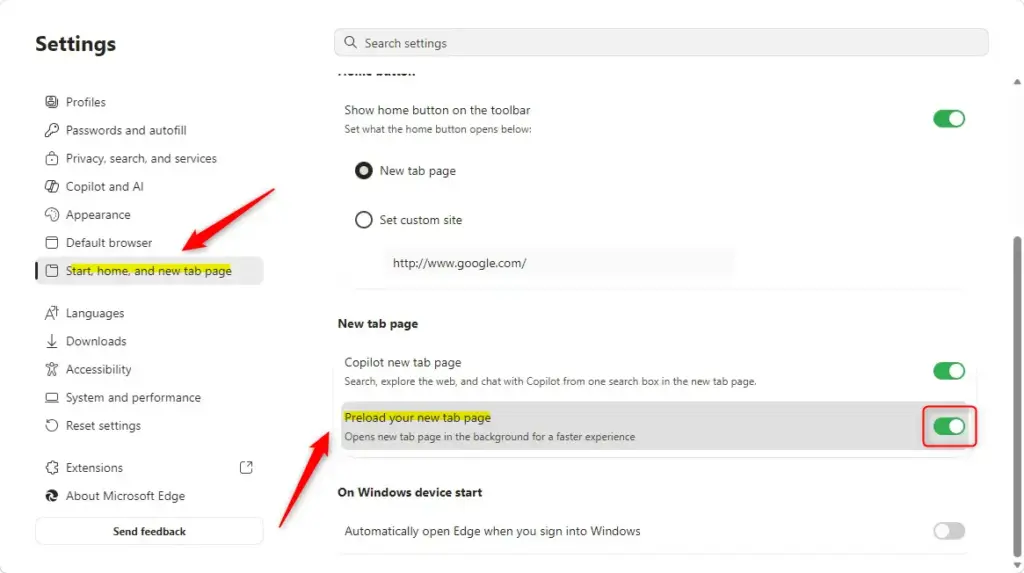
On the left side of the Settings page, click "Start, home, and new tabs."
Toggle the Preload Feature
You can turn edge preload new tab on or off by opening your browser settings and finding the New tab page section. The preload option is usually turned on by default. Flip the switch to Off if you want to stop Microsoft Edge from loading the new tab page in the background, or turn it back to On if you want faster loading times.
Close the Settings Tab
You can now close the Settings tab in Edge. The change takes effect immediately.
Option 2Manage Preloading for All Users via Registry Editor (Advanced)
You can control edge preload new tab settings for every user account on your computer by using the Registry Editor. This advanced method requires administrator access. If you are not comfortable making changes to system files, use the setting inside the browser instead or ask someone for help.
Follow these steps precisely. Back up your Registry before making significant changes.
Here's what we'll do:
- Registry Path:
HKEY_LOCAL_MACHINE\SOFTWARE\Policies\Microsoft\Edge - Key Name:
NewTabPagePrerenderEnabled - Value Type:
DWORD (32-bit) Value - Data Values:
- Set the value to
1to enable preloading for all users. - Set the value to
0to disable preloading for all users.
- Set the value to
If the key is missing or set to 0, it usually indicates the setting is enabled by default or controlled by the user's individual settings (as seen in Option One). Removing the key or setting its value to 0 allows user settings to manage it again.
How to Manually Edit the Registry
We will make these changes step-by-step using the Registry Editor.
Open the Registry Editor
Press the Windows key + R on your keyboard. This opens the "Run" dialog box. Type regedit in the box and press Enter, or click "OK."
A User Account Control (UAC) prompt might appear, asking for permission to make changes. Click "Yes."
Navigate to the Correct Registry Key
You need to open the Registry Editor and go to the path HKEY_LOCAL_MACHINE\SOFTWARE\Policies\Microsoft\Edge to set up edge preload new tab policies for everyone. You can click through the folders on the left side of the window or paste this exact path into the address bar at the top and press Enter.
You can click through the folders on the left. Alternatively, click the address bar at the top, paste the complete path, and press Enter.
If the Edge key is missing under Microsoft, you will need to create it.
To create the key if it's missing: Right-click the Microsoft folder, select New, then Key. Name the new key exactly Edge and press Enter.
Create or Modify the Value
You must create a new DWORD value named NewTabPagePrerenderEnabled and set its data to 1 to enable edge preload new tab for all users. Right-click in the empty space on the right side of the Registry Editor, choose New, select DWORD (32-bit) Value, type the exact name, and set the value data.
To Enable Preloading (Set Value to 1):
- Right-click in the empty space on the right side.
- Select New, then click DWORD (32-bit) Value.
- Name the new value exactly
NewTabPagePrerenderEnabledand press Enter. - Double-click the new
NewTabPagePrerenderEnabledvalue. - In the "Value data" box, type
1. Make sure "Base" is set to "Hexadecimal." - Click "OK."
To Disable Preloading (Set Value to 0):
- Follow the steps above to create or select the
NewTabPagePrerenderEnabledvalue. - Double-click on it.
- In the "Value data" box, type
0. Make sure "Base" is set to "Hexadecimal." - Click "OK."
To Reset to Default (Allow User Control):
If you wish to allow individual users to control this setting through Edge's options (as described in Option One), you can either delete the NewTabPagePrerenderEnabled value or change its Value data to 0. Deleting it is the cleaner approach for a complete revert. To delete, right-click on NewTabPagePrerenderEnabled in the right pane and select "Delete." Confirm when prompted.
Close the Registry Editor
You can now close the Registry Editor window.
Apply the Changes
You must restart MicrosoftEdge for edge preload new tab registry changes to take effect across your computer. Close all open browser windows completely and open the application again. This applies the new policy without needing to restart your whole computer, though a full system reboot is occasionally necessary.
However, restarting the application is usually sufficient for Edge.
Summary
You can control edge preload new tab behavior using two main methods depending on your needs. Adjust the toggle switch directly inside your browser settings for your personal use, or use the Registry Editor with extreme care if you want to apply the rule to every user account on your computer.
Was this guide helpful?

About the Author
Richard
Tech Writer, IT Professional
Richard is a writer at Geek Rewind who turns complex IT tasks into clear, step-by-step guides. He draws on years of hands-on experience in system administration and enterprise IT operations, focusing on Windows, Linux and WordPress: the problems people actually run into, and the fixes that work. His server and WordPress guides come from systems he runs himself. Richard builds and maintains the platform behind Geek Rewind, from its Ubuntu servers and Nginx configuration to its custom WordPress plugins. Many new tutorials start with readers' questions, and he's always glad to answer them in the comments.



No comments yet — be the first to share your thoughts!