How to Make VHD/VHDX Mount Automatically in Windows 11?

Windows 11 does not remember mounted VHD and VHDX files (virtual hard disk files that show up as extra drives). After a restart they are disconnected, and you have to attach them by hand. This applies to files you use as extra storage as well as files that hold virtual machines.
The fix is a small scheduled task. Task Scheduler (the built-in tool that runs programs automatically on a trigger) runs a short PowerShell command each time Windows starts. The command attaches your virtual disk, so it is ready before you open File Explorer .
Open Task Scheduler (taskschd.msc), click Create Task, and set a trigger to run At startup with Run with highest privileges selected. Add a Start a program action that runs PowerShell with a Mount-DiskImage command pointing to your VHD or VHDX file. Windows then attaches the disk on every boot, before you open File Explorer .
Set Up Your Automatic VHD Connection Task
You need an administrator account, because attaching a virtual disk requires elevated rights. Have the full path to your VHD or VHDX file ready before you start. The whole setup takes about five minutes.
Step 1Open Task Scheduler
- Press Win+R to open the Run dialog.
- Type taskschd.msc and press Enter.
The Task Scheduler window opens. You will see a tree on the left, a list of tasks in the middle and an Actions pane on the right. If a User Account Control prompt appears, approve it.
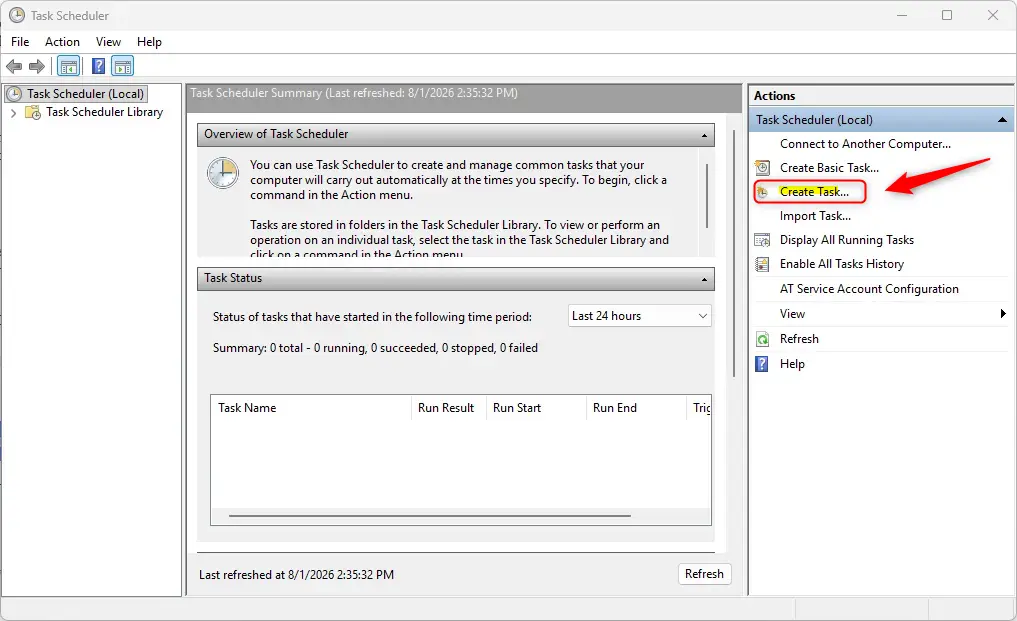
Step 2Create a New Task
- In the left pane, click Task Scheduler Library.
- In the right pane, under Actions, click Create Task….
A Create Task window opens with several tabs: General, Triggers, Actions, Conditions, Settings and so on. Choose Create Task…, not Create Basic Task…. The basic wizard does not offer the options we need, such as running with highest privileges.
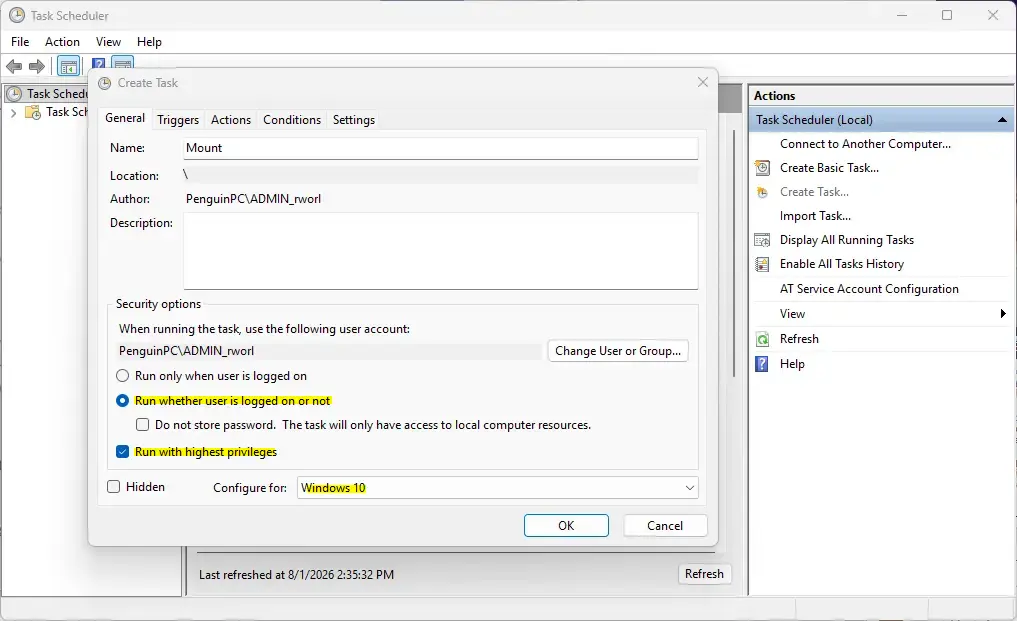
Step 3Name Your Task
A clear name makes the task easy to find later, when you want to change or remove it.
- On the General tab, click the Name box and type a distinct title, for example "Mount My VHD at Startup".
- Click the Description box and type the full path of the VHD or VHDX file this task connects. This is optional, but it helps a lot if you end up with several tasks for several virtual disks. For example, you could type:
D:\MyVirtualDisks\ImportantData.vhdx
Step 4Set Up Automatic Running
The task has to run in the background, with administrator rights, even when nobody is signed in. Both settings below are on the same General tab.
- Under Security options, select Run whether user is logged on or not.
- Select the Run with highest privileges check box.
- Open the Configure for dropdown and select Windows 10. This choice is often more compatible with system tasks like this one, and it works fine on Windows 11.
- Run whether user is logged on or not: The task runs even when you are not signed in. The task will also run without showing a window.
- Run with highest privileges: Attaching a virtual disk needs administrator permission, and this box gives the task those rights. Without it, the task usually starts but the disk never mounts.
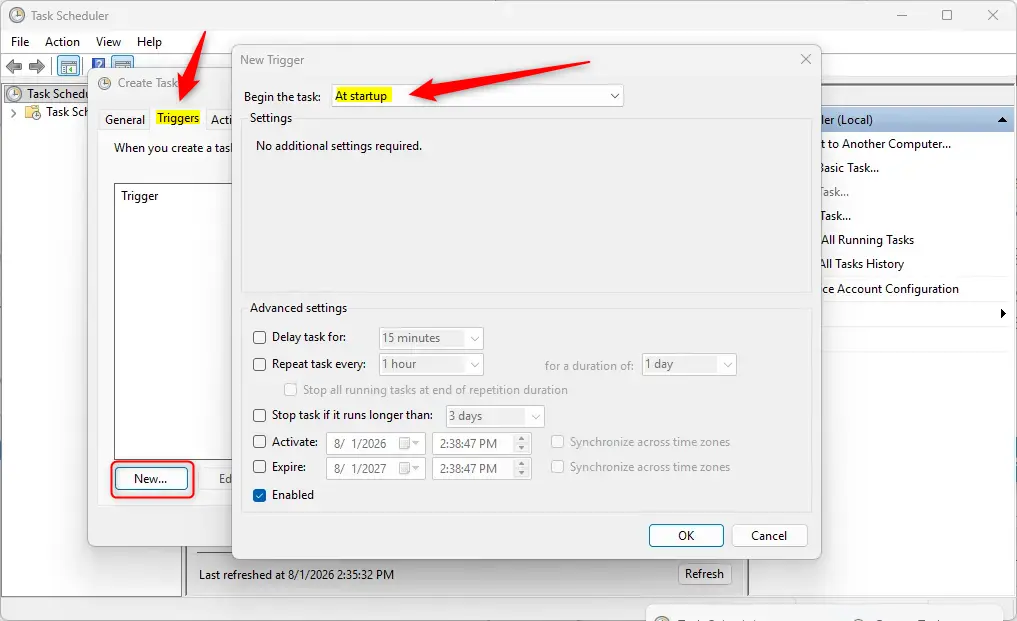
Step 5Choose When the Task Runs (Trigger)
The trigger decides when the task runs. We want it to run every time the computer boots.
- Click the Triggers tab, then click New....
- In the Begin the task dropdown, select At startup.
If you would rather attach the disk only when you sign in, choose At log on instead. For a disk that other programs or services need, At startup is the better choice.
Optional delay: At startup, Windows is still loading services and drivers. If the task sometimes fails on a slow machine, give the system a moment first.
- In the Advanced settings section of the same window, select the Delay task for check box.
- Choose a short time, such as 30 seconds or 1 minute.
Make sure the Enabled check box at the bottom is selected, then click OK. The trigger now appears in the list on the Triggers tab.
Step 6Choose What the Task Does (Action)
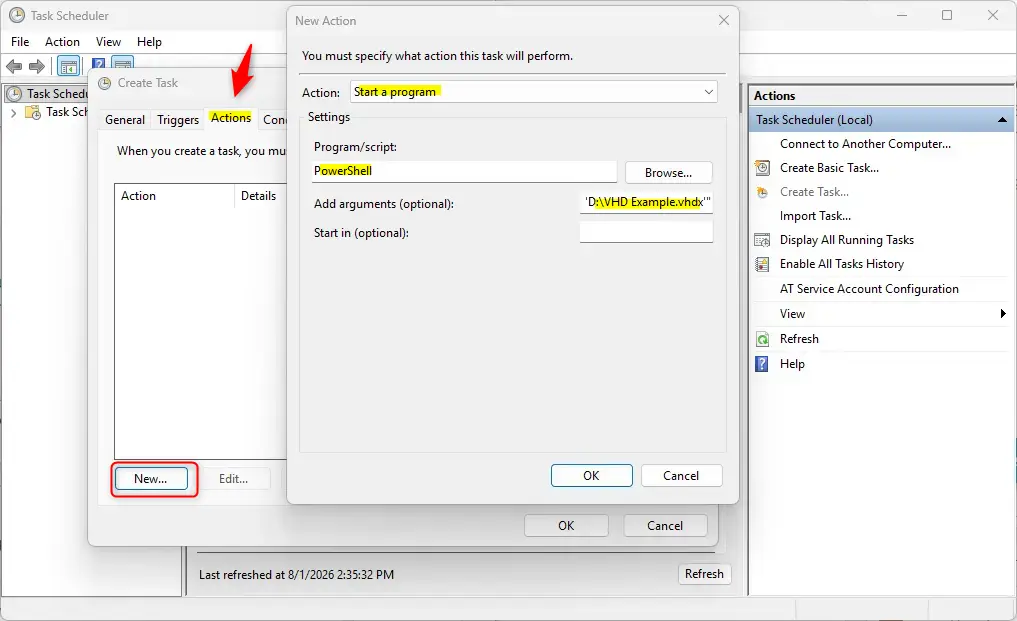
The action is the command that actually attaches the disk. It runs through Windows PowerShell.
- Click the Actions tab, then click New....
- Leave Action set to Start a program.
- In the Program/script box, type
PowerShell. - In the Add arguments (optional) box, type the command that connects your virtual disk. The command is shown below.
Mount-DiskImage -ImagePath 'Your\Full\Path\To\Your.vhdx'Very important: You must replace 'Your\Full\Path\To\Your.vhdx' with the full path of the VHD or VHDX file you want to connect. Keep the single quotes around the path. For example, if your file is at E:\Virtual Machines\MyData.vhdx, your command would look like this:
Mount-DiskImage -ImagePath 'E:\Virtual Machines\MyData.vhdx'When the command is correct, click OK. The action now appears in the list on the Actions tab.
A typo here is the most common reason the task does not work. Open File Explorer and confirm the file really is at that location. If the path contains spaces, the single quotes are what keep it in one piece.
Step 7Check Settings and Finish
By default, Task Scheduler skips tasks when a laptop is on battery. That would stop your disk from mounting whenever you boot unplugged.
- Click the Conditions tab.
- Under Power, clear the Start the task only if the computer is on AC power check box.
- Also clear Stop if the computer switches to battery power if it is selected. Otherwise the task could be cut short when you unplug.
- Click OK to save the task.
On a desktop PC these options have no effect, but it does no harm to clear them.
Step 8Enter Your Password
Because you chose Run whether user is logged on or not, Windows needs to confirm who the task runs as. A credentials prompt appears.
- Type the password for your current Windows account.
- Click OK.
Use the account password, not a PIN or a fingerprint. If your account has no password at all, Windows will refuse to save a task set to run when you are not logged on. In that case, set a password for the account first.
Step 9Check Your New Task
Before you restart, check that the task was saved and that it works.
- In the main Task Scheduler window, click Task Scheduler Library and find your task by name.
- Right-click the task and choose Run.
- Open File Explorer and look for the new drive under This PC.
If the drive appears, the command is right. If it does not, look at the Last Run Result column for the task. A value of 0x0 means the task ran successfully. Any other value usually points to a wrong path or missing administrator rights. Fix it, then run the task again.
Once the manual run works, restart your PC. After Windows starts, and after any delay you set, your virtual drive should be connected and ready to use in File Explorer.
Manage Your Automatic Task
You do not need to recreate the task to change how it behaves. Open Task Scheduler, click Task Scheduler Library and right-click your task. A menu opens with the options below.
- Enable/Disable: To stop the VHD from connecting automatically, choose Disable. To turn it back on, choose Enable. Disabling is the easiest way to undo the setup without losing it.
- Edit: To change the VHD file path or other settings, choose Properties. This opens the same window where you set the task up. Windows may ask for your password again when you save.
- Delete: If you no longer need automatic connection, choose Delete. This removes the task completely. It does not delete the VHD file itself.
If you move the VHD or VHDX file to a new folder or drive, open Properties and update the path on the Actions tab. Otherwise the task will fail at the next startup.
Summary
Using Task Scheduler to mount a VHD or VHDX automatically saves you from connecting your virtual disks by hand after every restart. In this guide you created a startup task that runs with administrator rights and uses PowerShell to attach the disk in the background. You also tested it and learned how to disable, edit or delete it. Your virtual drives will now be ready as soon as your computer starts.
Have a question about this guide?
Answered by AI from this guide. Good questions may be added to this page — please don't include personal details.
Did this guide fix your problem?

About the Author
Richard
Tech Writer, IT Professional
Richard is a writer at Geek Rewind who turns complex IT tasks into clear, step-by-step guides. He draws on years of hands-on experience in system administration and enterprise IT operations, focusing on Windows, Linux and WordPress: the problems people actually run into, and the fixes that work. His server and WordPress guides come from systems he runs himself. Richard builds and maintains the platform behind Geek Rewind, from its Ubuntu servers and Nginx configuration to its custom WordPress plugins. Many new tutorials start with readers' questions, and he's always glad to answer them in the comments.
No comments yet — be the first to share your thoughts!