Stop Your Wi-Fi Adapter from Saving Power In Windows 11

Wi-Fi drops or reconnects slowly in Windows 11 often happens because the Wi-Fi adapter turns down its own power while the PC sits idle. You can stop this in two places: clear the power management checkbox for the adapter in Device Manager, and set the Wireless Adapter Settings power plan option to Maximum Performance. Both changes take a couple of minutes.
The second change is the one most guides skip. Windows can cut power to the adapter to save battery or to use less power when the PC is idle. On some drivers, that cut is what makes the connection fail. Turning power saving off uses a little more battery on a laptop. On a desktop, the difference is hardly noticeable.
To stop your Wi-Fi adapter from saving power in Windows 11, open Device Manager, right-click your Wi-Fi adapter under Network adapters, select Properties, and on the Power Management tab clear “Allow the computer to turn off this device to save power”. Then set Wireless Adapter Settings to Maximum Performance in your power plan.
Check that power saving is the cause
Power saving is a likely cause if the connection drops when the PC has been idle, when the laptop is on battery, or after the screen turns off. It is also likely if the Wi-Fi icon in the taskbar still shows a connection but pages stop loading until you click it or move the mouse.
Power saving is an unlikely cause if the connection drops while you are using the PC. It is also unlikely if other devices on the same network drop at the same time. In that case, the problem is probably your router or signal strength, and the steps below will not change it., or if other devices on the same network drop at the same time. In that case the problem is probably your router or the signal strength, and the steps below will not change it.
Turn off power saving for the Wi-Fi adapter in Device Manager
This is the main fix. It stops Windows from switching the adapter off to save power. This step requires administrator privileges. If you are signed in with a standard account, Windows asks for an administrator password when you apply the change.
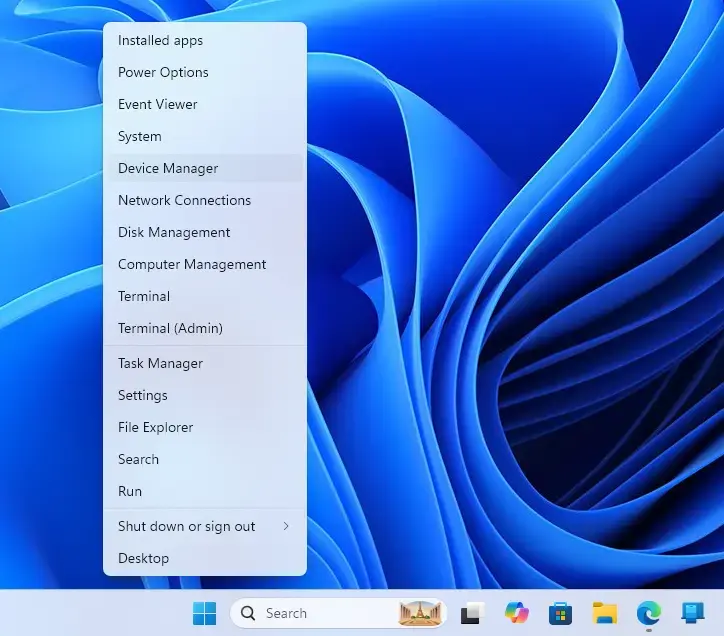
- Right-click the Start button.
- Select Device Manager. A window opens with a list of hardware categories.
- Double-click Network adapters to expand the category. You now see every network adapter in the PC.
- Find your Wi-Fi adapter. Its name usually contains “Wi-Fi”, “Wireless”, “WLAN” or “802.11”, for example “Intel(R) Wi-Fi 6 AX201 160MHz” or “Realtek RTL8822CE 802.11ac PCIe Adapter”. Ignore entries labelled “Bluetooth ”, “Ethernet”, “Virtual” or “WAN Miniport”.
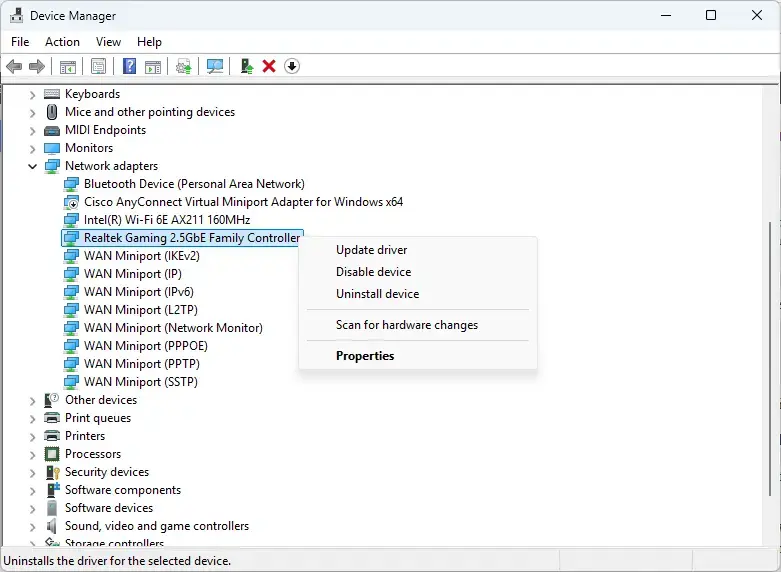
- Right-click the Wi-Fi adapter and select Properties. The adapter’s Properties window opens.
- Select the Power Management tab.
- Clear the Allow the computer to turn off this device to save power checkbox.
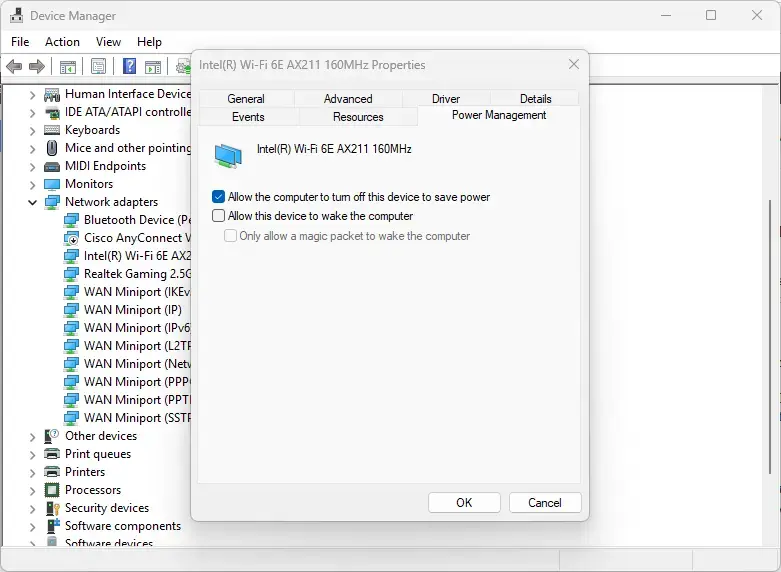
- Select OK. The window closes and the setting applies immediately.
If the Power Management tab is missing
Some adapter drivers do not show a Power Management tab. This usually means the driver does not expose the option, or Windows is using a generic driver instead of the one from your PC or adapter manufacturer. Install the latest Wi-Fi driver (the software that lets Windows control the adapter) from the PC maker’s support page or the adapter maker’s site, then check the tab again. If it is still missing, use the power plan method in the next section, which works regardless of the driver.
If the checkbox is greyed out
A greyed-out checkbox usually means you opened Properties without administrator rights, or a work or school policy controls the setting. Close the window, then open Device Manager from an administrator account. If the PC is managed by an organization, the setting may be locked, and you need to ask your IT department.
Keep the adapter from waking the PC (optional)
The same tab may show Allow this device to wake the computer and Only allow a magic packet (a special network signal that wakes the PC) to wake the computer. These control whether network activity can wake the PC from sleep. They do not control Wi-Fi power saving, so leave them as they are unless your PC is waking up when you don't want it to.
Set the power plan to Maximum Performance for the wireless adapter
Windows has a second, separate power saving setting for wireless adapters. It lives inside the power plan, and it can reduce adapter power even when the Device Manager checkbox is clear. This step does not need an administrator account on most PCs, though a work-managed PC may block it.
- Select Start, type Control Panel, and open it from the results.
- Go to Control Panel Hardware and Sound Power Options The power plans on your PC appear here, with one already selected.
- Select Change plan settings next to the plan that is currently selected. Change the plan you are actually using, because each plan keeps its own settings.
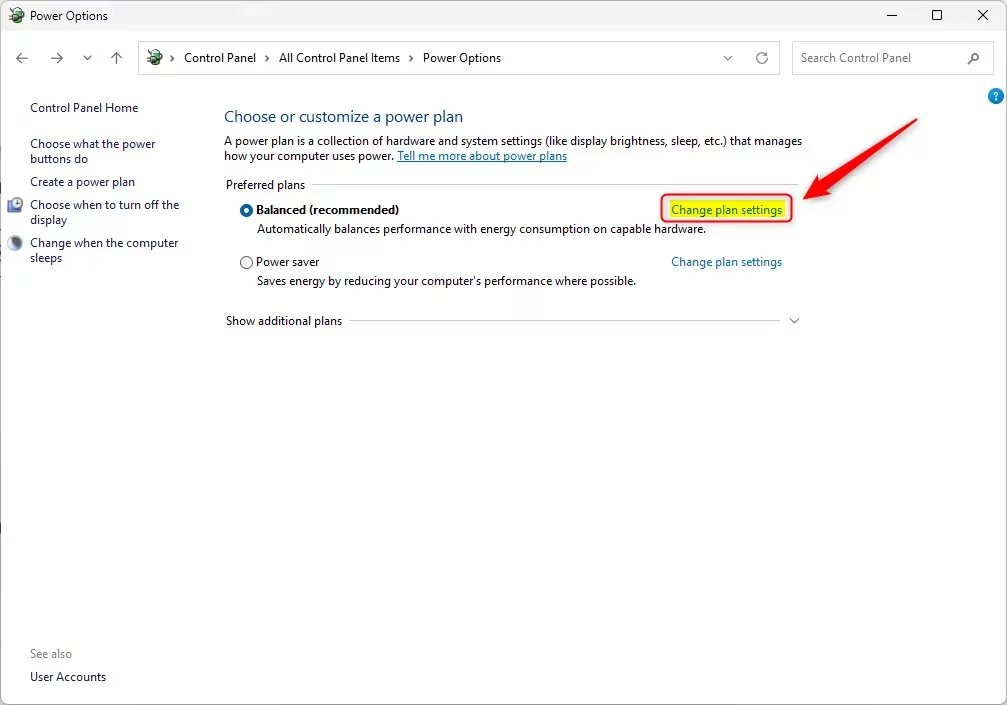
- Select Change advanced power settings. A small Power Options window opens with a list of settings you can expand.
- Double-click Wireless Adapter Settings to expand it, then expand Power Saving Mode.
- Set the value to Maximum Performance. On a laptop you see two lines, On battery and Plugged in. Change both if you want the setting to hold in both situations. On a desktop you see a single line labelled Setting.
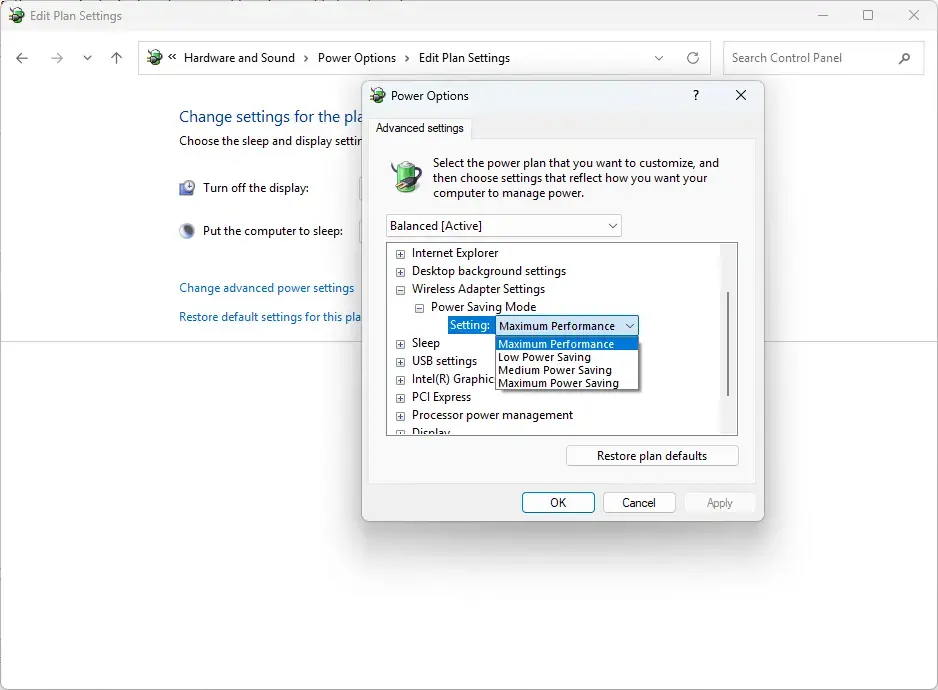
- Select Apply, then OK. The window closes and the new value takes effect.
The other choices in the list are Low Power Saving, Medium Power Saving and Maximum Power Saving. Maximum Performance is the one that keeps the adapter at full power.
If Wireless Adapter Settings is missing
The Wireless Adapter Settings group only appears when the PC has a wireless adapter and the driver supports the option. It does not appear on a desktop with no Wi-Fi adapter, and some drivers or PCs hide it. If you have a Wi-Fi adapter and the group is missing, update the adapter driver and open the advanced power settings again. If it is still missing, rely on the Device Manager checkbox and the driver's own options, covered below.
If you use more than one power plan
If you switch plans, for example to a manufacturer plan or a battery saver plan, the Wireless Adapter Settings value in that plan applies instead. Repeat the steps for each plan you use.
Set the 🪟 Windows 11 power mode to Best performance
Windows 11 also has a Power mode setting in Settings. It does not control the Wi-Fi adapter directly, but it affects how aggressively Windows saves power overall. Changing it is optional, and it costs more battery life than the two fixes above, so try the earlier steps first.
- Open Settings by pressing Windows + I.

Windows 11 Start menu with Settings gear icon highlighted. - Go to Settings System Power & battery The Power page opens.
- Find Power mode. On a laptop, you may see separate lists for Plugged in and On battery.
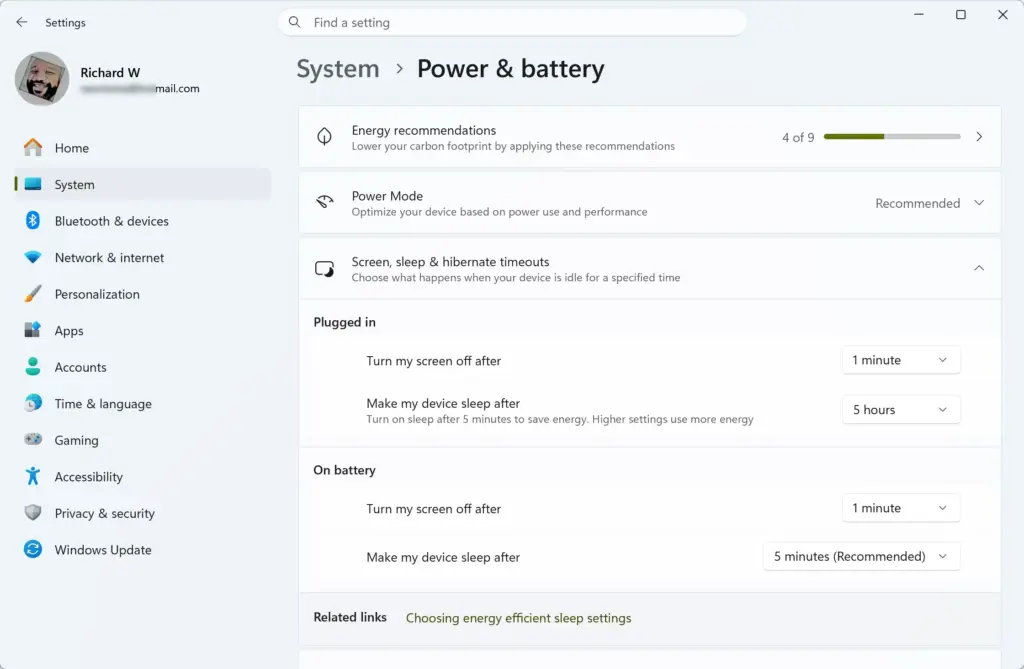
- Select Best performance from the list. The change applies immediately.
If Power mode is missing, your PC uses a power plan from the manufacturer that replaces it. In that case, adjust the plan from Control Panel as described above.
Check the driver's own power settings
Many Wi-Fi drivers carry their own power saving options in addition to the ones Windows provides. These sit on the Advanced tab of the adapter's Properties window in Device Manager. The names depend on the manufacturer and driver version. Look for entries that mention power saving or sleep.
- Open Device Manager and expand Network adapters, as in the first section.
- Right-click your Wi-Fi adapter and select Properties.
- Select the Advanced tab. A list of driver properties appears on the left, with a Value box on the right.
- Select a property whose name mentions power saving. If the PC has none, skip this section.
- Choose the option in the Value list that disables the feature, such as Disabled or Off. If the choices are numbered or named by level, pick the one that means no power saving or the highest performance.
- Select OK.
Before you change anything on this tab, write down the original value. The properties differ by driver, so a name that means one thing on one adapter may mean something else on another. Change only options that clearly describe power saving.
Handle a USB Wi-Fi adapter
If you use an external USB Wi-Fi adapter, Windows can also cut power to the USB port the adapter is plugged into. That produces the same symptoms, so two extra checks apply. The first is in Device Manager, and it requires administrator privileges.
- In Device Manager, expand Universal Serial Bus controllers.
- Right-click a USB Root Hub entry and select Properties. If you are not sure which one the adapter is on, repeat for each entry.
- Select the Power Management tab.
- Clear Allow the computer to turn off this device to save power.
- Select OK.
The second check is in the advanced power settings from the power plan section. Expand USB settings, then USB selective suspend setting, and set it to Disabled. This stops Windows from suspending individual USB ports when they are idle. Select Apply, then OK.
Confirm the change worked
You do not need to restart for the changes above to apply. To test, leave the PC idle for the length of time that normally triggers the drop, then wake it and check that you are still connected without clicking the Wi-Fi icon. For a more careful test, open a large page or start a continuous download, step away from the keyboard for a while, and see whether it stalls.
If the connection still drops after these changes, power saving is not the cause. Try updating the Wi-Fi driver, moving closer to the router, or changing the router's channel next. Updating the Wi-Fi driver, moving closer to the router, or changing the router's channel are the usual next steps. If the adapter reconnects only after sleep, that is a wake-from-sleep problem, which is separate from the idle power saving covered here.
Undo the changes
You can reverse every change here by repeating the same steps and restoring the original value.
- Device Manager: open the adapter's Properties, go to the Power Management tab, and select Allow the computer to turn off this device to save power again.
- Power plan: return to Wireless Adapter Settings Power Saving Mode and choose the earlier value. If you did not note it, Medium Power Saving or Low Power Saving are common starting points, but the default depends on the plan and the PC.
- Power mode: go back to Settings System Power & battery and choose the mode you used before.
- Driver options: restore the value you wrote down on the Advanced tab.
If this didn't work
A Windows feature update or a Wi-Fi driver reinstall can restore the default power settings, so recheck the Device Manager checkbox and Power Saving Mode afterward. If the drops continue with every setting above changed, update the Wi-Fi driver from your PC or adapter manufacturer and test again. If the connection drops only on one network, look at the router's settings rather than the PC.
How to disable power saving for Wi-Fi adapter 🪟 Windows 11?
To disable power saving for a Wi-Fi adapter in Windows 11, open Device Manager, expand Network adapters, and double-click your Wi-Fi adapter. On the Power Management tab, clear the 'Allow the computer to turn off this device to save power' checkbox and select OK. Then set Power Saving Mode under Wireless Adapter Settings to Maximum Performance.
How do you disable the power saving mode for your wireless network adapter?
Set Power Saving Mode under Wireless Adapter Settings to Maximum Performance. Open Control Panel, select Power Options, then Change advanced power settings for your active plan. Expand Wireless Adapter Settings and Power Saving Mode, and choose Maximum Performance for both On battery and Plugged in.
How do I disable power saving on my Ethernet adapter?
To disable power saving on an Ethernet adapter, open Device Manager, expand Network adapters, and double-click your Ethernet adapter. On the Power Management tab, clear the 'Allow the computer to turn off this device to save power' checkbox and select OK. The change takes effect right away, and you don't need to restart.
Why do I have to keep resetting my network adapter in 🪟 Windows 11?
Repeated resets usually mean Windows keeps turning the adapter off to save power, or the driver is outdated or faulty. First, turn off power saving for the adapter in Device Manager. If the resets continue, update the driver from Device Manager or the adapter maker's website, then restart the PC.
Did this guide fix your problem?

About the Author
Richard
Tech Writer, IT Professional
Richard is a writer at Geek Rewind who turns complex IT tasks into clear, step-by-step guides. He draws on years of hands-on experience in system administration and enterprise IT operations, focusing on Windows, Linux and WordPress: the problems people actually run into, and the fixes that work. His server and WordPress guides come from systems he runs himself. Richard builds and maintains the platform behind Geek Rewind, from its Ubuntu servers and Nginx configuration to its custom WordPress plugins. Many new tutorials start with readers' questions, and he's always glad to answer them in the comments.
No comments yet — be the first to share your thoughts!