How to Control Whether an App Can Run in the Background in Windows 11

Background apps in Windows 11 are programs that keep working when you are not looking at them. They check for email, sync data, refresh live tiles, and download updates. Too many of them drain a laptop battery, use data, and slow the system down.
You can control this per app from the Settings app. It takes about a minute for each app, and you don’t need to restart.
Open Settings Apps Installed apps, click the three dots next to an app, select Advanced options, then use the Let this app run in the background drop-down to choose Always, Power optimized, or Never. The change takes effect immediately.
How to Control Background App Permissions in 🪟 Windows 11
Windows 11 lets you decide what each app may do when you are not actively using it. Used well, this saves battery and frees up memory and processor time for the apps you are working in.
Traditional desktop programs, the ones installed with a setup file, usually do not offer a background setting. Their three-dot menu has no Advanced options entry. To stop one of those from running in the background, check its own settings or the Startup apps list.
Step 1Open Your App Settings
- Click the Start button, usually in the bottom-left or center of the taskbar .
- Select Settings. You can also press
Windows Key + Ion your keyboard to open Settings directly. The Settings window should now be open.
Windows 11 Start menu with Settings gear icon highlighted. - In Settings, click Apps in the left menu.
- Select Installed apps. You should now see a list of the programs on your PC.
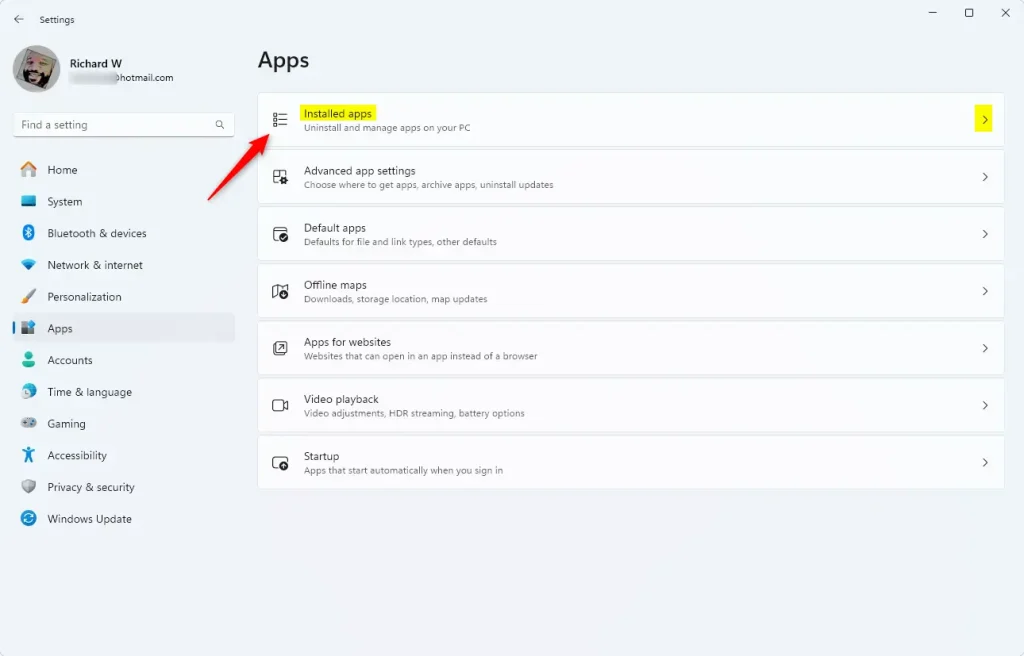
Windows 11 Settings app showing the list of installed applications.
These steps are the same on Windows 11 Home and Pro.
Step 2Find the App You Want to Control
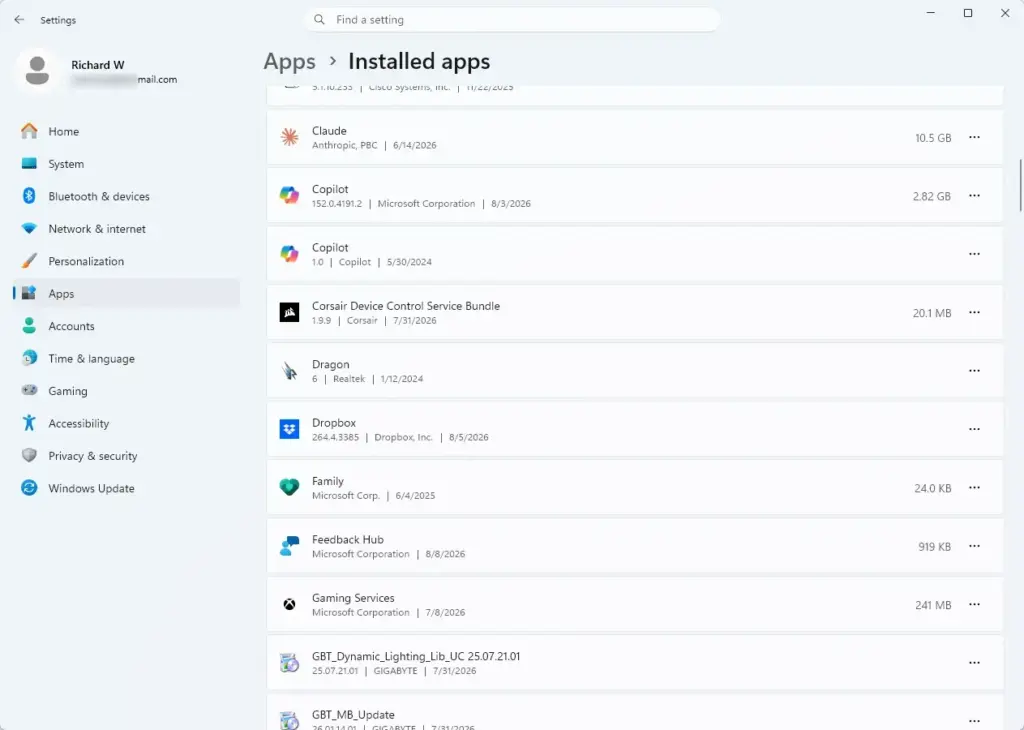
The list shows every app on your computer. Scroll through it to find the one you want to manage. You can also type the app’s name in the search box above the list to jump straight to it. The Sort by menu can help too: it lets you sort by name, size, or install date. Sorting by name is useful if you know what you are looking for. Sorting by size can show you which big apps are worth a closer look.
Step 3Access Advanced Options
- Find the app you want to change in the list.
- To the right of the app's name, click the three dots (...). This is the "More options" button. A small menu opens.
- Select Advanced options from this menu. The app's own settings page opens.
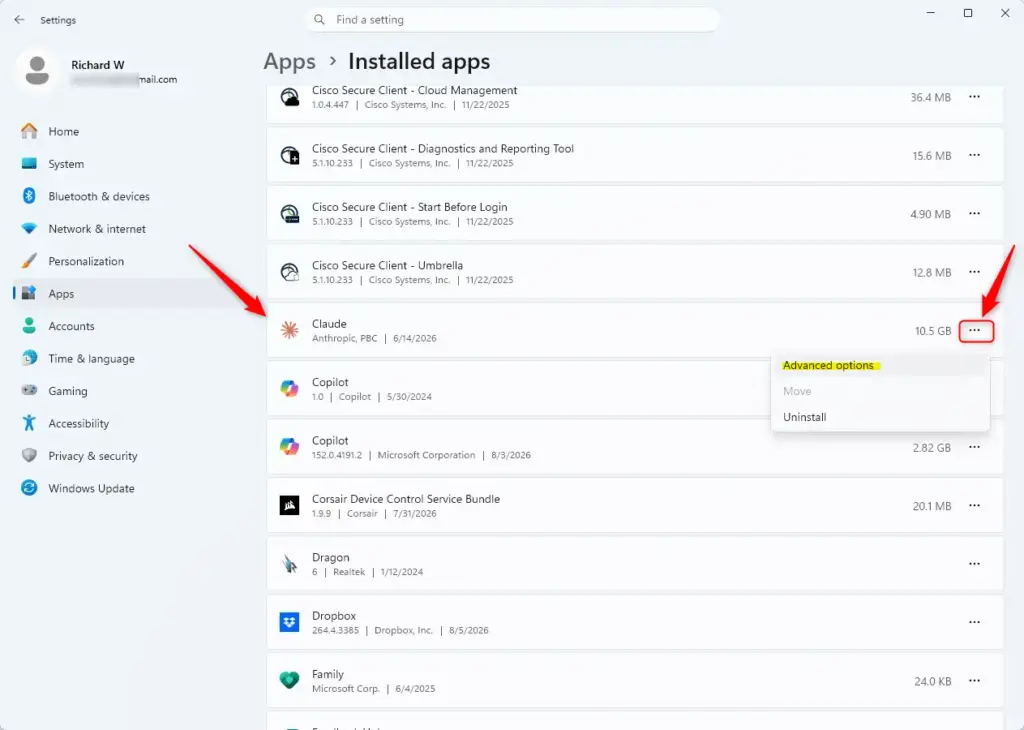
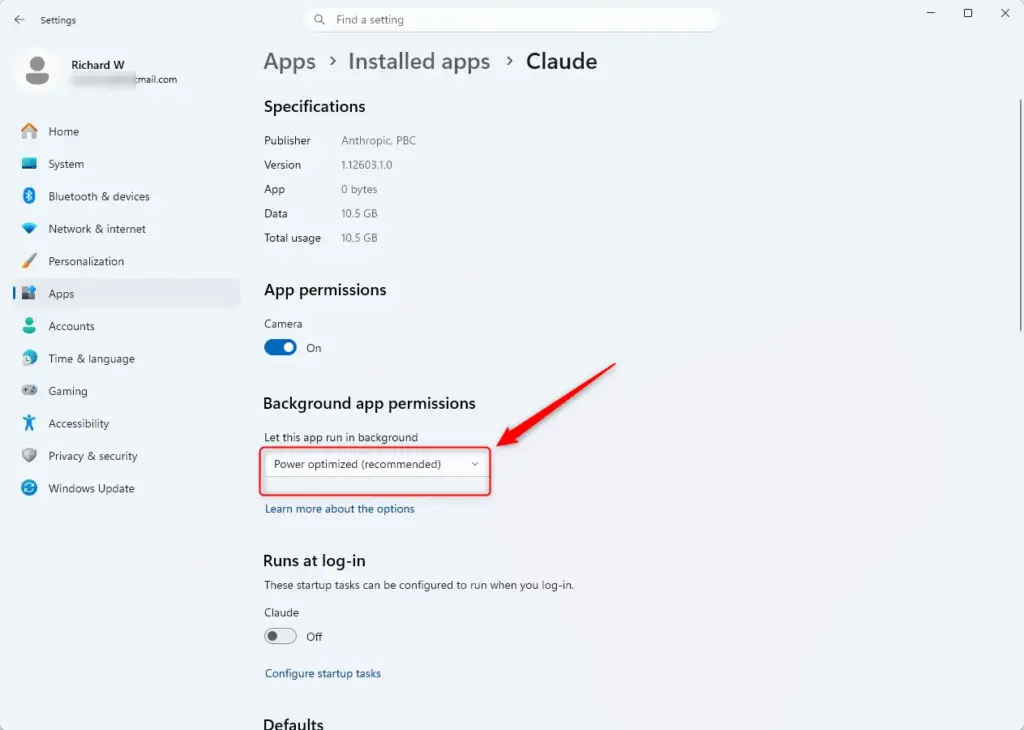
- Scroll down to the Background apps permissions section. Use the Let this app run in the background drop-down to pick a setting.
If Advanced options is missing from the menu, the app is probably a traditional desktop program. Those do not have this setting. If the background permissions section is missing or greyed out on a Store app, your PC may be managed by an organization that sets this through policy. In that case, ask your IT administrator.
Step 4Adjust Background App Permissions
Background app permissions control whether each program can run when you are not actively using it. You choose between Always, Power optimized, or Never for each app. The change takes effect right away and does not need a restart. To undo it, come back to the same page and pick a different option.
- Always: The app is always allowed to run in the background. It can fetch information and send you notifications even when you are not using it. This can use more power, so it is a poor choice for battery-hungry apps on a laptop. Save it for apps where timely alerts matter, such as a messaging app you rely on.
- Power optimized (recommended): This is the default for many apps and is usually the right choice. Windows decides when the app may run in the background, based on things like battery level and how you use the app. The app can still get important notifications and update from time to time. It keeps apps working without wasting much battery.
- Never: The app is not allowed to run in the background at all. You won't get notifications or updates from it until you open it. This suits apps you rarely use, or ones you want to be sure are not using resources when you don't need them.
Start with the apps you use most. If they are not already set to Power optimized, change them to that. For apps you only open once in a while, such as a rarely used game or a utility you open every few months, consider setting them to Never.
If your laptop battery drains quickly, check the Store apps near the top of the battery usage list in Settings System Power & battery. Those are good candidates for a stricter setting. After you change an app, use the PC normally for a day or two and see whether anything you care about has stopped working.
For example, if you set your email app to "Never," you may not see new emails until you open the app manually. Be sure you understand what this means for each app before you change its settings. If an app stops notifying you, set it back to Power optimized or Always.
References:
https://support.microsoft.com/en-us/windows/privacy/windows-background-apps-and-your-privacy
Summary
Managing background apps helps your computer run better and saves battery power by stopping unused programs from running out of sight. To change the setting, go to Installed apps, open the advanced options for a specific program, and set its background permission to Never or Power optimized. Remember that desktop programs without an Advanced options entry need to be managed in their own settings.
Frequently asked questions
How to stop apps from runni g in the background?
Open Settings, select Apps, then Installed apps. Click the three dots beside a Microsoft Store app, choose Advanced options, and set Background apps permissions to Never. Desktop programs usually have no such setting. For those, use the Startup apps list in Task Manager or the program's own settings.
How to allow pcmatic to run in background in 🪟 Windows 11?
PC Matic is a desktop program, so Windows 11 usually has no background setting for it. Check the PC Matic settings for a startup or background option. Avoid turning off its protection to free up resources, since that leaves your PC unprotected. Keep it running and use Task Manager's Startup apps tab only to control launch at sign-in.
How to keep my battle net app tunning in background so I don't diconnect while playing diablo immo?
Keep the Battle.net app open while you play, since it has to stay running to keep your connection active. Do not set it to restricted in Settings, and do not disable it in the Startup apps tab of Task Manager. If you still disconnect, the cause is more often your internet connection than background restrictions.
How to open background apps?
Press Ctrl+Shift+Esc to open Task Manager. Select the Processes tab to see every app currently running, including those in the background. Apps listed under Background processes are the ones running without a window open. Select one and choose End task to close it.
How to disable apps running in the back round windowws 11?
Open Settings, select Apps, then Installed apps. Find the Microsoft Store app, click the three dots beside it, and choose Advanced options. Under Background apps permissions, select Never. This stops the app from running when it is closed. Desktop programs need their own settings or the Startup apps tab instead.
Still have a question?
Answered by AI from this guide. Good questions may be added to this page — please don't include personal details.
Did this guide fix your problem?

About the Author
Richard
Tech Writer, IT Professional
Richard is a writer at Geek Rewind who turns complex IT tasks into clear, step-by-step guides. He draws on years of hands-on experience in system administration and enterprise IT operations, focusing on Windows, Linux and WordPress: the problems people actually run into, and the fixes that work. His server and WordPress guides come from systems he runs himself. Richard builds and maintains the platform behind Geek Rewind, from its Ubuntu servers and Nginx configuration to its custom WordPress plugins. Many new tutorials start with readers' questions, and he's always glad to answer them in the comments.
No comments yet — be the first to share your thoughts!