How to Restrict Background App Notifications in Windows 11 Notification Settings

- 29 steps
- Needs administrator rights
Restricting background app notifications in Windows 11 stops programs from sending constant pop-ups and alerts while you work. Background apps run tasks you don’t see, such as checking for new messages or downloading updates, and they often flood your screen with alerts. On a laptop, that activity can also use up battery.
The main controls are in the Settings app, under System and then Notifications. From there you can silence individual apps, hide alerts on the lock screen, schedule quiet hours, and remove taskbar badges. Everything in this tutorial works the same on Windows 11 Home and Pro. The menu wording below matches current Windows 11 releases (22H2 and later). Older builds may label a few options differently, and I point those out where they come up.
Open Settings, click System then Notifications, scroll to Notifications from apps and other senders, find the app you want to restrict, and toggle its switch to Off. The app stops sending pop-ups and sounds immediately.
Understanding How 🪟 Windows 11 Handles Notifications
Windows 11 shows notifications as pop-up banners in the bottom-right corner of the screen and stores past alerts in the notification center. Knowing which kind of alert you are looking at makes it easier to decide what to keep and what to block.
- Banner Pop-ups: Small notification boxes that slide into the bottom-right corner of your screen for a few seconds, then disappear.
- Action Center (notification center): The place where past alerts are stored until you read or clear them. Open it by clicking the time and date in the bottom-right corner of your screen. Some people still call it the Action Center, so this tutorial uses both names.
- Sound Alerts: Audio chimes that play whenever a new alert arrives.
- App Badges: Small red dots or numbers on app icons in your taskbar or Start menu that show unread items.
Background apps are programs that keep running quietly while you do other things. Many of them send you updates to get your attention. When you restrict their notifications, they stop showing pop-ups and playing sounds. They can still do their work, but they do it without interrupting you.
Restricting notifications does not stop the app from running. If your goal is to stop the app from running at all, see the Task Manager section near the end.
Step 1Accessing Notification Settings in 🪟 Windows 11
You reach the notification settings through the Settings app. It takes only a few clicks.
- Click the Start button at the bottom of your screen.
- Click the Settings icon, which looks like a small gear. You can also press the Win+I to open Settings directly.

Windows 11 Start menu with Settings gear icon highlighted. - In the Settings window, make sure System is selected in the list on the left side.
- Click Notifications in the main list of options.
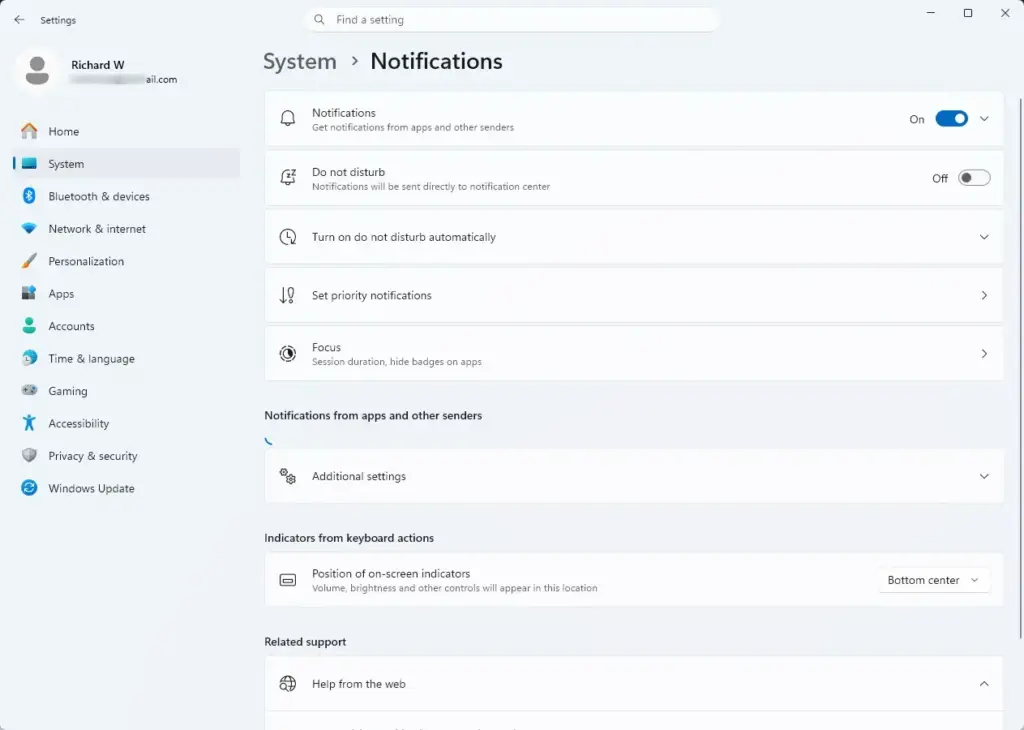
Settings › System › Notifications
You should now see the Notifications page. At the very top is a master switch that turns all notifications on or off. Below it are the Do not disturb settings, and further down is the list of apps that can send you alerts.
If you turn the master switch off, every app is silenced at once. That is a blunt tool, and you may miss alerts you want, such as calendar reminders. The steps in the next section let you be more selective.
Step 2How to Restrict Background App Notifications in 🪟 Windows 11 Notification Settings
Turning off alerts one app at a time lets you silence the noisy programs and keep the important ones. Here is how to do it.
- Open the Settings app by pressing the Win+I.
- Click System, then click Notifications.
Settings › System › Notifications - Scroll down the page until you reach the section labeled Notifications from apps and other senders.
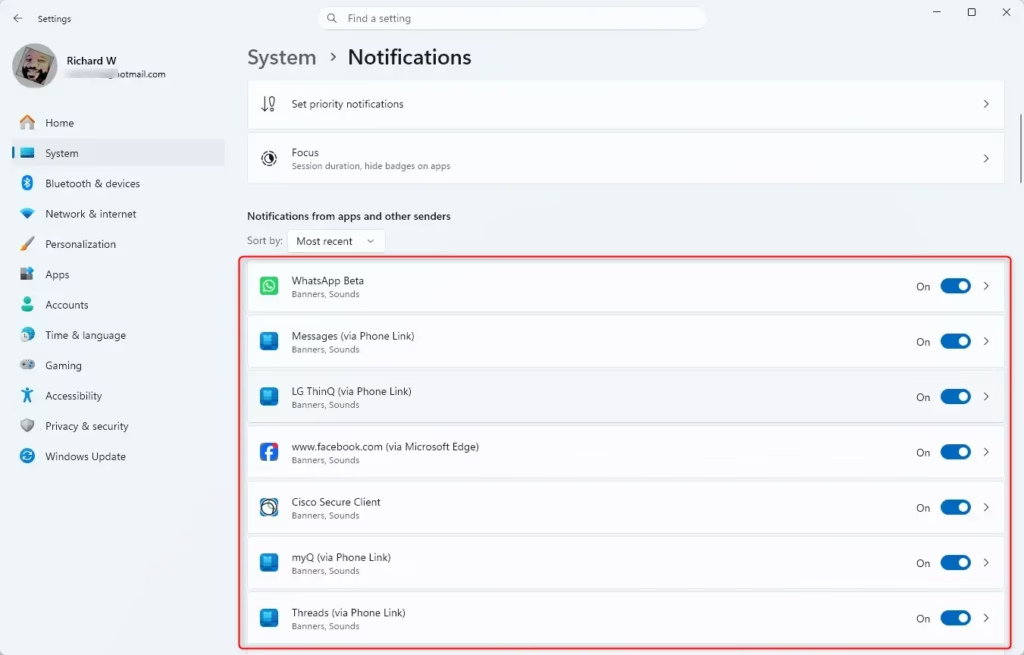
- Look through the list of apps. Each one has an on/off switch next to it. The list only includes apps that have already asked to send notifications, so a program you just installed may not appear until it has sent its first alert.
- Find the app that sends too many alerts and click its switch to turn it Off. The switch label changes to Off, and that app stops showing banners and playing sounds.
If you don’t want to silence an app completely, click the app’s name (or the small arrow next to it) to open its sub-settings. There you can choose whether it shows banner pop-ups, plays a sound, or appears in the notification center. A common setup is to turn off the banner and sound but leave the notification center option on. The app is then quiet, but you can still read its alerts later.
To undo any of this, return to the same page and turn the app’s switch back on.
If a prompt asks for permission, click Yes or enter an administrator password. On a standard account, you may need to ask the person who manages the PC.
Step 3Hiding Notifications on the Lock Screen
Notifications on the lock screen can show message previews to anyone walking past your desk. You can hide them without changing how notifications behave once you are signed in.
- Open Settings by pressing the Win+I.
- Click System, then click Notifications.
- Click the main Notifications row at the top to expand it, if it is not already expanded.
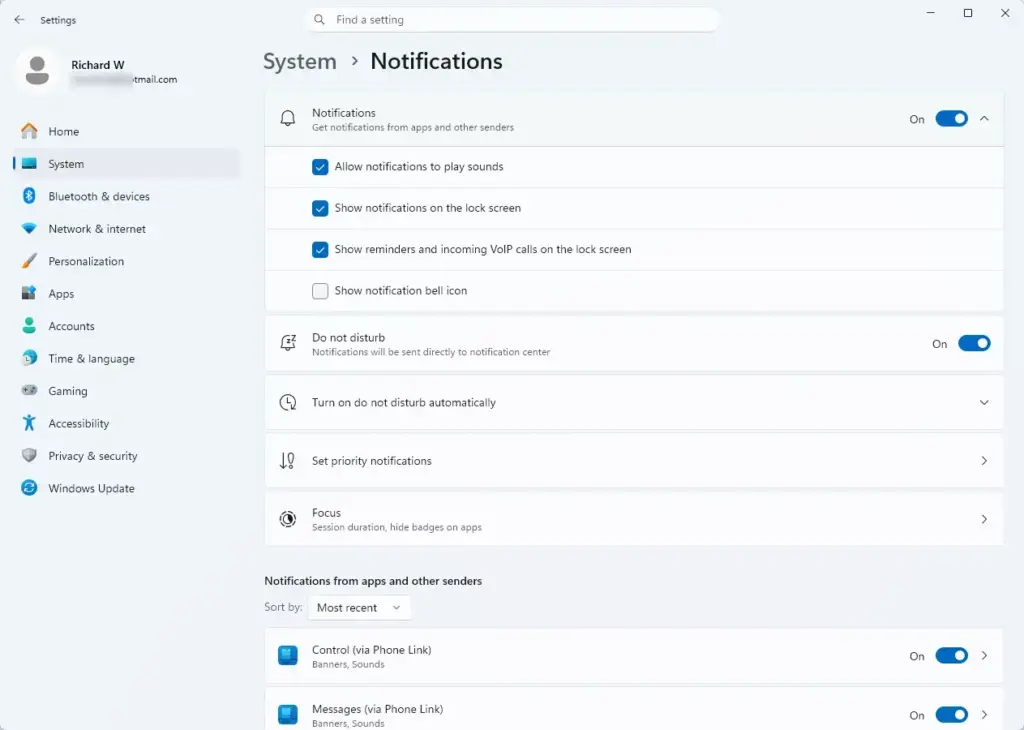
- Uncheck the box labeled Show notifications on the lock screen.
You should see the box clear, and the change applies immediately. There is no need to restart. To test it, press the Win+L to lock the PC and wait for a new alert. Nothing should appear on the lock screen.
Hiding previews matters in shared spaces. Coworkers and visitors can’t read your private messages, email alerts, or app updates while you are away. Your notifications still appear on the desktop and in the notification center once you sign back in. To undo the change, tick the box again.
Step 4Using “Do Not Disturb” to Silence All Background Alerts Instantly
Do Not Disturb is the quickest way to silence everything at once. It is useful when you are writing a report, joining a video call, or watching a movie.
- Open Settings and go to System Notifications.
Settings › System › Notifications - Find the Do not disturb setting near the top of the page.
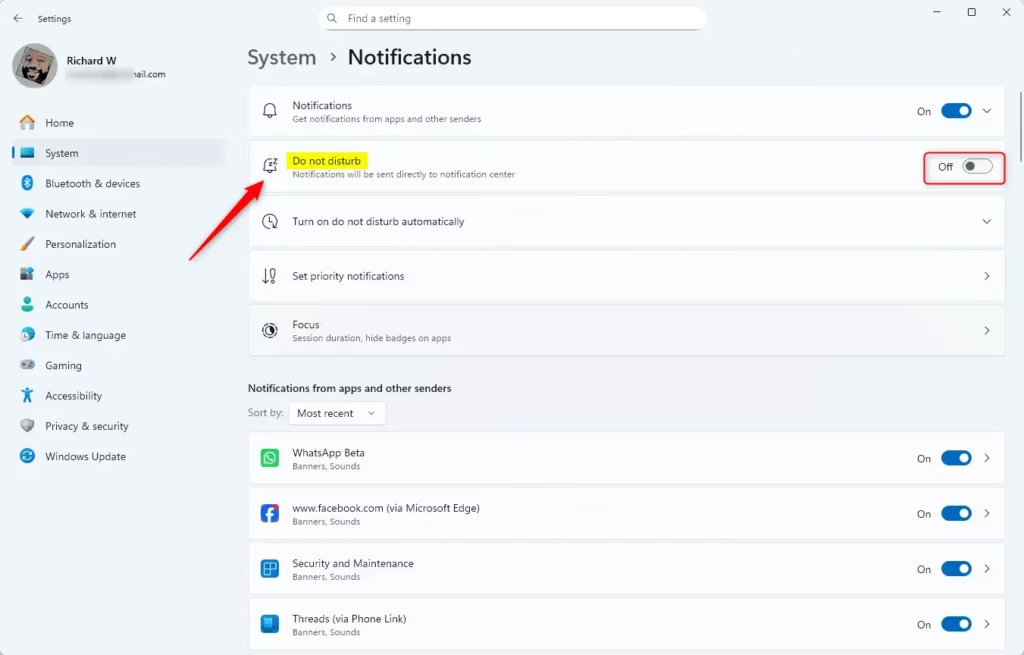
- Click the switch to turn it On.
If you are on an older Windows 11 build and don’t see Do not disturb, look for Focus assist instead. Microsoft renamed it in a later update. Updating Windows brings the newer layout.
When Do Not Disturb is active:
- Banner pop-ups stop appearing on your screen.
- Notification sounds are muted.
- Incoming alerts go straight into the notification center, so you can read them later.
You can also switch it on and off quickly. Click the time and date in the bottom-right corner to open the notification center, then use the bell icon at the top of the panel. On some builds, the Do Not Disturb button is also available in the quick settings panel. If you don’t see it there, click the pencil (Edit quick settings) icon to add it. To turn Do Not Disturb off, use the same switch or button again.
Step 5Setting Up Automatic Rules for Focus and Quiet Hours
You don’t have to turn on Do Not Disturb by hand every time. Windows can switch it on for you at set times or in certain situations.
- Open Settings and go to System Notifications.
Settings › System › Notifications - Click the Do not disturb section to expand its options.
- Look for the Turn on do not disturb automatically subsection. On some builds the wording is slightly different, such as "Automatically turn on do not disturb".
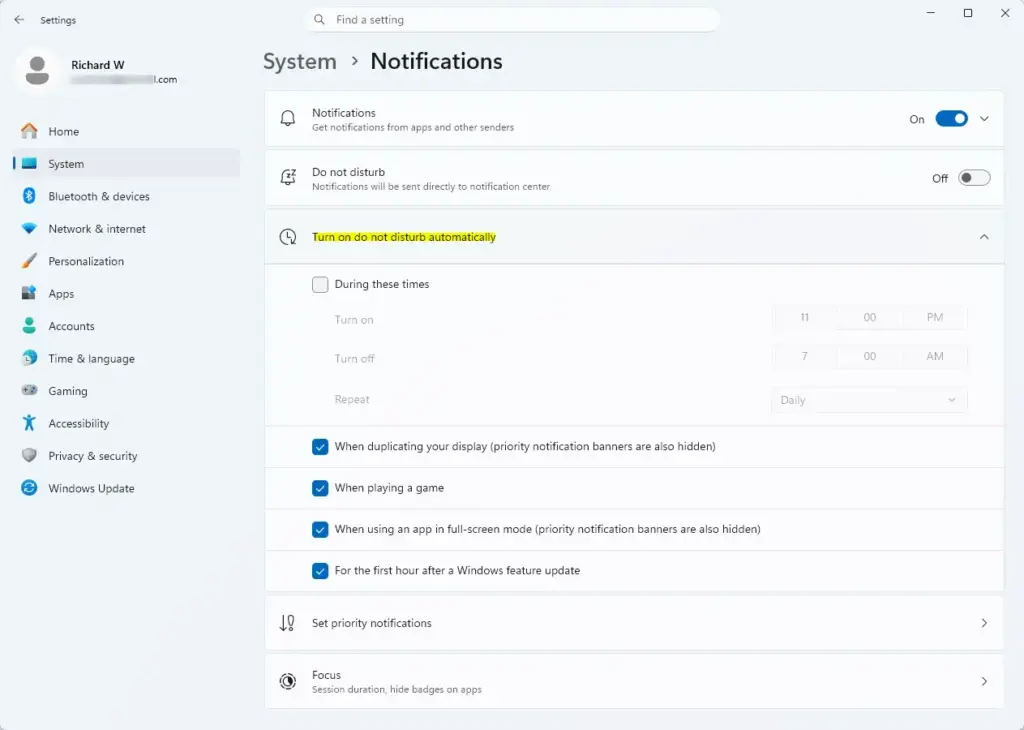
Settings › System › Notifications › Turn on do not disturb automatically - Tick the boxes that match how you work. You can have it turn on during a set time window (such as late at night), when you duplicate your display for a presentation, or when you play a game. Depending on your build, you may also see options for full-screen apps and for the first hour after a Windows feature update.
You should see each box stay ticked once you click it. If you pick the time-based option, set the start and end times when the page offers them. Your background apps will then stay quiet during gaming sessions and meetings without you doing anything. To stop an automatic rule, clear its box.
Expert Tip 1: Stopping App Badge Counts to Reduce Visual Clutter
App badges are the little red dots or numbers on taskbar icons. They are quiet compared with pop-ups, but they still pull your eye. Turning them off gives you a calmer taskbar.
- Open Settings and go to System Notifications.
- Scroll to the bottom of the page and click the Additional settings section to expand it.
- Uncheck the box labeled Show notifications on the taskbar, or look for the setting related to app badge notifications.
The exact wording of this option varies between Windows 11 versions, and on many builds the badge control is not on this page at all. If you can't find it, open Settings Personalization Taskbar, expand Taskbar behaviors, and clear Show badges on taskbar apps. The red dots and numbers should disappear from your taskbar icons right away, and no restart is needed. Tick the box again to bring them back.
A clean taskbar means fewer unread counts to react to. That helps you stay on your work instead of checking icons every few minutes.
Expert Tip 2: Managing Hidden Background Apps Through Task Manager
Turning off notifications does not stop an app from running. If a program still drains your battery or starts itself every time you sign in, Task Manager lets you stop it from starting up with Windows.
- Right-click the Start button at the bottom of your screen.
- Select Task Manager from the menu. You can also press Ctrl + Shift + Esc.
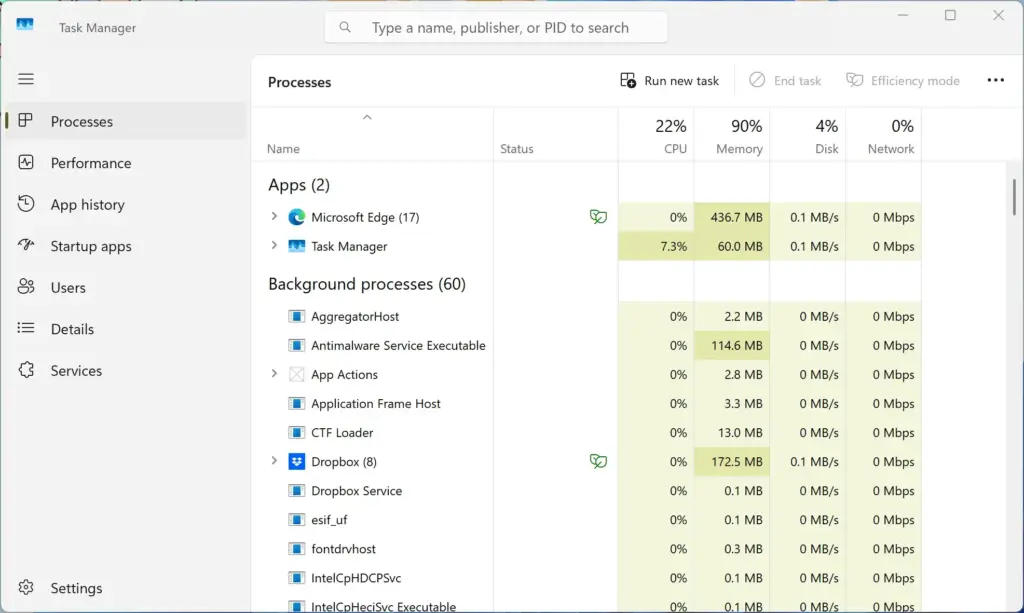
Task Manager - In the Task Manager window, look at the icons down the left side and click Startup apps. Its icon looks like a small gauge or speedometer.
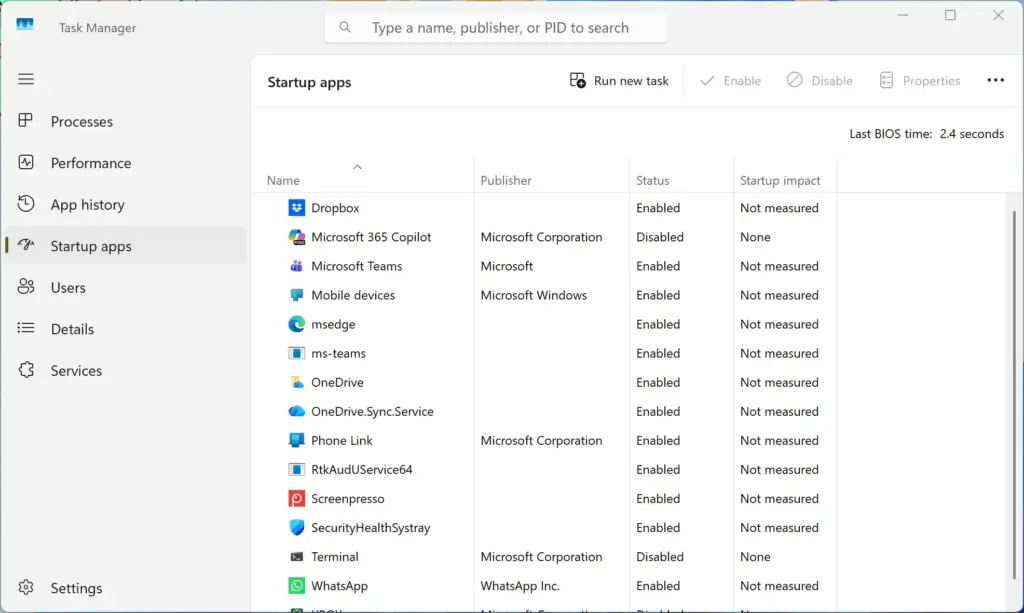
Task Manager › Startup - Review the list of programs that start automatically when you sign in. The Startup impact column shows which ones slow your PC the most.
- Find a background app that you do not need running right away.
- Right-click the app and select Disable. Its status changes to Disabled.
The change takes effect the next time you sign in or restart. The app is not removed. You can still open it by hand, and to undo the change you right-click it in the same list and select Enable.
Disabling startup apps you don't need keeps the PC responsive, saves battery on laptops, and means the app won't send notifications until you open it yourself. Only disable programs you recognize. If you aren't sure what an entry is, leave it alone, since some are security or driver tools.
For apps installed from the Microsoft Store, there is one more option. In Settings Apps Installed apps, click the three dots next to the app and choose Advanced options. Under background app permissions you can stop the app from running in the background. Not every app shows this option, and classic desktop programs don't have it.
Summary
Windows 11 gives you several layers of control over notifications. You can silence individual apps, hide sensitive previews on the lock screen, schedule quiet hours with Do Not Disturb, remove taskbar badges, and stop unneeded apps from starting up. Start with the noisiest apps, then add the other changes as you need them. Every setting can be reversed in the same place you changed it.
Frequently asked questions
How do I stop app notifications on 🪟 Windows 11?
Open Settings and go to System Notifications. Turn off 'Notifications' at the top to disable all notifications, or scroll down to toggle off 'Show notifications' for banners and alerts individually. You can also mute specific apps by finding them in the list below.
How do I block notifications from certain apps?
Open Settings System Notifications and scroll to the app list. Find the app you want to block and toggle off its switch. You can also adjust per-app settings like disabling pop-ups or hiding alerts on your lock screen.
How do I stop background apps on 🪟 Windows 11?
Open Settings System Battery and device > App permissions Background app permissions. Toggle off apps you don't want running in the background. You can also manage which apps run at startup in Task Manager's Startup tab.
Why do Windows notifications keep popping up?
Apps send notifications when they have updates or new messages. Check Settings System Notifications to turn off notifications globally or per-app. You can also enable Focus Assist to silence alerts during specific times or when you're focused on a task.
Still have a question?
Answered by AI from this guide. Good questions may be added to this page — please don't include personal details.
Did this guide fix your problem?

About the Author
Richard
Tech Writer, IT Professional
Richard is a writer at Geek Rewind who turns complex IT tasks into clear, step-by-step guides. He draws on years of hands-on experience in system administration and enterprise IT operations, focusing on Windows, Linux and WordPress: the problems people actually run into, and the fixes that work. His server and WordPress guides come from systems he runs himself. Richard builds and maintains the platform behind Geek Rewind, from its Ubuntu servers and Nginx configuration to its custom WordPress plugins. Many new tutorials start with readers' questions, and he's always glad to answer them in the comments.
No comments yet — be the first to share your thoughts!