Customize App Notification Sound Alerts in Windows 11 Notifications Settings

Windows 11 lets you change or turn off the sounds individual programs make when they send you an alert. Most of this is handled in the Settings app under System Notifications. Some apps, and the default alert tone itself, are still controlled by the classic Sound window, so this tutorial covers both.
Setting this up means you can tell what is happening without looking at the screen. You can keep a soft chime for chat, a louder tone for important mail, and silence for apps you do not care about. The steps are the same on Windows 11 Home and Pro.
To customize app notification sound alerts in Windows 11, open Settings , go to System Notifications, and expand the Notifications row to tick Allow notifications to play sounds. Then scroll to Notifications from apps and other senders, click the app you want to change, and tick or clear Play a sound when a notification arrives to enable or disable its sound.
Basic Steps to Manage Notification Sounds in 🪟 Windows 11
If it is off, no app can play a notification sound, whatever its own settings say. Check it first.
- Press Win+I to open Settings . You can also click the Start button and then the gear-shaped Settings icon. You should see the Settings window with a menu down the left side.

Windows 11 Start menu with Settings gear icon highlighted. - Click System in the left-hand menu.
- Click Notifications on the right side of the screen. The page shows a Notifications switch at the top, followed by Do not disturb and a list of apps further down.
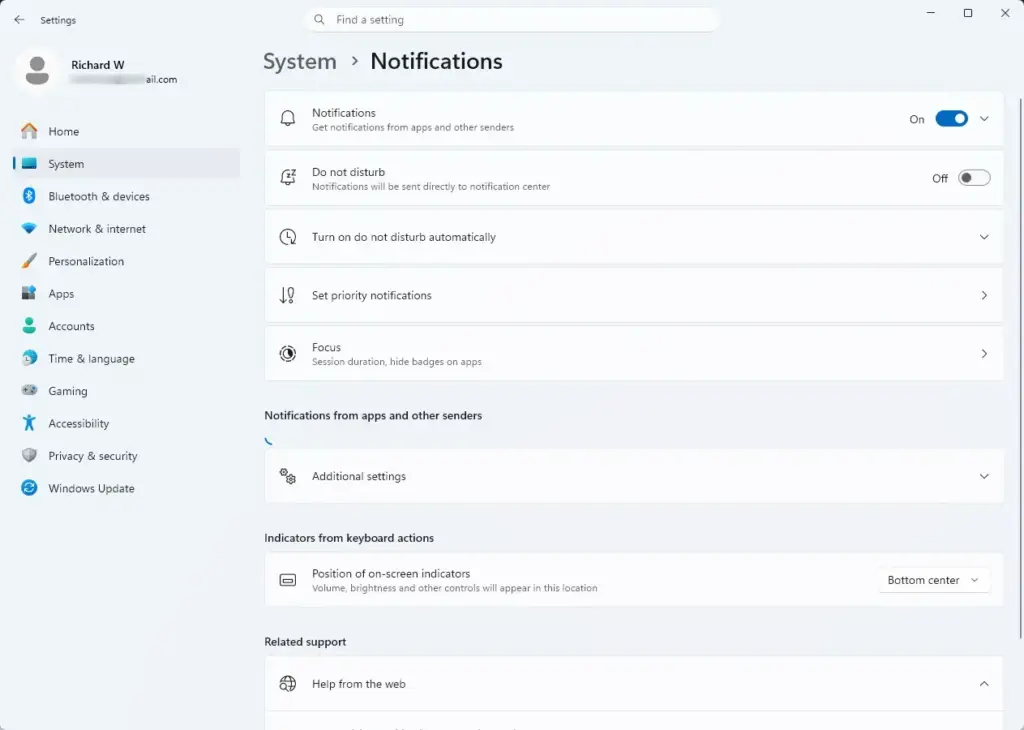
Settings › System › Notifications - Make sure the Notifications switch is set to On.
- Click the small arrow (chevron) at the right end of the Notifications row to expand it. A few extra options appear underneath.
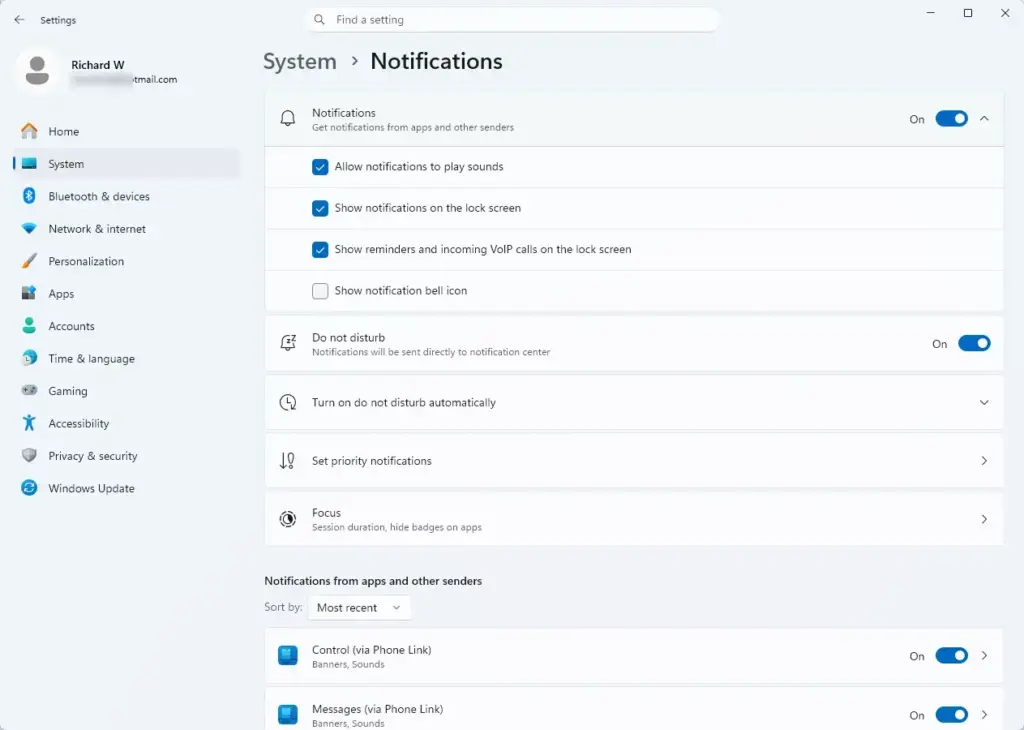
- Tick the box for Allow notifications to play sounds. If it is unticked, none of your apps will make a noise when they send an alert.
You do not need administrator rights for any of this. These settings belong to your own user account, so a standard user can change them without an admin password.
Turning on the master setting only gives apps permission to play sounds. An individual app can still be silent if its own notification settings are off. Also, if Do not disturb is on, Windows mutes notification sounds until you turn it off. The next section covers the per-app settings.
How to Customize App Notification Sound Alerts in 🪟 Windows 11 Notifications Settings
Each app has its own page under Notifications, where you can decide whether it is allowed to make noise. Use this to silence the noisy apps and keep sound for the ones that matter.
- Press Win+I to open Settings .
- Go to System and then click Notifications.
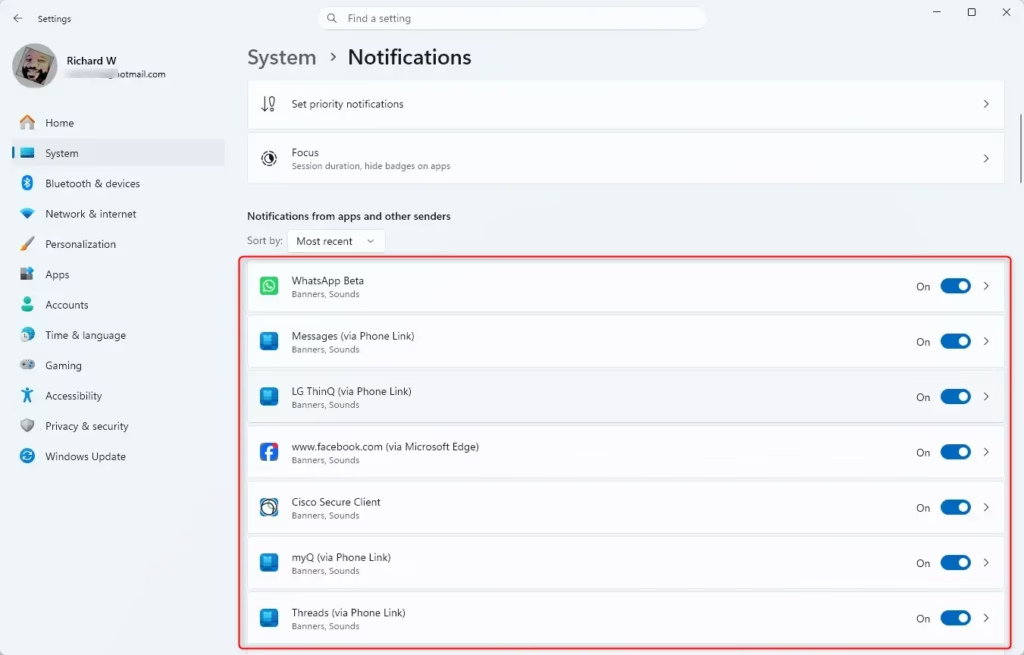
Settings › System › Notifications - Scroll down to Notifications from apps and other senders. This is a long list of every app on the computer that can send alerts. Each one has its own on/off switch.
- Find the app you want to change, such as your email client or chat program, and click its name. The app’s own notification page opens.
- Make sure the main Notifications switch for that app is set to On. If it is off, the app sends no alerts at all, so there is nothing to hear.
- Find the sound checkbox on this page and tick it to allow sound, or clear it to mute the app. On current builds of Windows 11 it is labelled Play a sound when a notification arrives. Older builds may word it as Allow notifications to play sounds.
The change takes effect straight away, with no restart or Apply button. To undo it, go back to the same page and flip the setting again.
(Note: Standard user accounts can complete these steps without admin rights.)
If an app is not in the list, it has not sent a notification yet or it does not use Windows notifications. Some apps, such as certain chat programs, also have their own sound settings inside the app. Check those if an app is still noisy after you muted it here.
Going through the list once lets you silence the apps you do not care about and leave sound on for the important ones.
Changing the Actual Sound Files in 🪟 Windows 11
The sound itself is not chosen in the modern Settings page. To change it, open the classic Sound window from Settings. This lets you replace the default alert tone with another sound that is already on your computer.
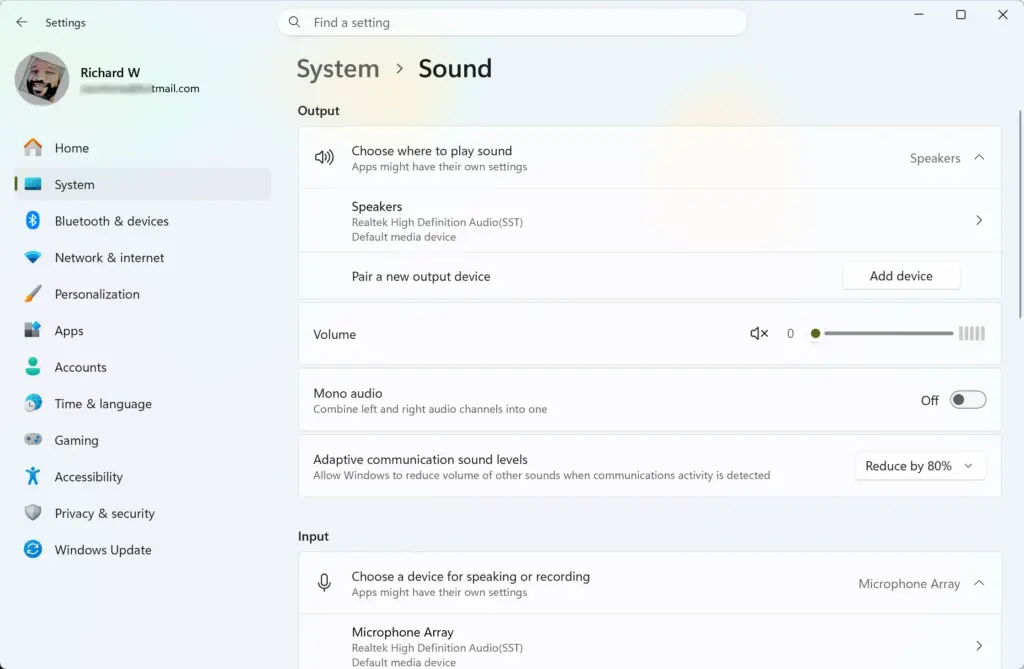
- Open Settings and click System in the left menu.
- Click Sound.
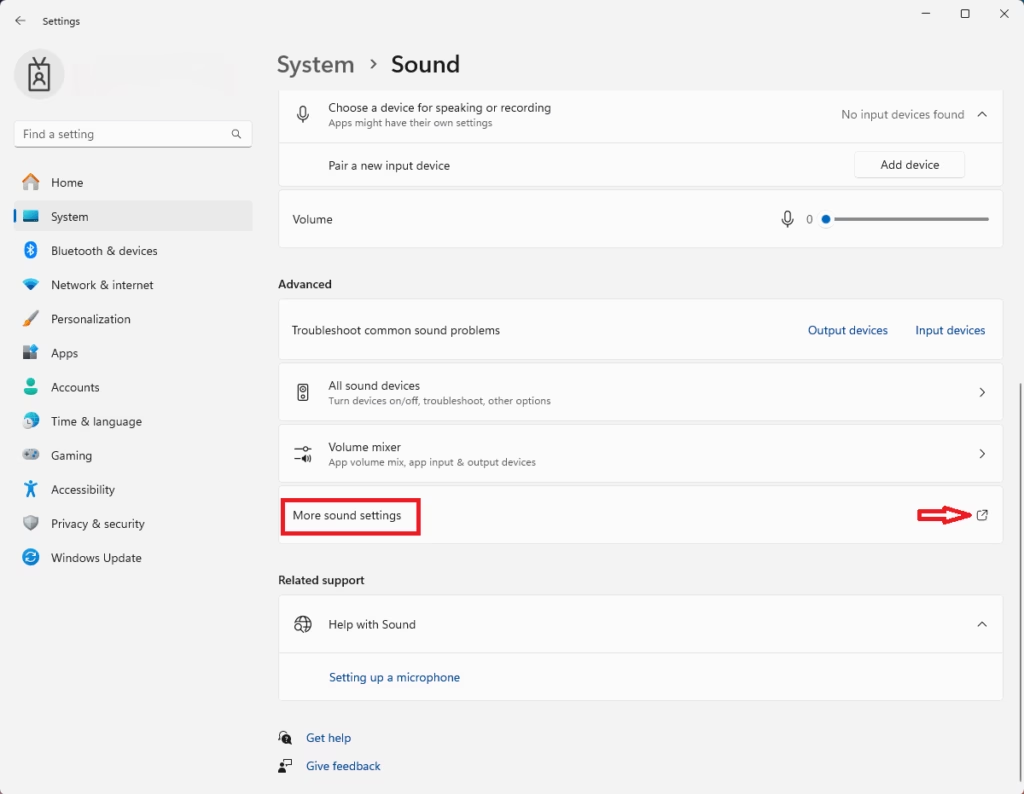
Settings › System › Sound - Scroll to the bottom of the Sound page and click More sound settings. A small, traditional window opens on top of Settings.
- Click the Sounds tab at the top of this window.
- In the Program Events list, scroll down until you find Notification.
- Click Notification to highlight it. The Sounds drop-down at the bottom of the window now shows the sound currently assigned to it.
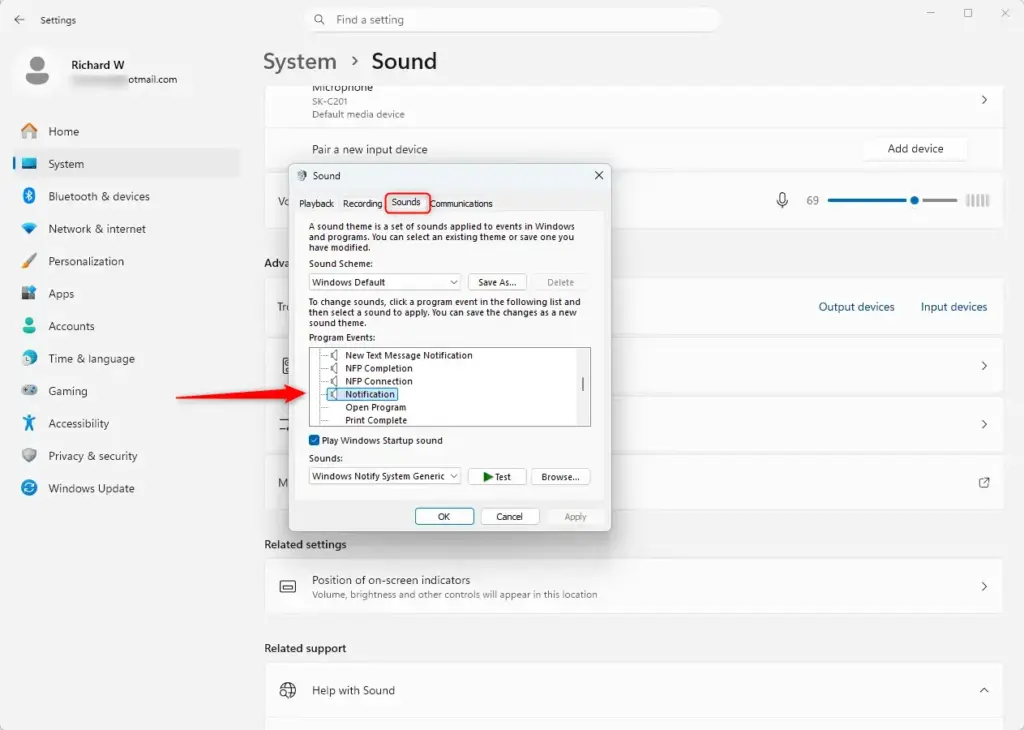
- Open the Sounds drop-down and pick a different built-in sound from the list.
- Click the Test button next to the drop-down to hear it. Try a few until you find one you like.
- Click Apply at the bottom right, and then click OK to save the change.
(Note: This action does not require administrator privileges.)
This changes the global notification sound for your system. Any app that uses the standard Windows notification sound will now play the one you picked. Apps that bring their own sound are not affected.
To go back, return to the same window, select Notification again and choose the original sound. You can also set the Sound Scheme box at the top of the tab back to Windows Default, but that resets every event sound in the list, not just this one.
Advanced Tip: Using Custom Audio Files for 🪟 Windows 11 Notifications
MP3 files will not work here, so convert them first.
Free online converters will do the job. So will a program like Audacity, which can export a clip as WAV. Keep the clip short, because it plays every time an alert arrives.
The simplest route is to put the WAV file in the 📁C:\
- Open File Explorer and go to 📁C:\
Windows\ on your main Windows drive.Media - Copy and paste your WAV file into this folder. Windows will ask for administrator permission because this is a system folder. Click Continue, or enter an admin password if you are asked for one. (Admin privileges required.)
- Open the classic Sound window again by following the steps in the previous section: Settings System Sound More sound settings Sounds tab.
- Select Notification under Program Events.
- Open the Sounds drop-down. Your custom file should now be in the list, because it is in the 📁C:\
Windows\ folder. If it is missing, check that the file really is a WAV and that it copied into the folder.Media - Select your file and click Test to check it plays.
- Click Apply, and then click OK.
If you cannot get admin permission, the Sounds tab also has a Browse button. It lets you pick a WAV file from any folder, such as your Documents folder, so you may not need to copy anything into the system folder at all.
From now on, a standard Windows notification will play your clip. To undo it, select Notification again and choose the original sound from the drop-down. You can delete your file from C:\Windows\Media afterwards if you like.
Summary
Setting up notification sounds in Windows 11 takes a few minutes and cuts down on distractions. You turn on the master sound setting, mute the apps that do not need to be heard, and pick a tone you can recognise.
You now know how to use the modern Settings page, the classic Sound window and custom WAV files. Open your notification settings, go through the app list once, and adjust it to the way you actually work.
Have a question about this guide?
Answered by AI from this guide. Good questions may be added to this page — please don't include personal details.
Did this guide fix your problem?

About the Author
Richard
Tech Writer, IT Professional
Richard is a writer at Geek Rewind who turns complex IT tasks into clear, step-by-step guides. He draws on years of hands-on experience in system administration and enterprise IT operations, focusing on Windows, Linux and WordPress: the problems people actually run into, and the fixes that work. His server and WordPress guides come from systems he runs himself. Richard builds and maintains the platform behind Geek Rewind, from its Ubuntu servers and Nginx configuration to its custom WordPress plugins. Many new tutorials start with readers' questions, and he's always glad to answer them in the comments.
No comments yet — be the first to share your thoughts!