How to Configure Custom Notification Priority Rules in Windows 11 Notifications Settings

Custom notification priority rules in Windows 11 let you choose which apps can interrupt you and which ones stay quiet. Windows 11 sorts your alerts into banners, sounds, and the Notification Center. To open the Notification Center, click the clock on the taskbar or press the Win+N.
You can set specific apps to high priority so their alerts break through Focus sessions or Do Not Disturb. This keeps game launchers and shopping apps quiet while you still get urgent messages from chat and email apps. The steps below use the Windows 11 Settings app and apply to Home and Pro alike. None of these changes needs a restart.
Open Settings , select System Notifications, scroll to the Do not disturb section, and click the toggle to turn it On. You can also click the bell icon in the Notification Center to enable it without opening Settings. Changes take effect immediately.
Accessing Your Notification Settings
All notification controls live in one place in the Settings app. Once you know the path (Settings System Notifications), every section below starts from the same page.
- Click the Start button on your taskbar and select the Settings icon, which looks like a small gear. You can also press the Win+I to open it directly. The Settings window should open.

Taskbar - In the Settings window, select System from the left-hand menu. The System options appear on the right.
- On the right side of the screen, click Notifications. You should now see a master toggle at the top, a Do not disturb section, and a list of apps further down.
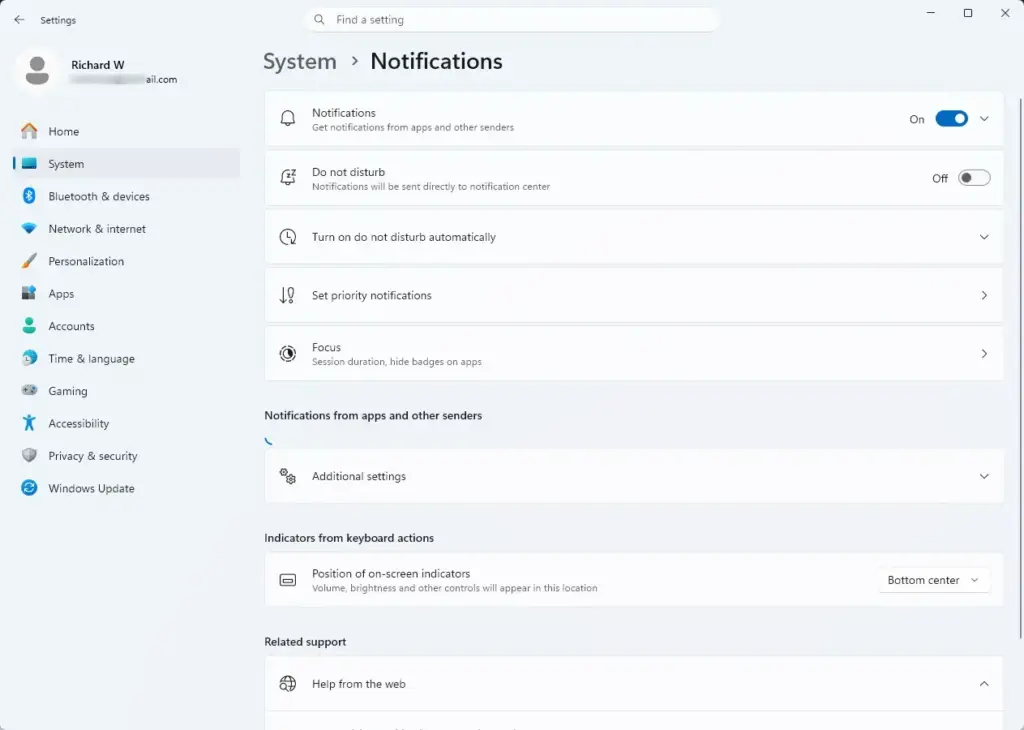
Settings › System › Notifications
From this page you can turn off all app alerts with one click, or expand individual sections to change how specific apps behave. Everything you change here takes effect immediately, so there is no Save or Apply button.
Turning Notifications On or Off Globally
The master switch stops all apps from showing pop-up banners or playing alert sounds at once. It is the quickest option, but it is also the bluntest one. If you only want to silence a few noisy apps, use the per-app settings later in this tutorial instead.
- Look for the main Notifications toggle switch at the very top of the page.
- Click the switch to turn it to the Off position. The apps list below will grey out or stop applying.
With the master switch off, no apps will show banners or play sounds. Apps still keep their messages in the Notification Center, so you can read them later if you wish. If you want alerts to arrive quietly rather than disappear, leave the master switch on and turn off banners and sounds for individual apps instead.
To undo this, click the same toggle again to set it back to On.
If you want more control, click the small arrow next to the main toggle to expand extra options. These include whether notifications play sounds and whether they show on the lock screen. Which options appear depends on your Windows 11 version, so your list may look slightly different from someone else’s.
How to Turn Do Not Disturb On or Off
Do Not Disturb silences standard app alerts, banner pop-ups, and flashing taskbar badges until you turn it off. Alerts are not lost. They still collect in the Notification Center. Do Not Disturb is a built-in toggle in Windows 11 version 22H2 and later. If you cannot find it, check your version under Settings System About and install pending updates.
To turn Do Not Disturb on manually from Settings:
- Press the Win+I to open Settings , then click System and Notifications.

Settings - Scroll down slightly until you see the Do not disturb section.
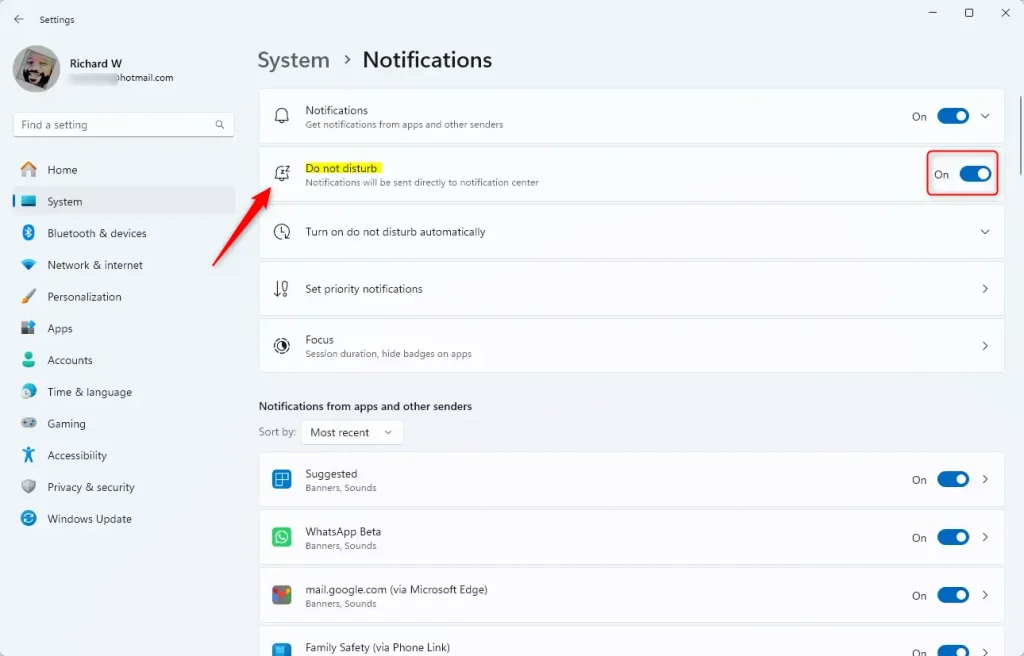
- Click the toggle switch next to Do not disturb to turn it On. A Do Not Disturb indicator, usually a bell with a line through it, should appear in the notification area of the taskbar .
You can also turn it on without opening Settings. Click the date and time area on your taskbar to open the Notification Center. Then click the bell icon near the top of the panel. Click it again to turn Do Not Disturb off. Note that the small Wi-Fi , volume, and Bluetooth panel is the separate quick settings menu, and it is not where this toggle usually lives.
How to Customize Do Not Disturb Automatic Rules
Automatic rules save you from turning Do Not Disturb on by hand every day. Windows can switch it on at set hours or when you are doing something where interruptions are unwelcome.
- Go to Settings System Notifications.
- Click the Do not disturb section to expand its additional options.
- Find the sub-section labeled Turn on do not disturb automatically and click it to see more choices.
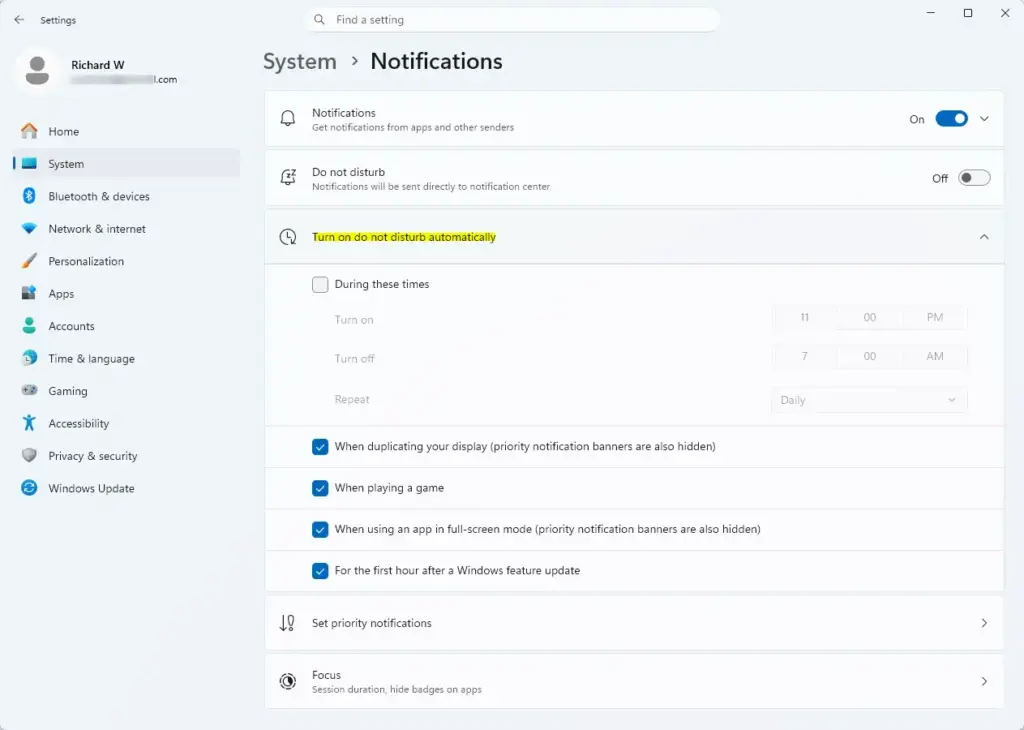
Settings › System › Notifications › Turn on do not disturb automatically - Tick the check box for a time-based rule to turn Do Not Disturb on automatically during specific hours, such as late at night. Then set your preferred start time and end time.
- Tick the other check boxes for the situations where you want Do Not Disturb to switch on by itself. These cover duplicating your display for a presentation, playing a full-screen PC game, and using an app in full-screen mode.
Settings › System › Notifications › Turn on do not disturb automatically
To undo any rule, untick its check box. The exact list of rules can vary slightly between Windows 11 builds, so if one is missing, check for updates .
How to Customize Priority Notifications in 🪟 Windows 11
Priority notifications are the heart of this tutorial. They let alerts from specific apps or people break through Do Not Disturb while everything else stays silent. Set Do Not Disturb up first, because these rules only matter while it is active.
- Open Settings System Notifications.
- Click Do not disturb to expand the settings list.
- Find the section titled Set priority notifications and click it to expand it.
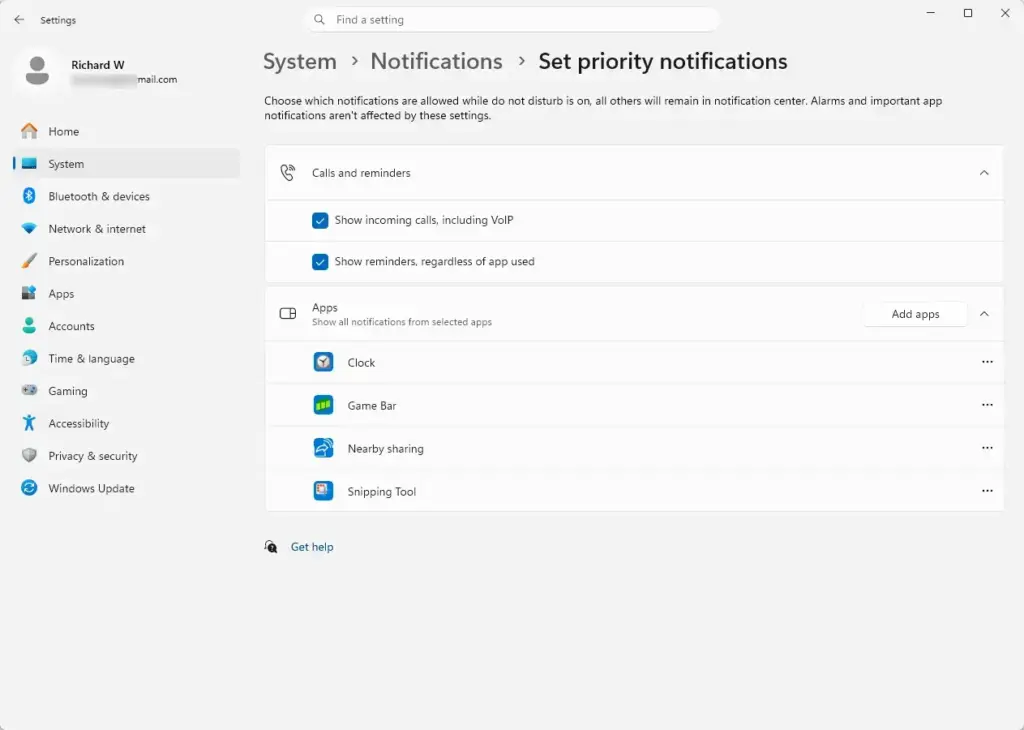
Settings › System › Notifications › Set priority notifications - Under the calls, messages, and notifications areas, choose which contacts or apps are allowed to bypass Do Not Disturb.
- To add an app, click the Add apps button. Browse the list of installed applications and select the ones you want to give priority status. The chosen apps should now appear in your priority list.
- To remove an app later, click the small remove button next to its name.
Keep this list short. If you add every app you own, Do Not Disturb stops doing its job. Chat and email apps are the usual candidates.
How to Customize Notifications for Each App
Each app has its own notification settings, so you can silence one noisy program without touching the rest. Every app that can send alerts is listed on this page.
- Go to Settings System Notifications.
- Scroll down to the section titled Notifications from apps and other senders. This area lists every application on your computer that can send alerts.
- Find an app in the list and click the small arrow next to its name to open its individual settings. Each app has its own toggle on the list as well.
- To stop all alerts from that app, use the main toggle at the top and set it to Off.
- To keep the app’s alerts but make them less intrusive, tick or untick the options for banner pop-ups, alert sounds, and notification badges on its taskbar icon. The wording of each option appears next to its check box.
- To change where the app’s alerts sit in the Notification Center, adjust its priority setting. Choosing the top option places its alerts above the others.
This notification priority is separate from the Do Not Disturb priority list in the previous section. The first controls ordering in the Notification Center. The second controls what gets through while Do Not Disturb is on. An app can use either one or both.
How to Change Notification Sounds
Sound settings let you silence all alert sounds, or leave them on for the apps you care about. Windows 11 has one global switch for notification sounds and then per-app switches.
- Open Settings System Notifications.
- Scroll to the bottom of the page and click the section labeled Additional settings to expand it. On many current builds, the sound option sits under the main Notifications toggle instead. If you do not see it here, expand that toggle at the top of the page.
- Untick the box that says Allow notifications to play sounds if you want complete silence from all app alerts.
- If you want to change audio for individual apps, adjust those inside each app’s own settings, as described in the previous section.
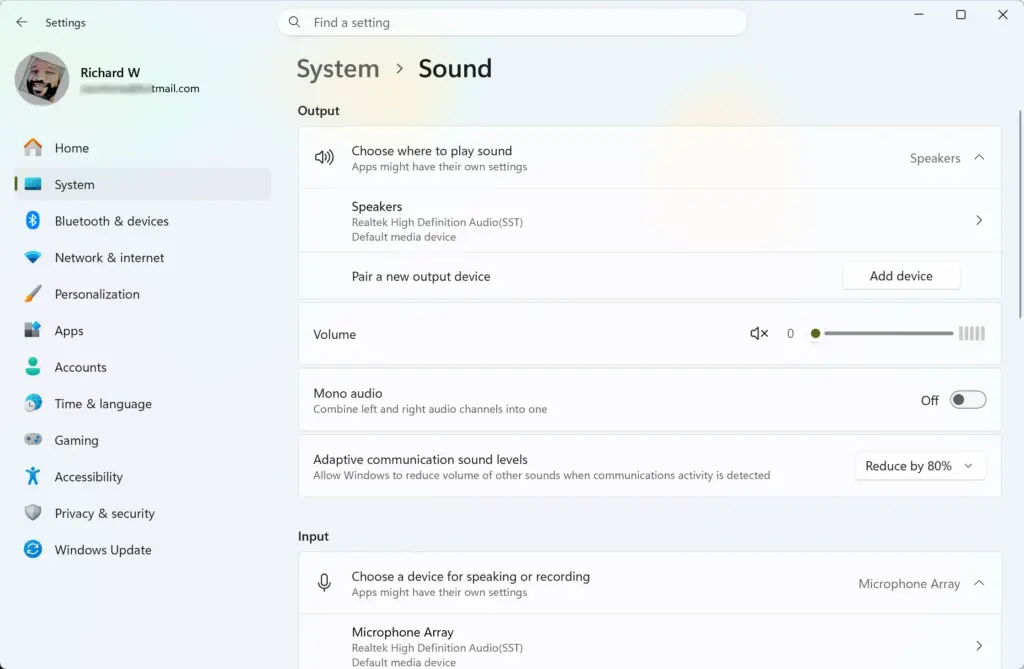
Settings › System › Sound
To bring the sounds back, tick the box again. If the sounds still do not play, check that your volume is not muted under Settings System Sound.
How to Change Banner Notifications Duration
If banners vanish before you can read them, you can make them stay longer. Windows treats this as an accessibility feature rather than a notification setting, so you will not find it on the Notifications page.
- Open the Windows Settings app.
- Click Accessibility in the left-hand menu.
- Select Visual effects on the right side of the screen.
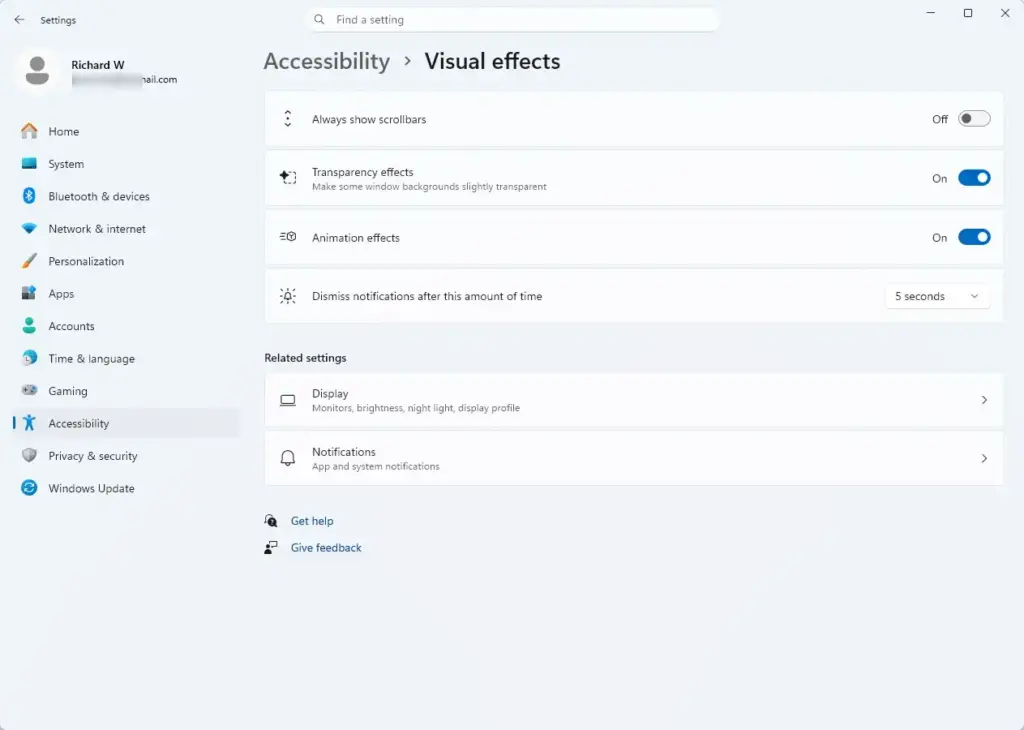
Settings › Accessibility › Visual effects - Look for the setting labeled Dismiss notifications after this amount of time.
- Click the drop-down menu and choose a longer duration, such as 7 seconds or 30 seconds. Banners will now stay on screen for that long.
To go back to the default, open the same drop-down and pick a shorter time.
How to Disable Lock Screen Notifications
Anyone walking past a locked PC can otherwise read the text of new alerts.
- Go to Settings System Notifications.
- Click the small arrow next to the main Notifications toggle switch at the top of the page to expand the extra options.
- Find the check box that says Show notifications on the lock screen and untick it.
With this setting off, your lock screen stays clean while the computer is locked. Private messages and app alerts no longer appear where passers-by can read them, which protects your data when you step away from your desk. You will still see the alerts after you sign in, in the Notification Center. To bring lock screen alerts back, tick the box again.
Summary
Managing notification settings in Windows 11 helps you stay focused without missing important messages from friends or work. From the Settings app you can turn alerts on or off, set up automatic Do Not Disturb schedules, and build priority rules that fit your daily routine. Start with the priority list and your per-app settings, then adjust as you see which alerts actually matter.
Have a question about this guide?
Answered by AI from this guide. Good questions may be added to this page — please don't include personal details.
Did this guide fix your problem?

About the Author
Richard
Tech Writer, IT Professional
Richard is a writer at Geek Rewind who turns complex IT tasks into clear, step-by-step guides. He draws on years of hands-on experience in system administration and enterprise IT operations, focusing on Windows, Linux and WordPress: the problems people actually run into, and the fixes that work. His server and WordPress guides come from systems he runs himself. Richard builds and maintains the platform behind Geek Rewind, from its Ubuntu servers and Nginx configuration to its custom WordPress plugins. Many new tutorials start with readers' questions, and he's always glad to answer them in the comments.
No comments yet — be the first to share your thoughts!