How to Disable Lock Screen Notifications in Windows 11

Lock screen notifications in Windows 11 are pop-up alerts, such as emails and chat messages, that appear on your sign-in screen before you enter your password. Turning them off hides your private details from anyone walking past your PC. You are left with just the time and your background picture.
You can turn these alerts off in the Settings app on Windows 11 version 23H2 and newer. The steps are the same on Home and Pro. Stopping the pop-ups also keeps your screen quiet while you step away from your desk. If you are not sure which version you have, open Settings System About and check the version line under Windows specifications.
Go to Settings System Notifications and uncheck “Show notifications on the lock screen”. This prevents alerts from appearing before you sign in.
Why Turn Off Lock Screen Notifications?
Turning off lock screen notifications keeps your personal data private. Message previews, email alerts and app pop-ups no longer show to anyone who looks at your monitor. It also removes visual distractions, so you can stay focused when you leave your desk and come back to a locked computer.
- Focus Better: See only your background and the time, not messages or updates.
- Keep Things Private: Stop sensitive info from showing on your lock screen, especially if others might see it. This matters most in shared offices, classrooms and homes where the PC sits in a common area.
- Save a Little Battery: Constant notifications use a small amount of extra power. The saving is small, but it can add up on a laptop.
- Enjoy a Simpler Look: A clean lock screen is often more pleasant.
Turning this off only changes what appears on the lock screen. Your notifications still arrive and still show in the notification center after you sign in, so you won’t lose any alerts.
Option 1Turn Off Notifications for Your Account Using Settings
This is the easiest way to manage lock screen notifications, and it only affects your own account. You don’t need administrator permission, and it works the same on Windows 11 Home and Pro. The change takes effect straight away, so you don’t need to restart.
Steps
- Open Settings : Press the Win+I on your keyboard. The Settings app opens.
- Go to Notifications: In the Settings window, click System on the left side. Then, on the right side, click Notifications. You should now see the notification options for your PC.
- See More Notification Options: At the top, you’ll see a main Notifications switch. Leave it on. Click the word Notifications or the small arrow next to it to expand the section. A list of extra options appears.
- Find the Lock Screen Setting: Look through the expanded list until you see Show notifications on the lock screen. It’s usually on by default. If you don’t see it, scroll down a little further.
- Turn It Off: Click the switch next to Show notifications on the lock screen. It moves to the left and usually turns grey or a lighter color. On some builds this option is a checkbox instead, so clear the tick.
- Test It: Press the Win+L to lock your PC. The lock screen should now show only the time and your background, with no alert pop-ups.
If the option is missing or greyed out, check that the main Notifications switch at the top is on. On a work or school PC, an administrator may control the setting, and you can’t override it.
The lock screen can also show detailed status from one app, such as Weather or Calendar. To change that, go to Settings Personalization Lock screen and look at the Lock screen status list. Choose None if you want nothing extra shown.
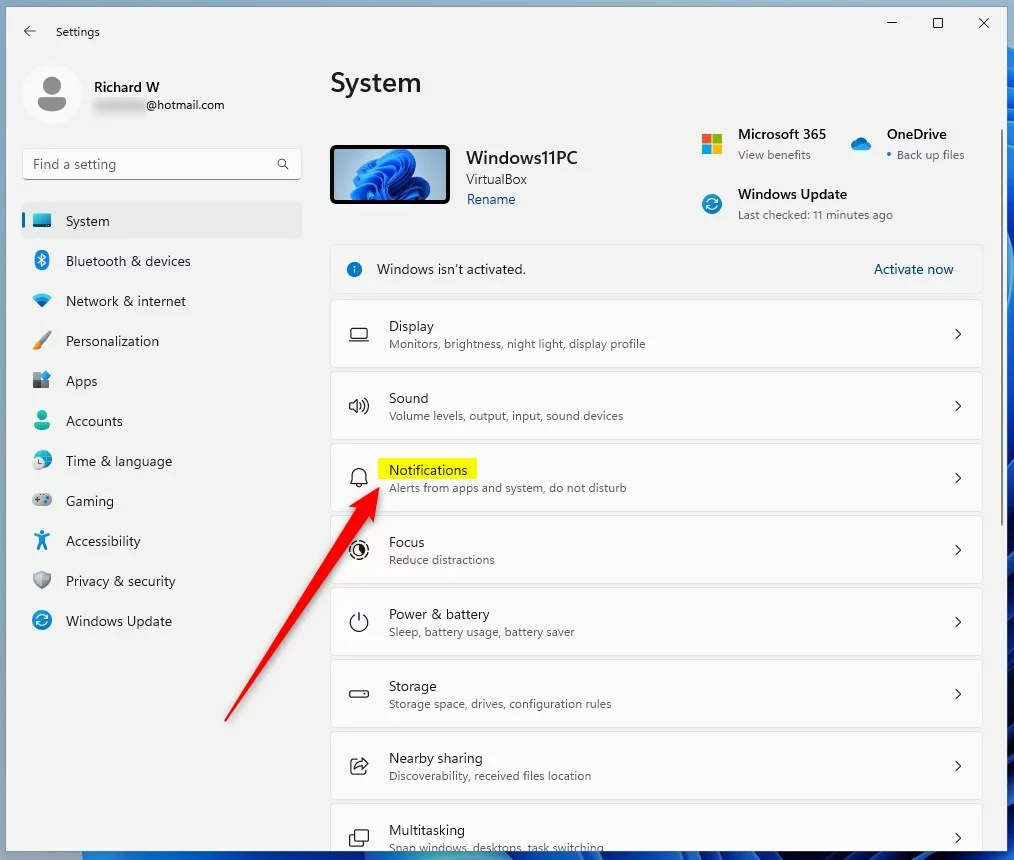
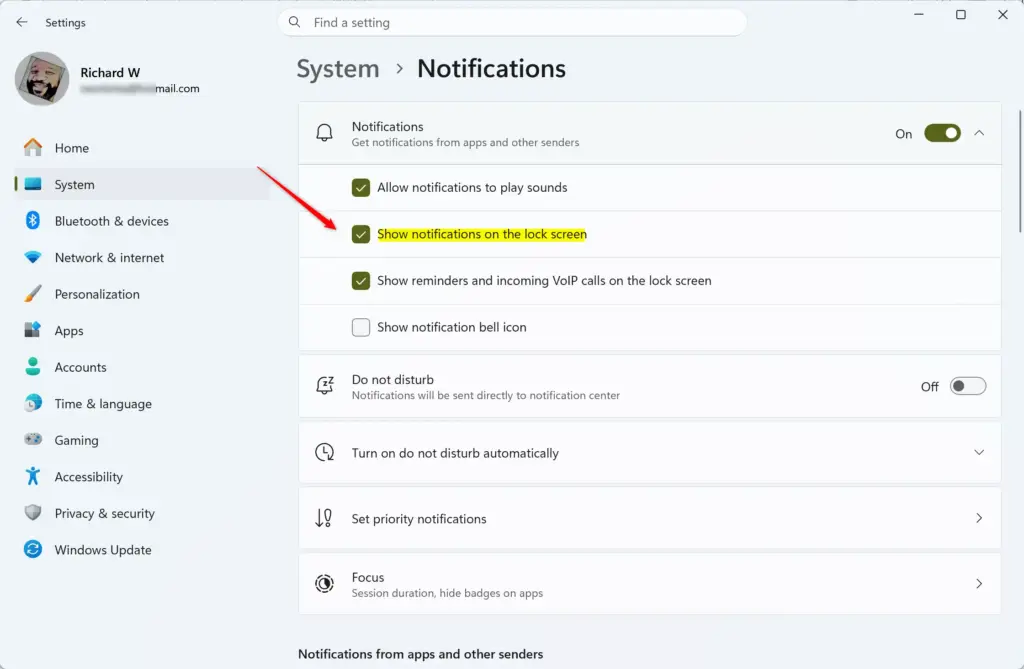
To sum up the Settings method: open Settings, go to the notifications page under System, and turn off Show notifications on the lock screen. That stops app alerts and message previews from appearing on your locked monitor. It needs no advanced tools or system changes, and you can undo it at any time.
Quick Tip:
You can bring the alerts back whenever you like. The change applies at once and needs no restart.
- Press Win+I to open Settings .
- Click System, then click Notifications.
- Expand the Notifications section if it is collapsed.
- Turn the Show notifications on the lock screen switch back on, or tick the box if it is a checkbox.
This restores alerts on your Windows 11 lock screen, so you won’t miss important updates.
Option 2Using the Registry Editor (For Experienced Users)
Registry Editor is a tool for viewing and changing low-level Windows settings . It lets you disable lock screen notifications by changing the system values directly. This method works well if the Settings app fails or if you prefer managing your Windows configuration through system files.
Be careful with it. A wrong change in the registry can cause problems, so only edit the key and value shown in this guide.
Why Use the Registry?
Sometimes the Settings app might not be available, or you might prefer to change settings directly. This method can also be useful for automating changes.
- Click the Start button and type Registry Editor. Click the matching result. If Windows asks for permission, click Yes. You need an administrator account for this.
- Before you change anything, make a backup. In Registry Editor, click File Export and save a copy. You can double-click that file later to restore the old settings.
- Go to the key and set the value shown in the blocks below.
- Close Registry Editor, then sign out and back in, or restart your PC, so Windows reads the new value.
To undo the change, set the value back to what it was, or delete the value if you added it. You can also import your backup file. Then sign out and back in. Settings may also show the option greyed out afterwards, because the registry value now controls it.
Steps for System-Wide Registry Changes
Making system-wide registry changes to disable lock screen notifications requires opening 🗝️HKEY_LOCAL_MACHINE\- Open Registry Editor: Press the Win+R, type
regedit, and press Enter. Click Yes if a permission message appears. - Go to the Right Folder: Go to this location:
RegistryHKEY_LOCAL_MACHINE\SOFTWARE\Policies\Microsoft\Windows\System
If theSystemfolder isn’t there underWindows, right-click on theWindowsfolder, choose New, then Key, and name itSystem. - Create or Change the Setting: In the right-hand side of the
Systemfolder, look for something calledDisableLockScreenAppNotifications.- To Turn Off Notifications for Everyone: Right-click in the empty space, choose New, then DWORD (32-bit) Value. Name it exactly
DisableLockScreenAppNotifications. Double-click this new value. Set its Value data to1and click OK. - To Turn On Notifications for Everyone (Default): If the value already exists, double-click it and set its Value data to
0and click OK. If it doesn’t exist and you want to turn them on, you can delete theDisableLockScreenAppNotificationsvalue if it’s set to 1, or make sure it’s set to 0. If the value isn’t there, it means the setting isn’t configured, and individual settings will work.
- To Turn Off Notifications for Everyone: Right-click in the empty space, choose New, then DWORD (32-bit) Value. Name it exactly
- Close Registry Editor: Close the Registry Editor. You might need to restart your computer for these changes to apply to all user accounts.
Summary
Controlling lock screen notifications in Windows 11 can be done through the Settings app for your own account, the Registry Editor for advanced tweaks, or the Local Group Policy Editor for shared computers. Each method achieves the same privacy result depending on your Windows edition and user permissions.
How to Use Registry Editor
Disabling lock screen notifications through the registry requires navigating to 🗝️HKEY_CURRENT_USER\- Open Registry Editor: Press the Win+R to open the Run box. Type
regeditand press Enter or click OK. You might see a message asking for permission; click Yes. - Go to the Right Folder: In the Registry Editor, look at the left side. You need to go to this location:
RegistryHKEY_CURRENT_USER\Software\Microsoft\Windows\CurrentVersion\Notifications\Settings
You can also copy and paste this path into the address bar at the top of the Registry Editor and press Enter. - Find or Create the Setting: In the right-hand side of the window, look for something called
LockScreenToastEnabled.- To Turn Off Notifications: If you find
LockScreenToastEnabled, double-click it. In the box that appears, type0in the Value data field and click OK. If you don’t findLockScreenToastEnabled, right-click in the empty space on the right side, choose New, then DWORD (32-bit) Value. Name it exactlyLockScreenToastEnabled. Then, double-click the newLockScreenToastEnabledvalue, set its Value data to0, and click OK. - To Turn On Notifications (Go Back): To turn them back on, find or create
LockScreenToastEnabledagain, but set its Value data to1and click OK.
- To Turn Off Notifications: If you find
- Close Registry Editor: You can now close the Registry Editor. The changes should work right away, but sometimes you might need to restart your computer for them to fully apply.
Warning!
Be very careful when editing the Registry. Double-check all the paths and names. If you’re not sure, it’s safer to use the Settings app method.
Option 3Turn Off Notifications for Everyone Using Group Policy (Windows Pro/Enterprise/Education)
Local Group Policy Editor (a tool for managing advanced system-wide rules) lets you disable lock screen notifications for every user account on a shared computer. This method is built into Windows 11 Pro, Enterprise, and Education editions to help system administrators enforce privacy settings across multiple profiles.
How Group Policy Works
Group Policy is a tool that allows administrators to control how Windows behaves. It lets you set rules that apply to everyone on the computer, potentially overriding individual user preferences set in the Settings app.
Steps to Turn Off for Everyone
- Open Local Group Policy Editor: Press the Win+R, type
gpedit.msc, and press Enter. Click Yes if a permission message appears. - Find the Setting: In the Group Policy Editor, look at the left side and follow this path:
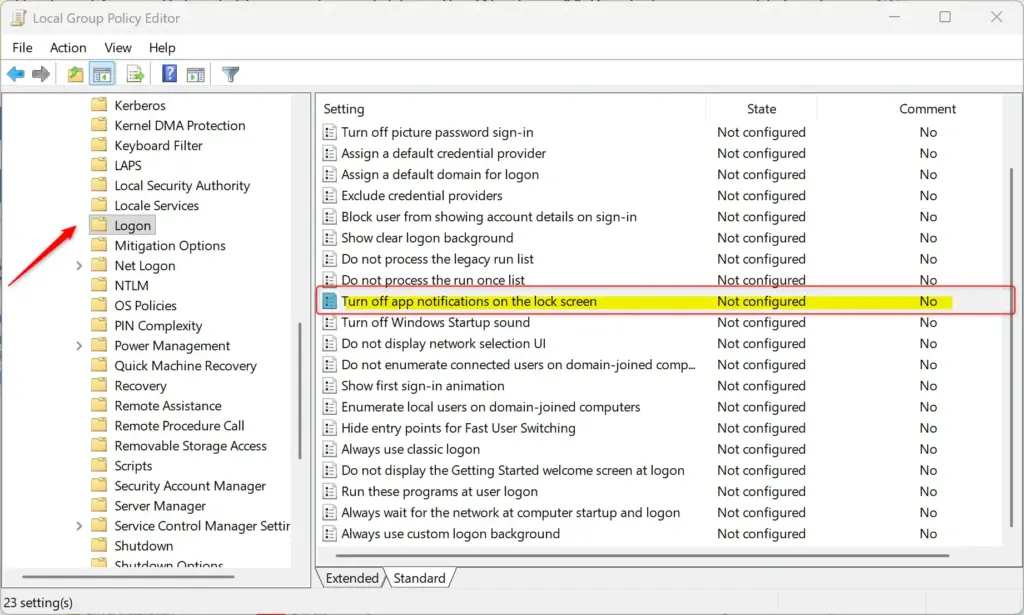
Computer Configuration>Administrative Templates>Windows Components>System>Logon - Find the Specific Policy: In the right-hand section, find a policy called Turn off app notifications on the lock screen. Double-click it.
- Set the Policy:
- To Turn Off Notifications for Everyone: Choose the Enabled option. This might seem strange, but enabling this policy actually turns off the notifications. Click Apply, then OK.
- To Allow Notifications for Everyone (Default): Choose the Not Configured option. This lets each person choose their own notification settings in the Settings app. Click Apply, then OK.
Turning off lock screen notifications for all users involves opening the Local Group Policy Editor and navigating to Computer Configuration Administrative Templates Windows Components System Logon This policy path applies the privacy rule globally across every user profile on your Windows 11 machine.
- Close Group Policy Editor: You can close the window. These changes usually take effect after you restart your computer or after Windows updates the policy in the background.
Important Note:
gpedit.msc, you'll need to use the Registry method (Option 2 or 4), which works on all Windows versions.Option 4Registry Method for All Users (Works on Windows Home)
If you don't have the Group Policy Editor (meaning you probably have Windows 11 Home), you can make the same setting change for everyone using the Registry Editor. Remember to be careful.
Steps for System-Wide Registry Changes
Making system-wide registry changes to disable lock screen notifications requires opening HKEY_LOCAL_MACHINE\SOFTWARE\Policies\Microsoft\Windows\System in the Registry Editor. You can create the system folder manually if it is missing, allowing you to enforce notification restrictions for every user without using group policy.- Open Registry Editor: Press the Windows key + R, type
regedit, and press Enter. Click Yes if a permission message appears. - Go to the Right Folder: Go to this location:
RegistryHKEY_LOCAL_MACHINE\SOFTWARE\Policies\Microsoft\Windows\System
If theSystemfolder isn't there underWindows, right-click on theWindowsfolder, choose New, then Key, and name itSystem. - Create or Change the Setting: In the right-hand side of the
Systemfolder, look for something calledDisableLockScreenAppNotifications.- To Turn Off Notifications for Everyone: Right-click in the empty space, choose New, then DWORD (32-bit) Value. Name it exactly
DisableLockScreenAppNotifications. Double-click this new value. Set its Value data to1and click OK. - To Turn On Notifications for Everyone (Default): If the value already exists, double-click it and set its Value data to
0and click OK. If it doesn't exist and you want to turn them on, you can delete theDisableLockScreenAppNotificationsvalue if it's set to 1, or make sure it's set to 0. If the value isn't there, it means the setting isn't configured, and individual settings will work.
- To Turn Off Notifications for Everyone: Right-click in the empty space, choose New, then DWORD (32-bit) Value. Name it exactly
- Close Registry Editor: Close the Registry Editor. You might need to restart your computer for these changes to apply to all user accounts.
Summary
Controlling lock screen notifications in Windows 11 can be done through the Settings app for your own account, the Registry Editor for advanced tweaks, or the Local Group Policy Editor for shared computers. Each method achieves the same privacy result depending on your Windows edition and user permissions.
Have a question about this guide?
Answered by AI from this guide. Good questions may be added to this page — please don't include personal details.
Did this guide fix your problem?

About the Author
Richard
Tech Writer, IT Professional
Richard is a writer at Geek Rewind who turns complex IT tasks into clear, step-by-step guides. He draws on years of hands-on experience in system administration and enterprise IT operations, focusing on Windows, Linux and WordPress: the problems people actually run into, and the fixes that work. His server and WordPress guides come from systems he runs himself. Richard builds and maintains the platform behind Geek Rewind, from its Ubuntu servers and Nginx configuration to its custom WordPress plugins. Many new tutorials start with readers' questions, and he's always glad to answer them in the comments.
[…] lock screen also allows you to display notifications and beautiful photos from around the world via Windows […]
[…] design, Windows will show you notifications on the device’s lock screen, the notification Center, and pop-up notification banners at the lower-right corner […]
[…] allows users to enable or disable local screen notifications, change the background, and […]
[…] computer without signing into Windows. All Windows computers have a button on the sign-in screen that allows you to put your computer to sleep, hibernate, shut down, […]