Protect Your Windows 11 with Microsoft Security

- 12 steps
- Needs administrator rights
Microsoft Defender Antivirus is the built-in security tool in Windows 11. It protects your computer from viruses, spyware, ransomware and other online threats. It starts working as soon as you turn on the PC, and it updates itself automatically with the latest threat data from Microsoft. On most PCs you never have to install or switch it on.
Windows Security is the app that gathers these protections in one place. It checks files and apps for danger in the background without getting in the way of your daily work. If you install a different antivirus program, Windows Security steps aside so the two don’t conflict. Defender turns back on if you remove that software. If you ever see two antivirus programs fighting over the same files, this handover is the first thing to check.
Open Windows Security by searching for it in the taskbar. Ensure all security areas show green checkmarks for optimal protection. This built-in tool defends against viruses, malware, and other online threats.
Login to Windows Security
Windows Security is the app you use to check your security status and run antivirus scans. You can open it in a few ways. The Start menu is the quickest.
- Press the Windows key.
- Type Windows Security in the search bar .
- Click the top result. The Windows Security window opens with an overview of your protection areas.
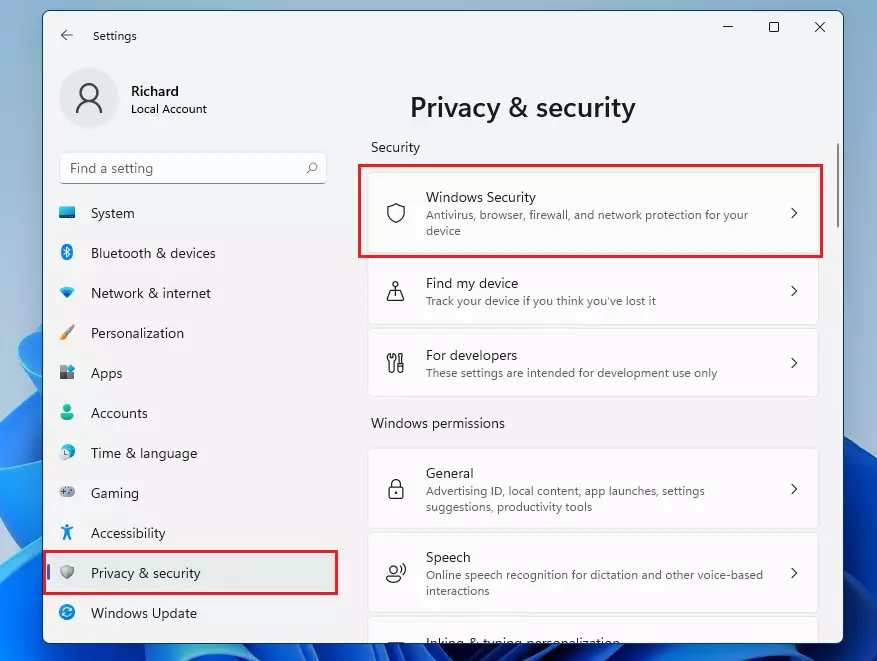
You can also go to Settings Privacy & security Windows Security and click Open Windows Security. Another way is to click the shield icon in the system tray. If you don’t see it, click the small arrow at the left of the tray to show hidden icons.

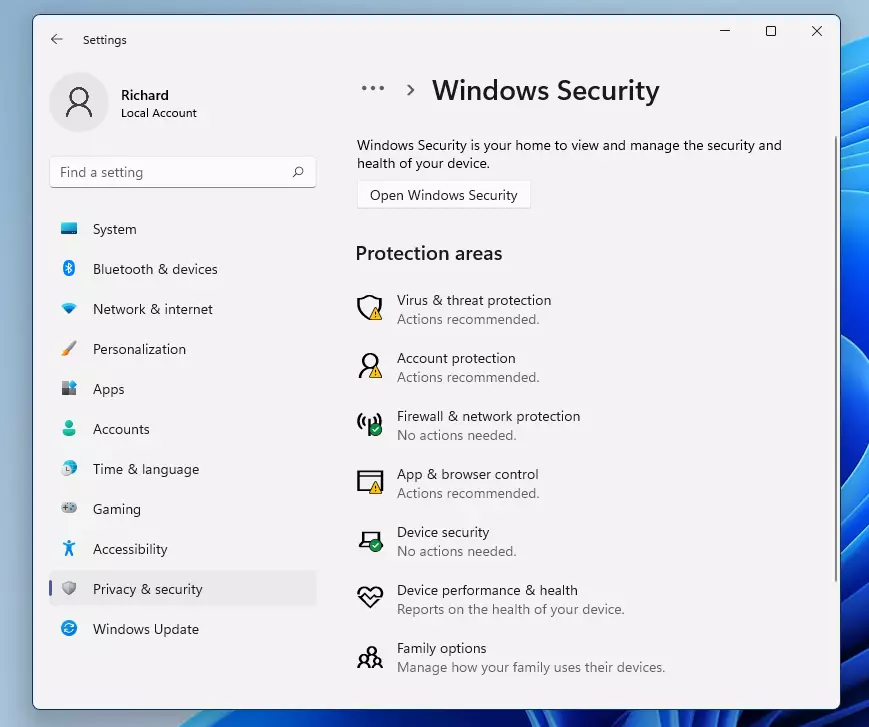
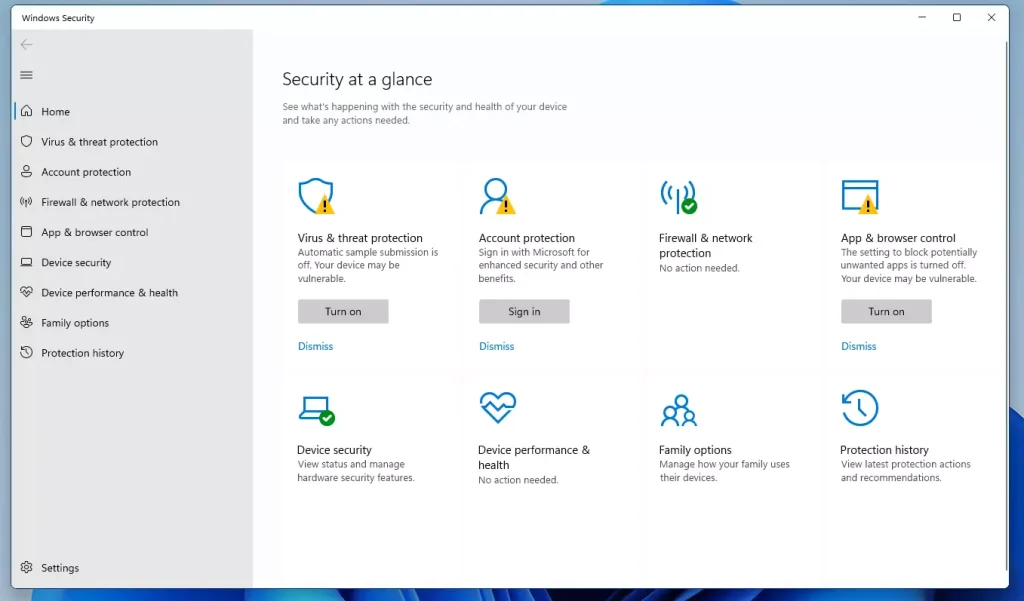
The main screen is a quick status report. Each protection area shows a small icon, and the colour tells you what to do:
- Green checkmarkYour computer is safe and nothing needs your attention.
- Yellow warningThere is a recommendation. Open that area and read what Windows suggests. It is often something minor, such as a setting that is turned off.
- Red markAct now. A security problem needs fixing, such as protection being switched off or a threat that wasn’t dealt with.
Click any area with a warning. Windows usually shows a button to fix the issue, such as Turn on or Restart now. Click it and the icon should change to green once the fix has applied.
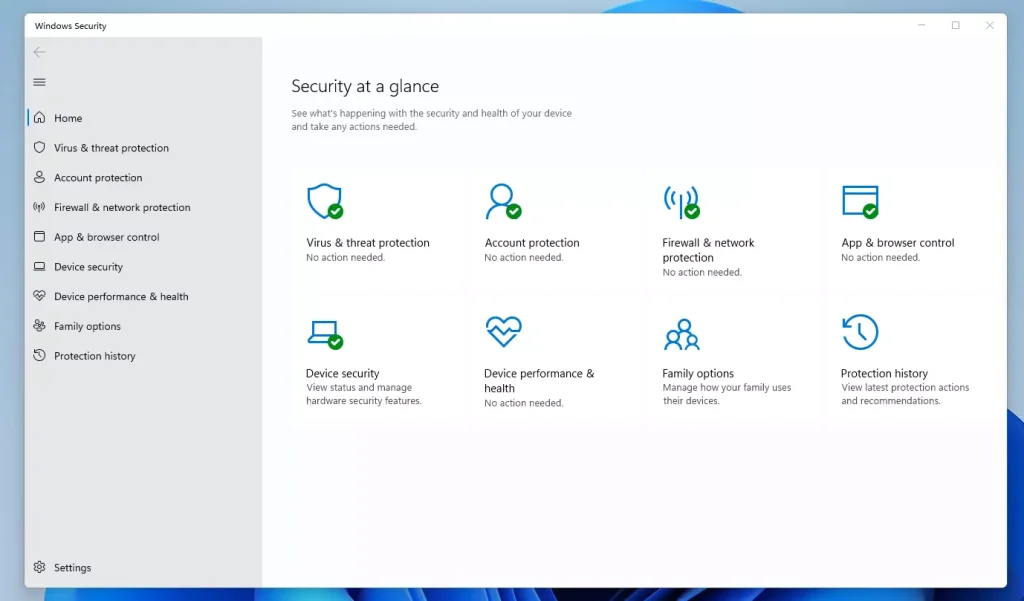
Security areas in Windows Security
Windows Security splits its tools into protection areas. Here is what each one does and what to look for in it:
- Virus & threat protection: Monitors your files for viruses and runs scans. This is where you start a quick scan, see past threats and check that real-time protection is on.
- Account protection: Manages your sign-in options, such as Windows Hello. It will also prompt you if your Microsoft account needs attention.
- Firewall & network protection: Watches your internet connections for suspicious activity. It shows whether the firewall is on for your domain, private and public networks.
- App & browser control: Uses SmartScreen to block dangerous websites, downloads and apps. Leave it on so Windows can warn you before you open something risky.
- Device security: This includes Core isolation and Memory integrity. These features use hardware security to stop malicious code from reaching your computer’s memory. Keep them turned on for the best protection. If Memory integrity won’t turn on, Windows usually lists an incompatible driver that needs updating or removing. Some older PCs don’t support the feature at all.
- Smart App Control: A modern feature that blocks untrusted or potentially unwanted apps. It adds a strong layer of defense for Windows 11 users. It isn’t available on every PC. It is mainly offered on new or freshly installed copies of Windows 11. On some versions, once you turn it off you can’t turn it back on without reinstalling Windows. Think before you switch it off.
- Device performance & health: Checks your system for updates and performance issues, such as storage space and driver problems.
- Family options: Helps you manage online safety for children. It links to Microsoft’s family tools, and you need a Microsoft account to use them.
Together, these areas manage everything from your firewall to your sign-in options. Virus & threat protection handles malware scans, Account protection secures your Microsoft sign-ins, and Firewall & network protection watches your internet connection. Each section lets you change settings and fix security warnings in one place. The exact list on your PC can differ a little depending on your edition and whether the PC is managed by an organization.
How to fix Windows Security apps
If the app stops opening, shows a blank window or behaves oddly, you may need to reset it. Follow this guide to fix it: %📂%LNK0%%
How to schedule a scan in 🪟 Windows 11
Defender already scans in the background, but you can also set a scan to run on a schedule you choose. Task Scheduler does this, so your computer checks for viruses at set times without any effort from you. It is included in Windows 11 Home and Pro. You need to be signed in with an administrator account to change these tasks.
Using Task Scheduler:
- Click the Start button, type Task Scheduler in the search bar and open it. The Task Scheduler window opens.
- In the left pane, go to Task Scheduler Library Microsoft Windows Windows Defender. The tasks in that folder appear in the middle pane.
- Right-click Windows Defender Scheduled Scan and select Properties. A properties window opens.
- Go to the Triggers tab and click New. The New Trigger window opens.
- Set your preferred schedule, for example daily or weekly at a time when you are not using the PC, then click OK.
- Click OK again to save the task. The new trigger now appears in the Triggers list.
To undo this, return to the same Triggers tab, select your trigger and click Delete.
Using PowerShell:
- Right-click the Start button and select Terminal (Admin). Click Yes if User Account Control asks for permission. A terminal window opens with administrator rights.
- Type
Set-MpPreference -ScanScheduleDay - Type
Set-MpPreference -ScanScheduleTime
If a command returns an error, check that the terminal says Administrator in its title bar. Most errors come from running it without admin rights.
Using the information above will keep your device secure. One important takeaway is that Windows Security is very capable, and most users do not need extra software. %📂%LNK1%%
Conclusion
- Windows Security offers strong, built-in protection against modern threats, and it works from the first day with no setup.
- Features like Smart App Control and Memory integrity are essential for Windows 11 security. Turn them on if your PC supports them.
- Regularly checking your status ensures your device stays healthy. A quick look for a green checkmark takes a few seconds.
- Knowing these tools helps you stay safe while browsing the web, and helps you tell a real warning from background noise.
Have a question about this guide?
Answered by AI from this guide. Good questions may be added to this page — please don't include personal details.
Did this guide fix your problem?

About the Author
Richard
Tech Writer, IT Professional
Richard is a writer at Geek Rewind who turns complex IT tasks into clear, step-by-step guides. He draws on years of hands-on experience in system administration and enterprise IT operations, focusing on Windows, Linux and WordPress: the problems people actually run into, and the fixes that work. His server and WordPress guides come from systems he runs himself. Richard builds and maintains the platform behind Geek Rewind, from its Ubuntu servers and Nginx configuration to its custom WordPress plugins. Many new tutorials start with readers' questions, and he's always glad to answer them in the comments.
[…] Removing the PIN from a Microsoft account will also turn off Account protection in Windows Security. […]
[…] changes to Microsoft Defender antivirus settings with tamper protection. Tamper Protection in Windows Security helps prevent malicious apps from changing Microsoft Defender Antivirus settings, including […]
[…] for and view device performance and health data in Windows 11. Windows has a built-in tool, part of Windows Security, that checks your device for security issues and provides a health report, which appears on the […]
[…] How to protect Windows 11 with Windows Security. […]
[…] How to install and use Microsoft Defender to protect one’s computer. […]
[…] post shows students and new users steps to turn Core Isolation Memory Integrity on or off with Microsoft Security in Windows 11. Core Isolation is a security feature that protects critical Windows core processes […]
[…] recently shared a guide on how to secure and protect your computer using Microsoft Security. We highlighted that when you […]
[…] do that, open the Windows Security app. Click the Start button and search for Windows Security, under Best match, select […]