How to Hide the Device Security Section in the Windows Security app on Windows 11
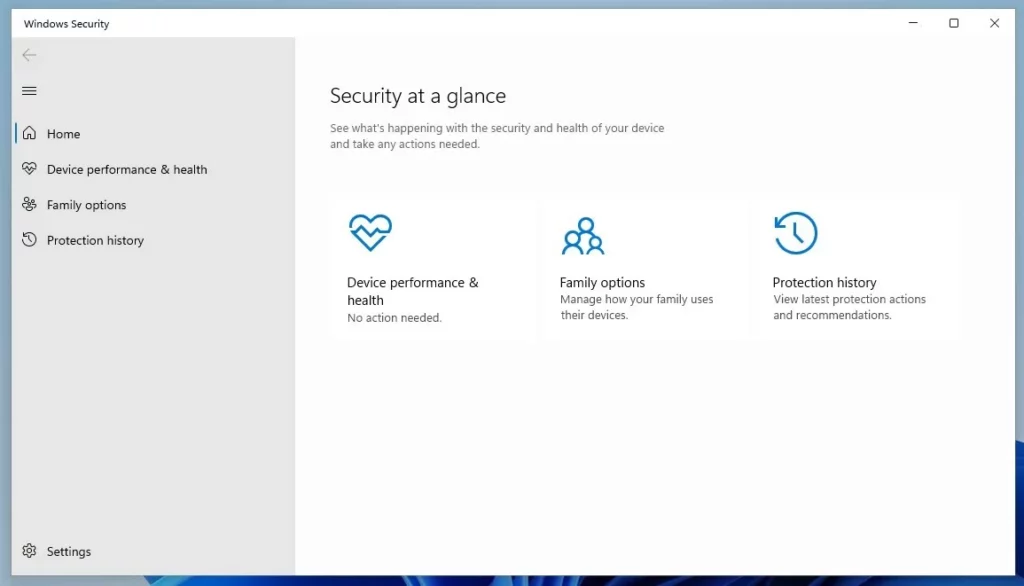
The Device Security section in the Windows Security app on Windows 11 shows your PC’s hardware security features, like virtualization-based security (VBS). VBS creates safe, separate areas on your computer’s hardware to better protect your data from malware.
You can hide this section for a cleaner look in the Windows Security app. Hiding it means the hardware security information simply won’t be visible.
To hide the Device Security section, you edit the Windows Registry. This involves adding a new registry key called `DeviceGuard` to a specific location: `🗝️HKEY_LOCAL_MACHINE\SOFTWARE\Microsoft\Windows Defender\Security Center`.
Edit the Windows Registry by navigating to 🗝️HKEY_LOCAL_MACHINE\SOFTWARE\Policies\Microsoft\Windows Defender Security Center\Device security. Create a DWORD value named UILockdown and set its data to 1 to hide the section or 0 to show it. Restart your PC to apply the changes.
Understanding Core Security Features
Windows 11’s Device Security leverages specialized hardware to shield your PC from online threats. Key features like Core Isolation and Memory Integrity employ virtualization to keep malicious code away from critical system components. The Security Processor, also known as the Trusted Platform Module (TPM 2.0), is a dedicated hardware chip for securely storing encryption keys, ensuring a secure startup process. Other features include Secure Boot, which verifies that only trusted software initiates your PC’s boot sequence, and Kernel-mode Hardware-enforced Stack Protection, which adds a defense against memory hijacking attacks. Credential Guard safeguards login information by storing it in a virtualized container, and Local Security Authority (LSA) Protection prevents unauthorized processes from accessing sensitive system memory.
- Core Isolation and Memory Integrity: This uses virtualization to isolate computer processes. It prevents malicious code from entering high-security areas of your system.
- Security Processor (TPM 2.0): The Trusted Platform Module (TPM) is a hardware chip that stores encryption keys. It ensures your PC is secure during startup.
- Secure Boot: This feature checks that your PC boots using only trusted software from the manufacturer.
- Kernel-mode Hardware-enforced Stack Protection: This adds a layer of protection to stop attackers from hijacking your system’s memory.
- Credential Guard: This protects your login information by storing it in a virtualized container.
- Local Security Authority (LSA) Protection: This prevents unauthorized processes from accessing sensitive system memory.
Best Practices for a Secure Environment
Why hide these settings?
You might want to hide the Device Security options if you manage a computer for others and do not want them changing security settings. Keeping the security baseline consistent is common in office or school environments.
What happens when done?
Applying these changes makes the Device security menu disappear from the Windows Security app or reappear, depending on the setting you choose. These modifications do not disable security features; they only hide the user interface for Device security.
Hide or Show Device Security via Group Policy
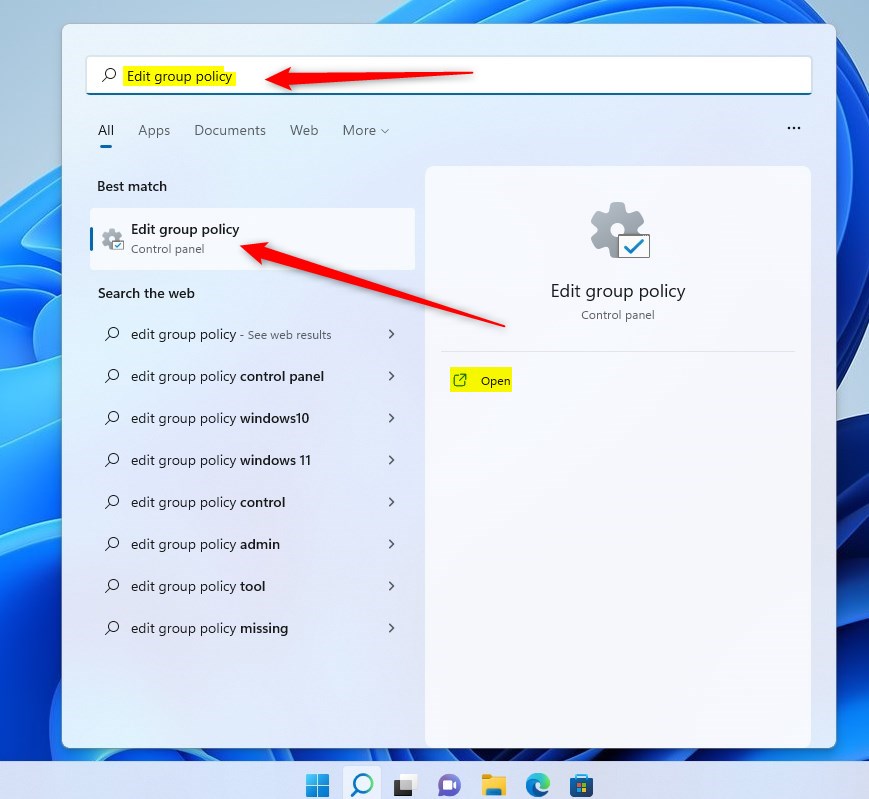
You can hide or show the Device Security section in Windows 11 using the Group Policy editor if you have administrator rights. To do this, open the Local Group Policy Editor by searching for ‘Edit group policy’ in the Start Menu. Then, navigate to the specific policy setting within the editor to make your changes.
- Open the Local Group Policy Editor by clicking the Start Menu and searching for “Edit group policy.”
- Select “Edit group policy” to open the editor.
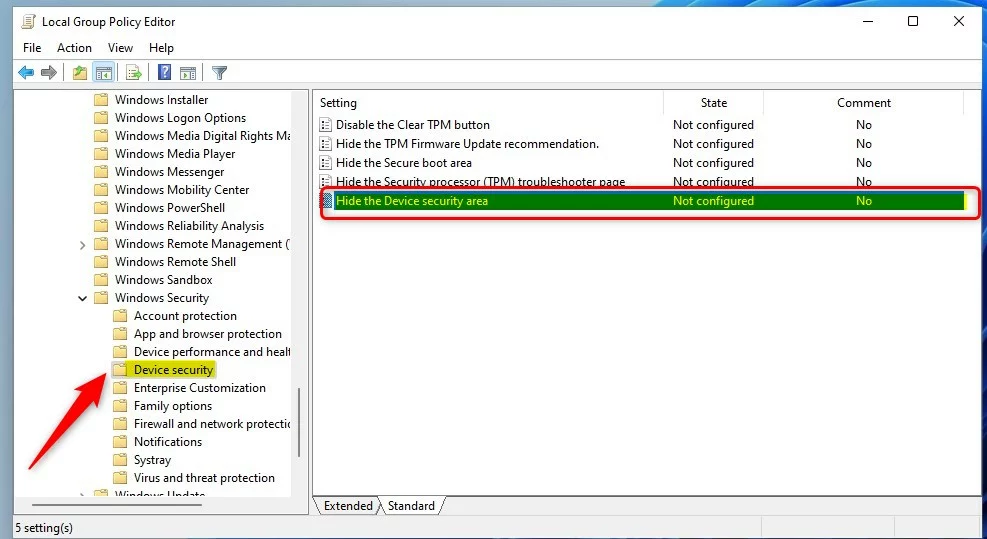
3. In the left panel, navigate to this path:
Computer Configuration\Administrative Templates\Windows Components\Windows Security\Device security
4. In the right pane, double-click on “Hide the Device security area.”
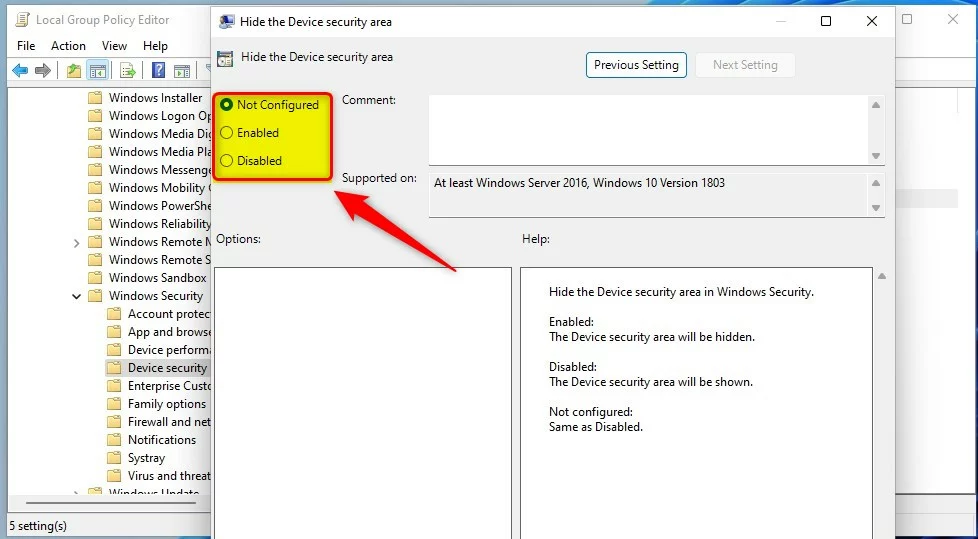
5. Choose one of the following options:
- Not Configured: The default setting.
- Enabled: Hides the Device security area.
- Disabled: Shows the Device security area.
Hide or Show Device Security via Registry
For those without access to Group Policy, the Windows Registry offers an alternative for managing the Device Security section’s visibility. Open the Registry Editor and navigate to this path: 🗝️HKEY_LOCAL_MACHINE\SOFTWARE\Policies\Microsoft\Windows Defender Security Center\Device security. Making changes here will hide or show the Device Security section.
If you cannot use the Group Policy editor, you can use the Windows Registry instead. Open the Registry Editor and go to this path:
🗝️HKEY_LOCAL_MACHINE\SOFTWARE\Policies\Microsoft\Windows Defender Security Center\Device security
If the folders do not exist, right-click the “Windows” key to create them.
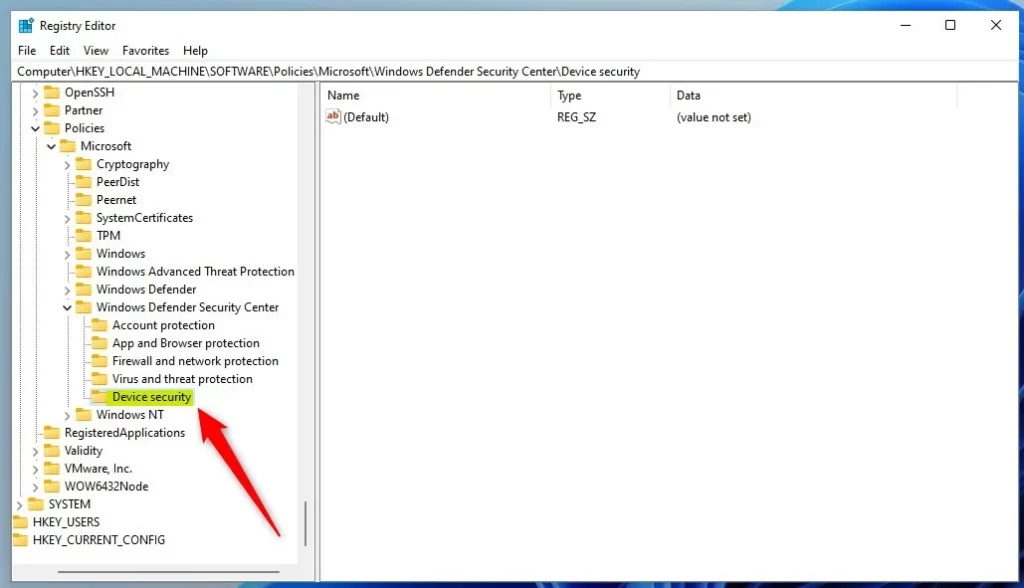
- In the right pane, right-click and select New > DWORD (32-bit) Value.
- Name this new value `UILockdown`.
UILockdown file. Set the Value data to 0 to show the section, or to 1 to hide it within the Windows Security app.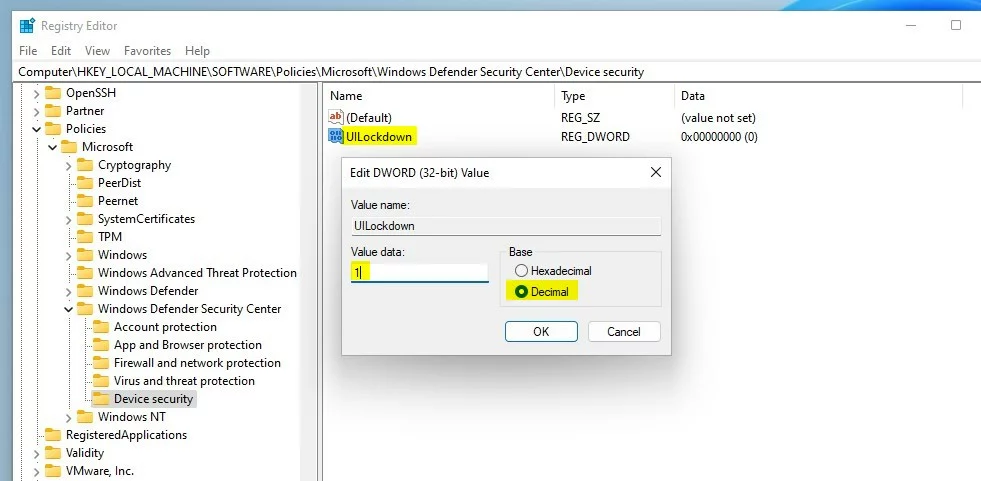
4. Restart your computer to apply the changes.
Summary
Windows 11 Device Security offers important hardware protection against today’s threats, and you can control its appearance using Group Policy or the Registry.
What is the difference between Device Security and Virus & threat protection?
Device Security protects your computer using hardware features like TPM to stop attacks at a basic system level, while Virus & threat protection looks for and removes active malware and viruses.
Why is my Device Security page showing ‘Standard hardware security not supported’?
Your Device Security page might say ‘Standard hardware security not supported’ because your computer’s hardware doesn’t have the latest features needed for things like Memory Integrity.
Was this guide helpful?

About the Author
Richard
Tech Writer, IT Professional
Richard, a writer for Geek Rewind, is a tech enthusiast who loves breaking down complex IT topics into simple, easy-to-understand ideas. With years of hands-on experience in system administration and enterprise IT operations, he’s developed a knack for offering practical tips and solutions. Richard aims to make technology more accessible and actionable. He's deeply committed to the Geek Rewind community, always ready to answer questions and engage in discussions.


[…] threat protection, firewall and network security, Account protection, App and Browser Control, and Device Security. This guide shows you how to hide or show the Windows Security app Family options […]