How to Check Secure Boot On Windows 11

Secure Boot stops unsafe software from running when you turn on Windows 11. It does this by checking the essential startup files before Windows loads. Windows 11 requires it, along with TPM 2.0, so your PC has to be capable of Secure Boot.
Checking whether Secure Boot is active takes a few clicks with built-in tools, and you don’t need to restart or open your firmware settings. Most Windows 11 computers already have it turned on by default.
Open Windows Security, click Device security, and look for the Secure Boot section—it displays On if enabled or Off if disabled. Alternatively, press Win+R, type msinfo32, and check the Secure Boot State value in System Information.
How to See if Secure Boot is On or Off
Here are three easy ways to check your Secure Boot status on Windows 11. All three only read the status and change nothing, so you can try more than one and compare the results.
1Check Using the Windows Security App
- Click the Start button, type Windows Security, and open the app from the results. The Windows Security window appears with a list of protection areas.
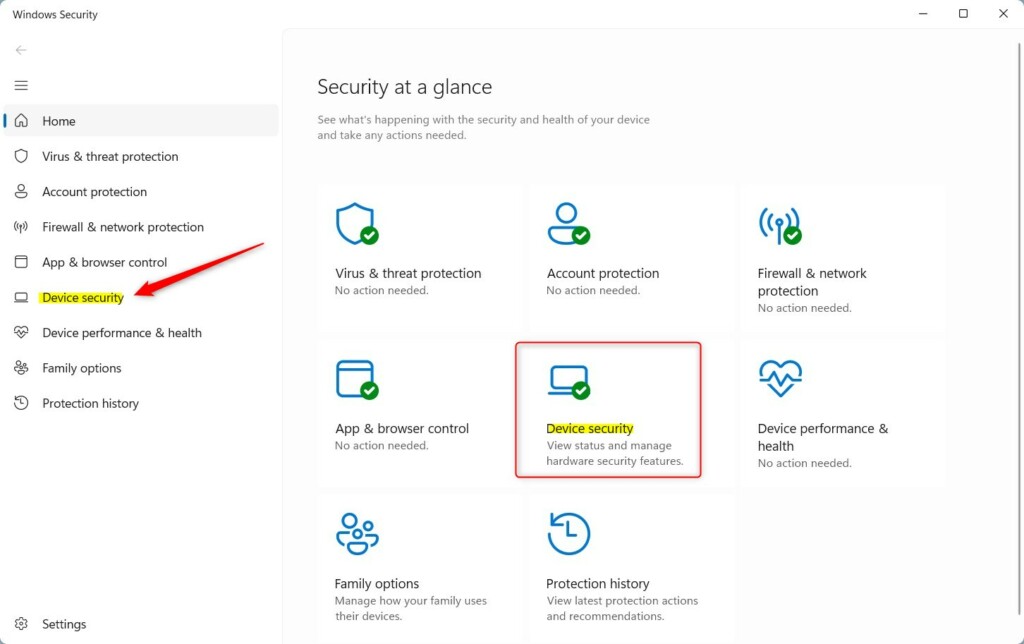
- Click Device security in the left pane or on the main page. If you don’t see it, the page may be hidden by your organization’s policy, or the device may not report this information.
- Look for the Secure Boot section. It says On if Secure Boot is enabled and Off if it’s disabled. Depending on your build, the wording may be a full sentence, such as “Secure boot is on”, but the meaning is the same.
If Windows Security doesn’t show a clear answer, the System Information tool is the next thing to try. It reports the Secure Boot state directly from the firmware.
It also shows whether the PC starts in UEFI or legacy mode, which matters because Secure Boot only works with UEFI.
2Use the System Information Tool
- Press Win+R on your keyboard to open the Run box.
- Type
msinfo32and press Enter. The System Information window opens with System Summary selected on the left. - In the right pane, scroll down until you find BIOS Mode and Secure Boot State. The list is alphabetical-style and fairly long, so they can be below the first screen of items.
- If BIOS Mode says UEFI and Secure Boot State says On, then Secure Boot is enabled.
- If Secure Boot State says Off, then Secure Boot is disabled. If it says Unsupported, or BIOS Mode says Legacy, the PC is not running in a way that allows Secure Boot.
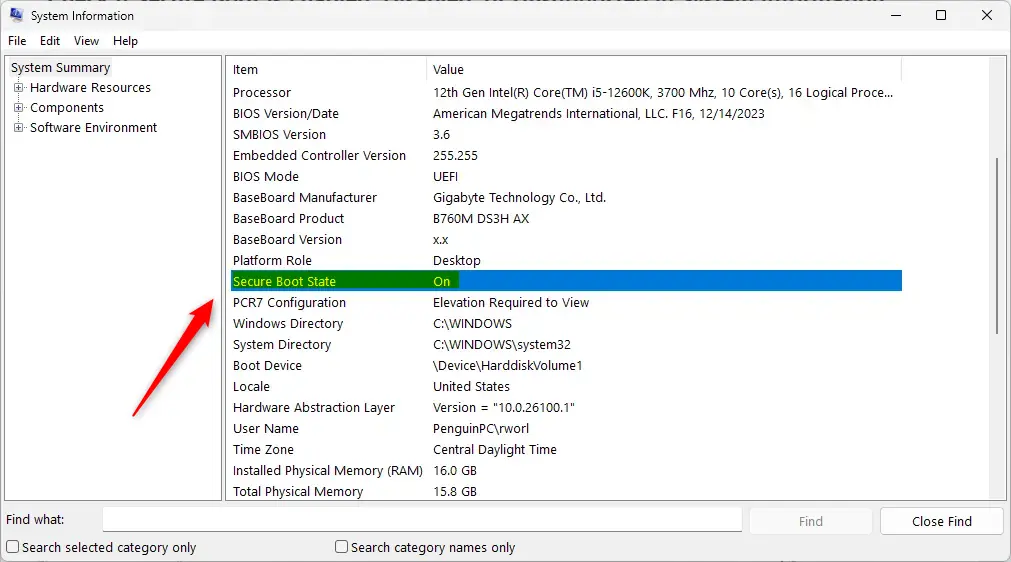
The System Information tool lets you check Secure Boot on Windows 11 without restarting your computer. You see your BIOS mode and Secure Boot state at a glance, and the whole check takes less than a minute.
3Use Windows Terminal to Check
- Right-click the Start button and select Windows Terminal (Admin). On some builds the entry is labeled Terminal (Admin). Click Yes if User Account Control asks for permission. %%SC0%%
- In the terminal window, type the following command and press Enter. The window should open in PowerShell by default. If it opens in Command Prompt, open a PowerShell tab first:
Windows Terminal gives you a fast way to check Secure Boot on Windows 11 with a single command. It must run as administrator, because the command reads firmware data. It returns a true or false value right away, so you know your exact system status. Here is what each result means:
- True — Secure Boot is enabled.
- False — Secure Boot is disabled.
- An error message — Secure Boot is not supported on your device. This usually means the PC is running in legacy BIOS mode. An access error instead means the terminal was not opened as administrator, so close it and repeat the steps above.
Summary
- Secure Boot helps protect your PC by only allowing trusted software when it starts.
- Windows 11 requires Secure Boot for installation. In practice, the PC must be Secure Boot capable and use UEFI mode, and it is normally left turned on.
- You can check Secure Boot status using the Windows Security app, System Information tool, or Windows Terminal.
- Secure Boot status shows as On/Off or True/False depending on the method you use.
Knowing how to check Secure Boot on Windows 11 helps you verify that your computer meets modern security standards and system requirements. You can use built-in tools like System Information or the Terminal to confirm your status in seconds.
The key to enter those settings and the name of the option differ by manufacturer, so check your PC or motherboard manual. Changing it requires a restart.
If you have questions or need more help, feel free to ask in the comments below!
Was this guide helpful?

About the Author
Richard
Tech Writer, IT Professional
Richard is a writer at Geek Rewind who turns complex IT tasks into clear, step-by-step guides. He draws on years of hands-on experience in system administration and enterprise IT operations, focusing on Windows, Linux and WordPress: the problems people actually run into, and the fixes that work. His server and WordPress guides come from systems he runs himself. Richard builds and maintains the platform behind Geek Rewind, from its Ubuntu servers and Nginx configuration to its custom WordPress plugins. Many new tutorials start with readers' questions, and he's always glad to answer them in the comments.



No comments yet — be the first to share your thoughts!