How to Enable or Disable Modify Indexed Locations in Indexing Options in Windows 11


Modify Indexed Locations in Indexing Options in Windows 11 lets you lock down search settings so no one can add or remove folders from your PC search catalog. Search indexing builds a fast list of your files, and Windows 11 turns this feature on by default for common folders.
Locking this setting stops other people from changing which drives and folders are tracked. You need administrator rights to make this change. The policy blocks changes made through Indexing Options. It does not turn indexing off, and Windows keeps searching the locations that are already indexed.
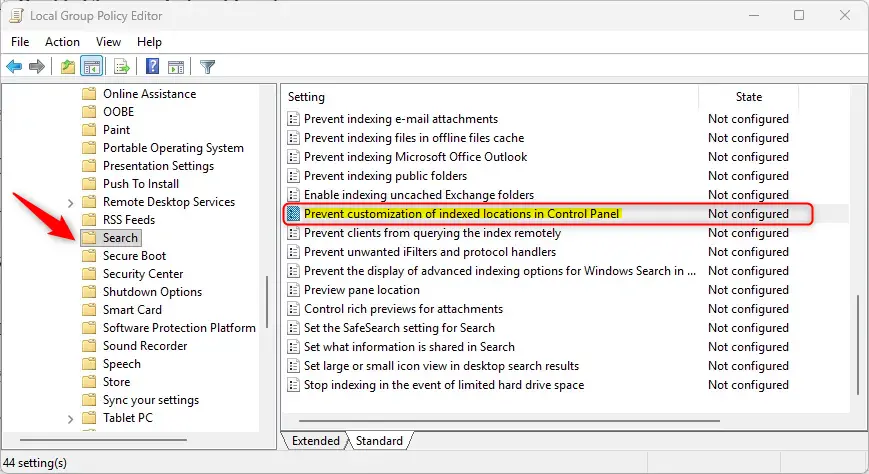
Open Local Group Policy Editor, go to Computer Configuration Administrative Templates Windows Components Search, double-click Prevent customization of indexed locations in Control Panel , select Enabled to lock it or Not Configured to allow changes, then click Apply and OK.
Method 1Local Group Policy Editor
Local Group Policy Editor (a tool for managing system settings) lets you control modify indexed locations on Windows 11 Pro, Enterprise, and Education editions. You can use this built-in feature to turn the setting on or off so standard users cannot change where Windows looks for your files when you search.
This method only works on the editions listed above.
- Open the Local Group Policy Editor. You can do this by typing
gpedit.mscin the Windows search bar and pressing Enter. If a User Account Control prompt appears, click Yes. The Local Group Policy Editor window should now open with a tree of folders on the left. - In the left-hand menu, go to:
Computer Configuration>Administrative Templates>Windows Components>Search. Click the last folder in the path. Its settings should now be listed in the right-hand section. - In the right-hand section, find and double-click on the setting named Prevent customization of indexed locations in Control Panel . A window with the same name should now open.
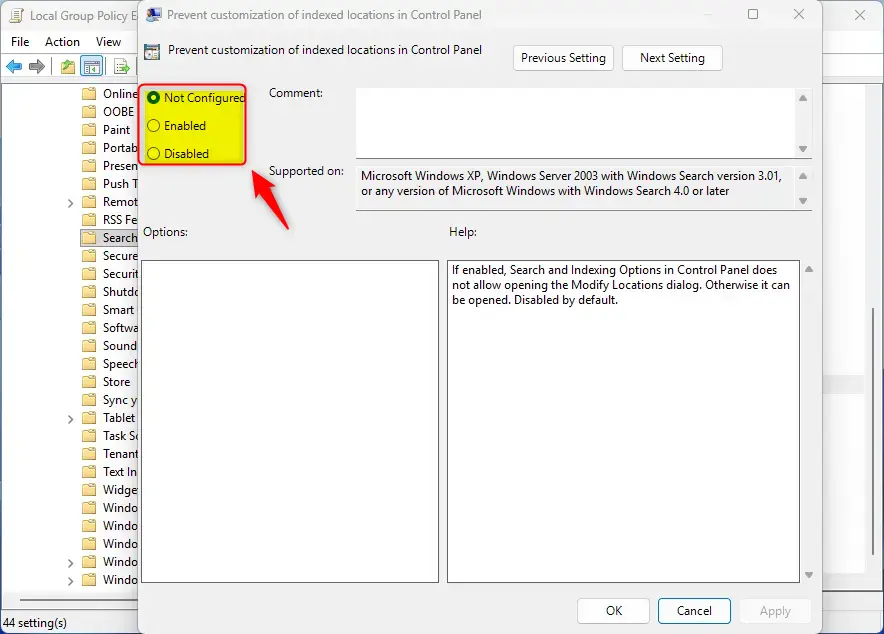
- Choose the option you want:
- Select Enabled to lock the setting. Standard users can no longer change which locations are indexed.
- Select Not Configured or Disabled to allow changes again. Not Configured is the default state and gives the normal Windows behavior.
- Click Apply, then click OK. The window closes and the policy is saved.
- Check that it worked. Open Indexing Options from the Control Panel and try to change the indexed locations. With the policy Enabled, the change should be blocked. If it still looks the same, sign out and back in, or restart the PC, so the policy refreshes.
To undo the change, go back to the same setting and select Not Configured, then click Apply and OK. If the setting looks greyed out or you cannot save it, make sure you are signed in with an administrator account and that you opened the editor on a supported edition.
To Enable Changing Indexed Locations (Default Setting)
Enable modify indexed locations in Windows 11 by deleting a specific registry value or leaving it absent from your system. This restores the default setting and lets anyone with access change the folders that Windows includes in its search results through the Indexing Options menu.- Select the option Not Configured.
- Click OK.
To Disable Changing Indexed Locations
- Select the option Enabled.
- Click OK.
Disable modify indexed locations in Windows 11 by adding a new DWORD value to the registry. This stops other users from changing the folders that Windows searches through the Indexing Options menu and locks down your search settings.
Method 2Registry Editor
Registry Editor (a database for storing system settings) lets you control modify indexed locations on all Windows 11 versions, including Home. You can use this method to turn the feature on or off by changing a single key when the group policy tool is not available on your edition of Windows.
Back up your registry before making changes. You need administrator rights to edit the registry.
To Enable Changing Indexed Locations (Default Setting)
To enable changing indexed locations, ensure a specific registry value isn't set.
Follow these steps:
- Open the Registry Editor by typing
regeditin the Windows search bar and pressing Enter. If prompted by User Account Control, click Yes. - Navigate to the following path in the left-hand pane:
HKEY_LOCAL_MACHINE\SOFTWARE\Policies\Microsoft\Windows\Windows Search. If theWindows Searchkey does not exist, you will need to create it. Right-click onWindows, selectNew, thenKey, and name itWindows Search. - In the right-hand pane, right-click on an empty space, select
New, thenDWORD (32-bit) Value. - Name the new value
PreventModifyingIndexedLocations. - Make sure the Value data for
PreventModifyingIndexedLocationsis set to0or that the value is deleted. If it exists and is set to1, change it to0. - Click OK.
- Close the Registry Editor.
To Disable Changing Indexed Locations
To disable changing indexed locations, add or modify a specific registry value.
Follow these steps:
- Open the Registry Editor by typing
regeditin the Windows search bar and pressing Enter. If prompted by User Account Control, click Yes. - Navigate to the following path in the left-hand pane:
HKEY_LOCAL_MACHINE\SOFTWARE\Policies\Microsoft\Windows\Windows Search. If theWindows Searchkey does not exist, you will need to create it. Right-click onWindows, selectNew, thenKey, and name itWindows Search. - In the right-hand pane, right-click on an empty space, select
New, thenDWORD (32-bit) Value. - Name the new value
PreventModifyingIndexedLocations. - Double-click on the new
PreventModifyingIndexedLocationsvalue. - In the Value data field, type
1. - Click OK.
- Close the Registry Editor.
Summary
You can decide if users can change the locations Windows indexes for searching on Windows 11. By using either the Local Group Policy Editor or the Registry Editor, you can enable or disable this feature to keep your computer's search settings configured as desired.
Was this guide helpful?

About the Author
Richard
Tech Writer, IT Professional
Richard is a writer at Geek Rewind who turns complex IT tasks into clear, step-by-step guides. He draws on years of hands-on experience in system administration and enterprise IT operations, focusing on Windows, Linux and WordPress: the problems people actually run into, and the fixes that work. His server and WordPress guides come from systems he runs himself. Richard builds and maintains the platform behind Geek Rewind, from its Ubuntu servers and Nginx configuration to its custom WordPress plugins. Many new tutorials start with readers' questions, and he's always glad to answer them in the comments.




No comments yet — be the first to share your thoughts!