Windows Backup saves your desktop folders, app settings, Wi-Fi 📶 networks, and Microsoft Store apps to your cloud storage account so you can move them to a new PC. It keeps a copy of your personal files and computer preferences linked to your Microsoft account. It is not a full system image, so it will not recover everything on the drive. It covers the folders and settings you choose.
Advertisement
Windows Backup is available in both Home and Pro editions of Windows 11. To pick which folders and settings you want to save, search for Windows Backup in the Start menu ⊞ and open it. The same options are in the Settings ⚙️ app, and the steps below use Settings.
⚡ Quick Answer
Open Settings›Accounts›Windows backup, toggle on the folders and settings you want to save, and Windows syncs them to your Microsoft account’s OneDrive storage. To restore, sign in with the same account on a new PC and select what to recover from Windows backup.
Advertisement
Step 1Sign in with a Microsoft account
You need a Microsoft account to back up and restore in Windows 11 using cloud services. A free Microsoft account includes 5 GB of OneDrive storage, and you can buy more if you need it. Signing in links your local profile to the cloud so your files and settings have somewhere to go. If you already sign in to Windows with a Microsoft account, you can skip these steps.
Open Settings.
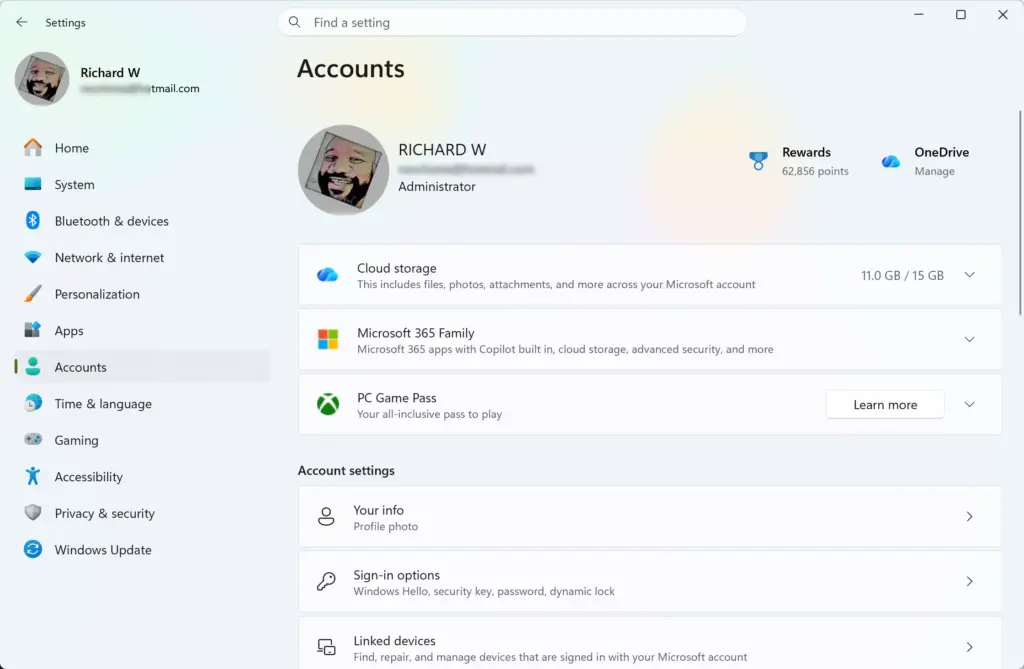
Select Accounts. Settings › Accounts
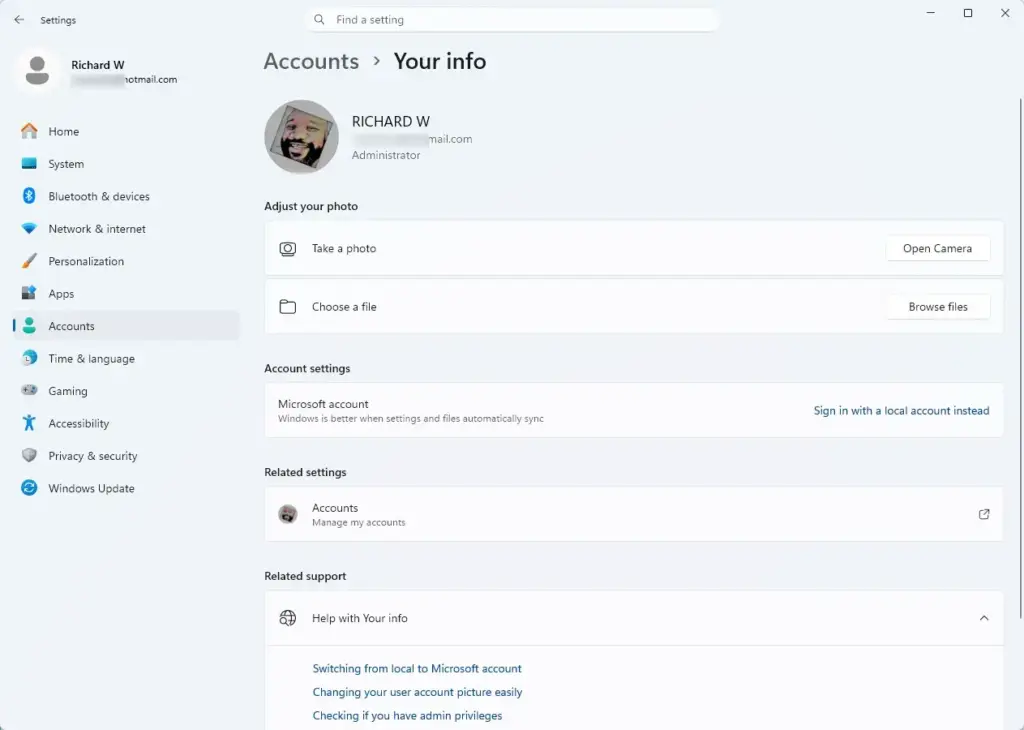
Select Your info. Settings › Accounts › Your info Under your name, check whether it shows an email address or says Local account.
If you are on a local offline account, select Sign in with a Microsoft account instead and enter your Microsoft account credentials. Follow the prompts, which may ask you to confirm your current Windows password or PIN.
Check Your info again. It should now show your Microsoft account email address.
If you do not have a Microsoft account yet, you can create one for free on the sign-in screen. To undo this later, switch back to a local account from the same Your info page. Be aware that a local account cannot use Windows Backup.
Step 2Back up your folders
You can back up and restore in Windows 11 by choosing which user folders sync continuously to OneDrive. This protects your Desktop, Documents, and Pictures folders if your drive fails or the PC stops working. Windows backup settings let you turn on folder sync in a few clicks.
Open Settings.
Select Accounts.
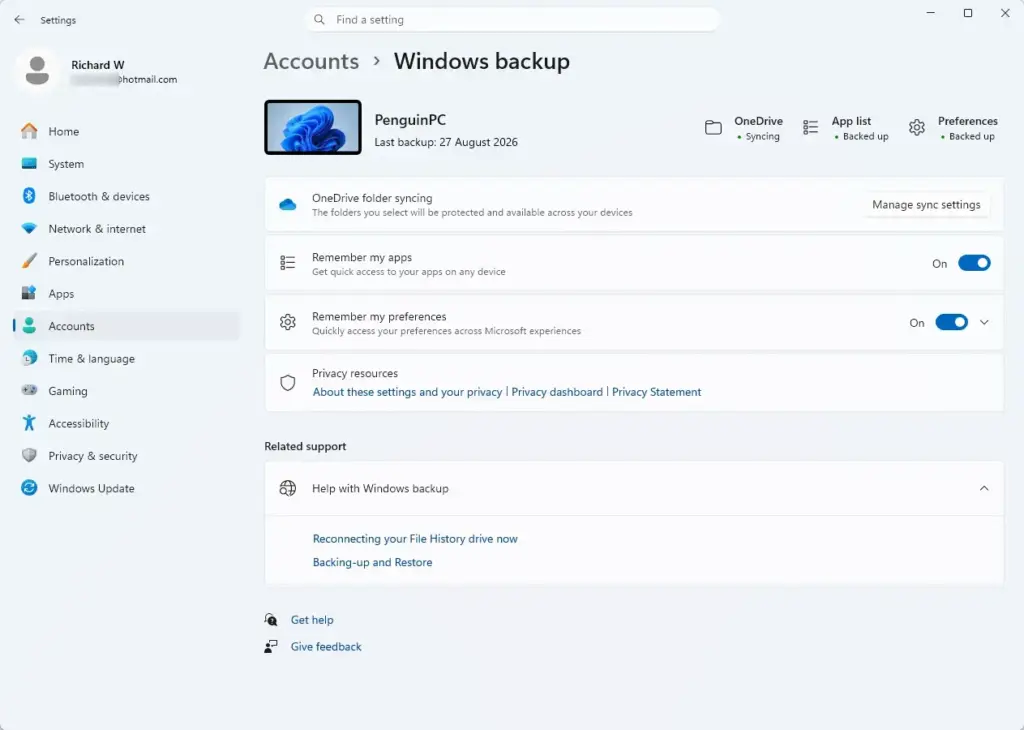
Select Windows backup. Settings › Accounts › Windows backup You should see the backup options, including a folder section and the app and preference switches.
Expand the Folders section or select Manage sync settings. On many current builds this section is called OneDrive folder backup and has a Manage folders button. The label depends on your Windows 11 version and OneDrive version.
Toggle the switches for Desktop, Documents, and Pictures to turn synchronization on or off. Some builds also list Videos and Music.
If a Save changes button appears, select it. Windows then starts syncing the chosen folders. You should see the backup status change as files upload.
⚠️WarningKeep an eye on the 5 GB free limit.
Large photo or video folders can fill it quickly, and Windows will warn you when you run out of space. If a folder will not fit, either buy more OneDrive storage or leave that folder switched off.
Advertisement
Step 3Back up your settings and preferences
Windows 11 can also save your system appearance, app preferences, saved Wi-Fi networks, and language settings to the cloud, so your next device matches your current setup.
Open Settings.
Select Accounts.
Select Windows backup. Settings › Accounts › Windows backup
Toggle on the options for Remember my apps and Remember my preferences. If you expand Remember my preferences, you can choose categories such as accessibility, personalization, and language settings.
Remember my apps saves the list of your Microsoft Store apps and some other installed apps, so they can be offered for reinstall on a new PC. It does not save the program files themselves or their data. Switching these toggles off stops future syncing of that data. It may not remove what is already saved in your account.
Step 4Let Windows handle the rest
Once configured, Windows runs your backups automatically in the background whenever you connect to the internet. You do not need to start them by hand. You can check synchronization progress and storage use on the same Windows backup page in the Settings app. If the status looks stuck, check that you are online and that OneDrive is running in the system tray.
What about my Microsoft Edge preferences?
Your web data needs separate handling. Microsoft Edge preferences are tied to your browser profile, not to the general Windows backup and restore in Windows 11 utility. Saved passwords, autofill information, open tabs, and extensions do not transfer through the main system settings, so you must turn on sync inside the browser to save your web data.
Advertisement
Open Microsoft Edge and sign in with your Microsoft account if you are not already signed in.
Open the Settings and more menu (the three dots), then select Settings.
Select Profiles, then Sync.
Turn sync on and choose the data types you want, such as Favorites, Passwords, Extensions, and Open tabs.
Menu names in Edge change from time to time, so look for the sync option under your profile if yours looks different.
Modify your backup configuration
As your cloud storage fills up or your preferences change, you can change what syncs automatically.
Open Settings, select Accounts, then choose Windows backup.
Switch off any folder you no longer want backed up, or switch off Remember my apps or Remember my preferences.
⚠️WarningBe careful when you stop backing up a folder such as Documents.
Files already uploaded stay in OneDrive, and the folder on your PC may look empty. Windows usually prompts you about this. If you want the files back on the PC, open your OneDrive folder in File Explorer and move or copy them back to the local folder before you stop syncing.
Restore your PC
When you set up a brand-new Windows 11 device, or reinstall the operating system on an existing machine, you can pull your backed-up data straight down from the cloud during the out-of-box experience, the first-run setup screens.
Advertisement
Start setup and sign in with the same Microsoft account you used for the backup.
When Windows offers to restore, choose the backup from your old PC. The wording is usually something like Restore from this PC backup, and the PC name is shown. Choose Set up as new PC if you want a clean start.
Review the list of apps and settings, then continue and let setup finish. After you reach the desktop, your folders sync from OneDrive and your saved apps appear on the Start menu or in the Microsoft Store for reinstall.
Expect some time for large folders and for app reinstalls to finish, because both depend on your internet speed. Edge data comes back only if you turned on sync in the browser, as covered earlier.
How do I restore a backup?
You can restore a backup during the setup assistant when you turn on a new or freshly reset Windows 11 device. By signing in with the exact same Microsoft account you used to create your backup, you can download your applications, desktop files, and system settings automatically. This process brings all your saved data back to your computer without manual file transfers.
Turn on your new or freshly reset Windows 11 device to start the setup assistant.
Sign in using the exact same Microsoft account you used to create your backup.
Select your most recent device backup from the list of available cloud restores when prompted.
Click "Restore" and wait for Windows to download your applications, desktop files, and system settings automatically.
How to create a full system backup for 🪟 Windows 11
A full system backup creates an exact sector-by-sector copy of your entire operating system drive, installed programs, and hidden system partitions. Standard cloud tools only handle personal files and settings, so you need a complete image for total recovery. You can use the older Backup and Restore (Windows 7) tool in Control Panel to create this comprehensive backup.
Open Control Panel.
Select Backup and Restore (Windows 7).
Click "Create a system image" in the left-hand menu.
Choose an external hard drive or network location to save the archive image.
Click "Start backup" and allow Windows to generate the complete system snapshot.
Alternative backup methods using File History
File History is an automated local backup tool that takes continuous snapshots of your personal user libraries without requiring cloud storage. It saves incremental versions of your files to an external drive or secondary internal partition. This feature lets you roll back an accidentally edited document to an earlier hour or day while you back up and restore in Windows 11.
Open Control Panel.
Select File History.
Connect an external storage drive to your computer.
Click "Turn on" to activate automated hourly backups of your user folders.
Click "Advanced settings" to adjust how often files are saved and how long older versions are kept before deletion.
What to do next
Verify that your backup storage drive has enough free space to accommodate your selected files and system snapshots. Next, you can explore setting up File History for automated hourly document versioning or configure advanced recovery drives for emergency troubleshooting.
Advertisement
Frequently asked questions
Does 🪟 Windows 11 have a Backup and Restore program?
Not as a main tool. Windows 11 uses Windows Backup, which saves your desktop folders, app settings, Wi-Fi networks, and Microsoft Store apps to OneDrive, linked to your Microsoft account. An older tool, Backup and Restore (Windows 7), is still in Control Panel for full system images.
Will I lose everything if I restore from a backup?
No, restoring does not erase the whole PC. It only brings back the folders and settings you saved. Anything not in the backup stays as it is. Before you restore, copy your current files somewhere safe, because restored files can replace files with the same name.
How do I backup my entire computer in 🪟 Windows 11?
Windows Backup does not copy everything on the drive. To make a full copy, open Control Panel, select Backup and Restore (Windows 7), then select Create a system image. Save it to an external drive with enough free space for your whole system.
How long does 🪟 Windows 11 restore from backup take?
It depends on how much you restore and how fast your internet connection is, because Windows Backup downloads your saved files from OneDrive. Settings and apps can finish in minutes. Large folders can take hours. Keep the PC plugged in and connected until it finishes.
Still have a question?
Answered by AI from this guide. Good questions may be added to this page — please don't include personal details.
📬 Get new Windows tips in your inbox
One email when we publish something worth your time. No spam, unsubscribe anytime.
Richard is a writer at Geek Rewind who turns complex IT tasks into clear, step-by-step guides. He draws on years of hands-on experience in system administration and enterprise IT operations, focusing on Windows, Linux and WordPress: the problems people actually run into, and the fixes that work.
His server and WordPress guides come from systems he runs himself. Richard builds and maintains the platform behind Geek Rewind, from its Ubuntu servers and Nginx configuration to its custom WordPress plugins.
Many new tutorials start with readers' questions, and he's always glad to answer them in the comments.
One email when we publish a guide worth your time — new Windows features, the fixes that actually
work, and a heads-up when Microsoft breaks something. Unsubscribe in one click.
📬 Get new Windows tips in your inbox
One email when we publish something worth your time. No spam, unsubscribe anytime.


No comments yet — be the first to share your thoughts!