How to Enable Windows 11 Lock Screen Fun Facts

- 16 steps
- Needs administrator rights
- Includes a restart or sign-out
Windows 11 lock screen fun facts show daily trivia, tips and jokes on your sign-in screen, next to the background image. The feature needs an active internet connection, because Windows downloads the daily content from Microsoft.
To start seeing the trivia, turn on Windows Spotlight in your Personalization settings. Spotlight is the Windows feature that rotates new background photos on the lock screen. After that, you can click the icons on the lock screen at any time to read more about the photo or fact on display.
Open Settings with Win+I, select Personalization, then click Lock screen and set Personalize your lock screen to Windows Spotlight. Fun facts, tips and tricks appear on the sign-in screen with no further setting. Picture and Slideshow need the “Get fun facts, tips, tricks, and more on your lock screen” checkbox ticked, and an internet connection is required.
How to change your lock screen settings
Sign in with a normal user account to change this. The setting works the same way on Windows 11 Home and Pro, so the steps below apply to both editions.
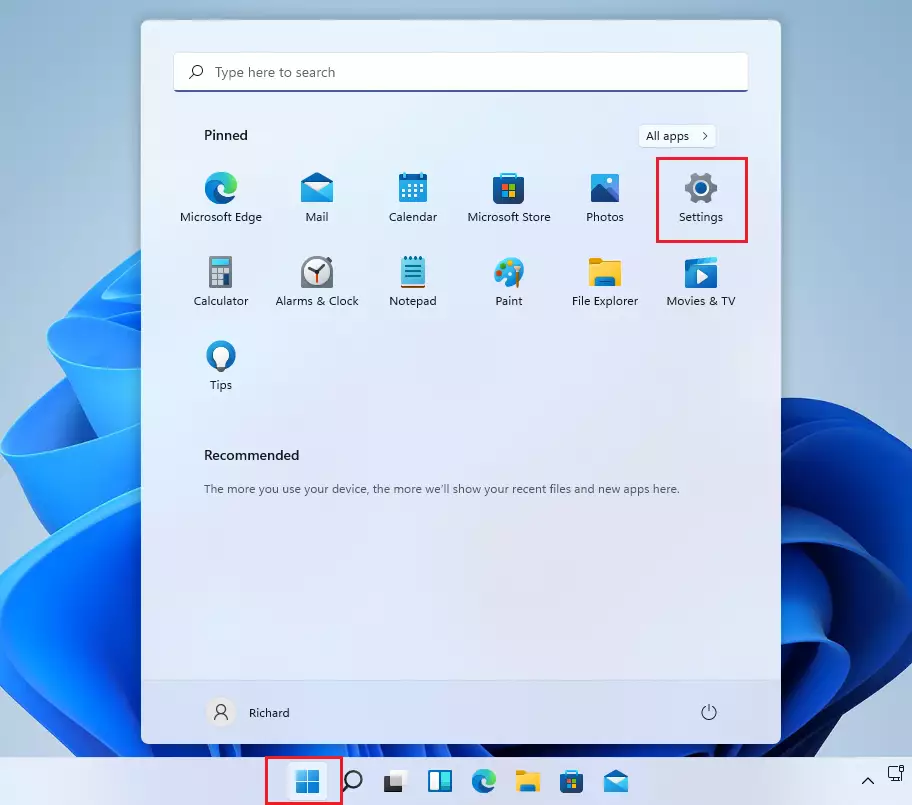
These steps enable Windows 11 lock screen fun facts from start to finish. They begin in the Settings app, which holds every lock screen option.
- Press Win+I to open Settings. The Settings app opens on the System page.
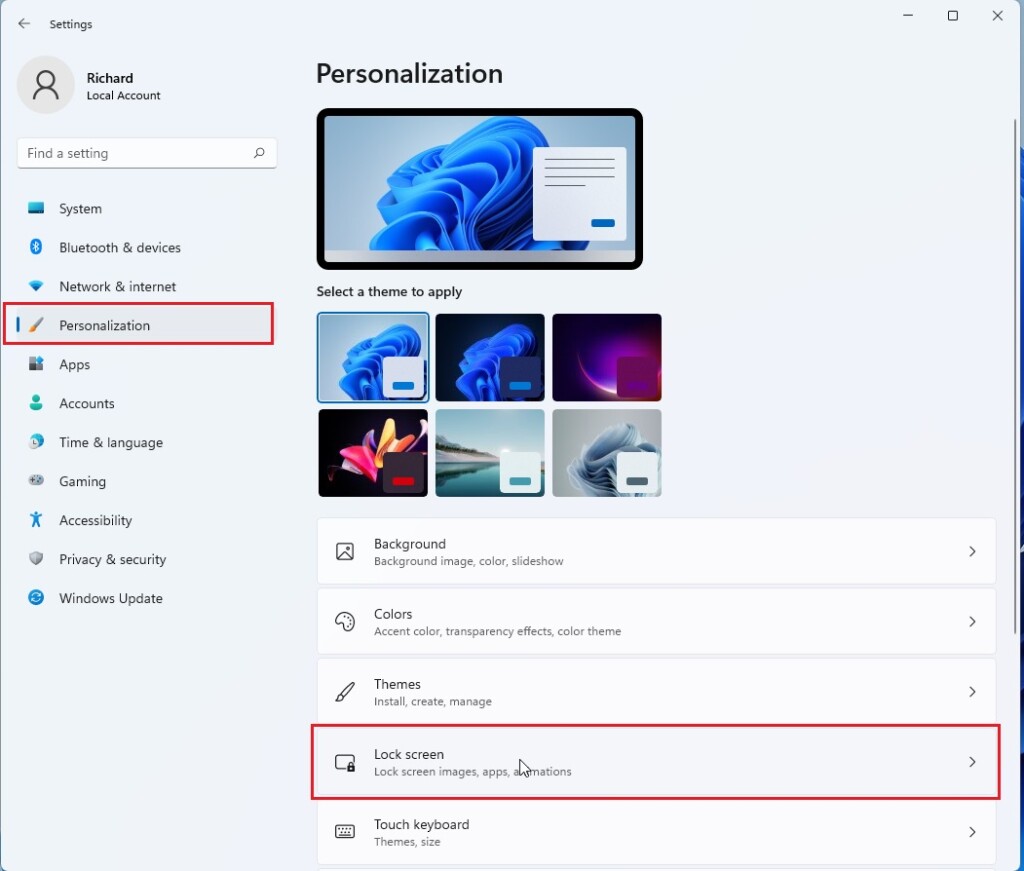
- Click Personalization in the left menu. The personalization options appear on the right.
- Click the Lock screen box on the right side. The lock screen settings page opens.
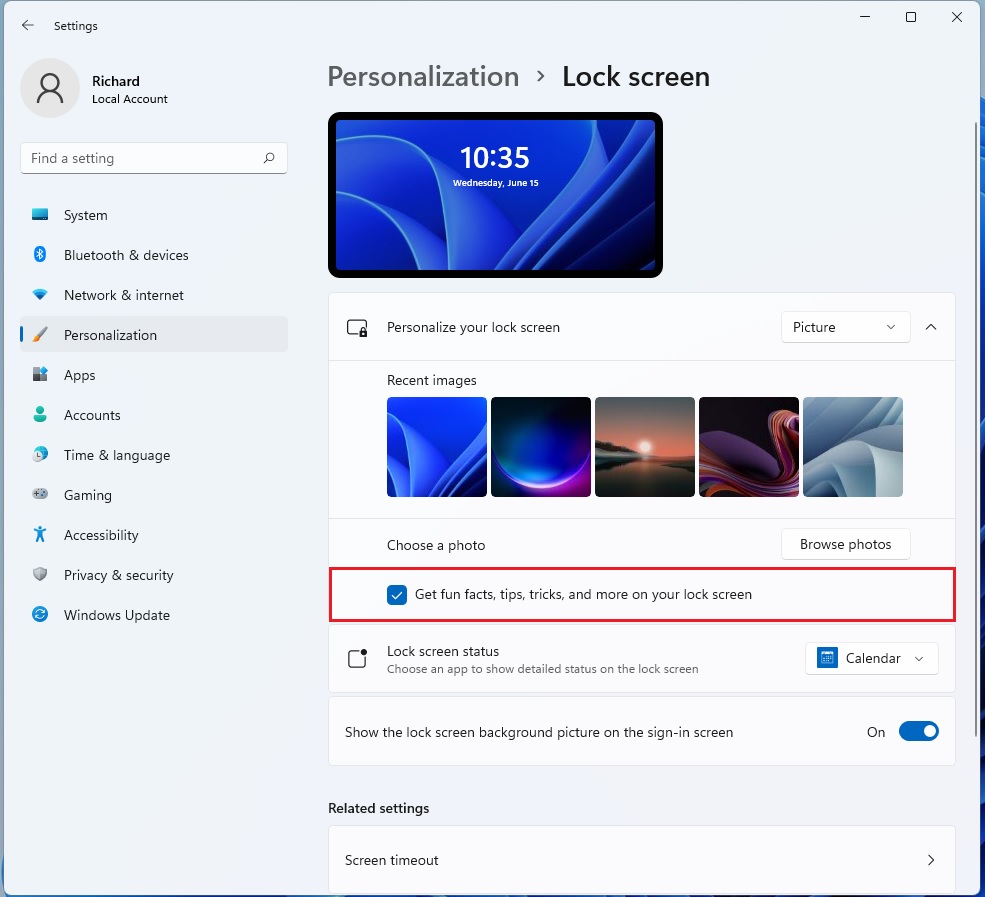
The lock screen page offers three options in the Personalize your lock screen drop-down. Each one treats fun facts differently:
- Windows Spotlightfun facts and tips are turned on automatically. Windows also rotates the background pictures for you.
- Pictureyou choose one image. Fun facts are off until you tick the checkbox described in the steps below.
- SlideshowWindows cycles through your own folders of pictures. Fun facts are off until you tick the same checkbox.
- Find Personalize your lock screen on the page. A drop-down menu sits next to it and shows your current choice.
- Open the drop-down and select Windows Spotlight. Spotlight turns fun facts on without any further setting.
- Tick Get fun facts, tips, tricks, and more on your lock screen if you chose Picture or Slideshow. The checkbox appears under the drop-down only for those two options.
- Press Win+L to lock your PC and check the result. The lock screen appears with your background and the fun fact icons.
That’s it. Windows 11 lock screen fun facts are now on. Spotlight content is downloaded in the background, so the first fact may take a little while to show up. To undo the change later, pick a different option in the same drop-down, or untick the checkbox.
How to reset Windows Spotlight (Admin Required)
Fun facts can stop appearing when the Spotlight image cache gets stuck or corrupted. The cache is the folder where Windows stores the pictures and text it has downloaded. You may see the same picture every day, or only a plain background.
Resetting Windows Spotlight clears the damaged files, and Windows then downloads fresh background images and trivia. You run the reset from Command Prompt with administrator rights.
- Open the Start menu and type CMD. Command Prompt appears at the top of the results.
- Right-click Command Prompt and select Run as administrator. If User Account Control asks for permission, click Yes. A Command Prompt window opens with administrator rights.
- Run the following commands one by one. Type or paste the first, press Enter, wait for it to finish, then do the same with the second.
DEL /F /S /Q /A %USERPROFILE%\AppData\Local\Packages\Microsoft.Windows.ContentDeliveryManager_cw5n1h2txyewy\LocalState\Assets\*.*
DEL /F /S /Q /A %USERPROFILE%\AppData\Local\Packages\Microsoft.Windows.ContentDeliveryManager_cw5n1h2txyewy\Settings\*.*
- Restart the computer after both commands finish. Windows rebuilds the Spotlight cache automatically on the next boot.
That’s it. The Spotlight cache is reset. Once you are back at the lock screen, give it a few minutes with an internet connection, because new content may not appear instantly.
Advanced Troubleshooting: Registry Fix (Admin Required)
- Press Win+R, type
regedit, and press Enter. If User Account Control appears, click Yes. Registry Editor opens. - Back up the registry by choosing File Export. Name the file, pick a safe location and click Save.
- Navigate to: 🗝️HKEY_CURRENT_USER\
Software\ Microsoft\ Windows\ CurrentVersion\ ContentDeliveryManager - Look for RotatingLockScreenEnabled in the right pane and make sure it is set to 1. To change it, double-click the value, type 1 in the Value data box, and click OK.
- Close Registry Editor, then sign out and back in, or restart the PC, so the change takes effect.
You should now have the value set to 1, with a backup copy saved in case you need to go back. To restore the backup, choose File Import in Registry Editor and select the file you saved.
If the setting reverts, or the option still can’t be changed, a work or school account may be managing your PC. In that case your organization controls the lock screen options, and you will need to ask your administrator.
Summary
You manage Windows 11 lock screen fun facts in Settings Personalization Lock screen. If they stop showing up or behave oddly, resetting the Spotlight cache usually fixes it. If the checkbox is greyed out, the RotatingLockScreenEnabled registry value is the next place to look.
Frequently asked questions
How to lock your 🪟 Windows 11 PC remotely?
Sign in to account.microsoft.com/devices with the Microsoft account linked to your PC, then select your PC and choose Lock. This works only if Find my device is turned on in Settings Privacy & security Find my device on that PC, and the PC is connected to the internet. Your PC must also be signed in with that Microsoft account.
How to enable mobile hotspot in 🪟 Windows 11?
Open Settings, select Network & internet, then select Mobile hotspot. Turn on the Share my internet connection with other devices switch. To change the network name or password, select Edit. Your PC needs a working internet connection and a Wi-Fi adapter for the hotspot to work.
How to lock screen?
Press Win+L on your keyboard to lock your screen right away. You can also select the Start button, select your user icon, and choose Lock. Locking the screen keeps your apps running in the background, and you sign in again with your password or PIN to return to your work.
How to change lock screen wallpaper in 🪟 Windows 11 site support.Microsoft.com?
Open Settings and select Personalization, then select Lock screen. Next to Personalize your lock screen, choose Picture or Windows Spotlight. If you choose Picture, select Browse photos to pick an image from your PC. The change applies the next time you lock your screen or sign out.
How to change lock screen wallpaper?
Open Settings and select Personalization, then select Lock screen. Next to Personalize your lock screen, choose Picture to use your own image, or choose Windows Spotlight to show rotating photos. For Picture, select Browse photos and choose a file. The new background appears the next time you lock your PC.
Still have a question?
Answered by AI from this guide. Good questions may be added to this page — please don't include personal details.
Did this guide fix your problem?

About the Author
Richard
Tech Writer, IT Professional
Richard is a writer at Geek Rewind who turns complex IT tasks into clear, step-by-step guides. He draws on years of hands-on experience in system administration and enterprise IT operations, focusing on Windows, Linux and WordPress: the problems people actually run into, and the fixes that work. His server and WordPress guides come from systems he runs himself. Richard builds and maintains the platform behind Geek Rewind, from its Ubuntu servers and Nginx configuration to its custom WordPress plugins. Many new tutorials start with readers' questions, and he's always glad to answer them in the comments.
No comments yet — be the first to share your thoughts!