How to Turn On or off Notification Sounds in Windows 11

Notification sounds in Windows 11 play an audio alert whenever an app or the system needs your attention. These default chimes can quickly become annoying if you get too many pop-ups throughout the day.
The Settings app gives you full control over how your PC makes noise. You can turn off all notification sounds, mute them for specific apps, or keep the audio on only for important messages. The Settings steps work the same on Windows 11 Home and Pro. The Registry Editor methods near the end of this guide are for advanced users and also work on both editions.
Press Win+I to open Settings , click System, then Notifications. Find the Play notification sound switch and turn it Off to silence all app alerts. The change applies immediately without restarting your PC.
Option 1Control Notification Sounds for All Apps Using Settings
This is the quickest way to get a quiet workspace. One switch in Settings stops every app from playing an alert sound. The notification pop-ups themselves still appear unless you turn those off separately.
- Press Win+I to open Settings. The Settings window opens with the list of categories on the left.
- Click System in the left-hand menu.
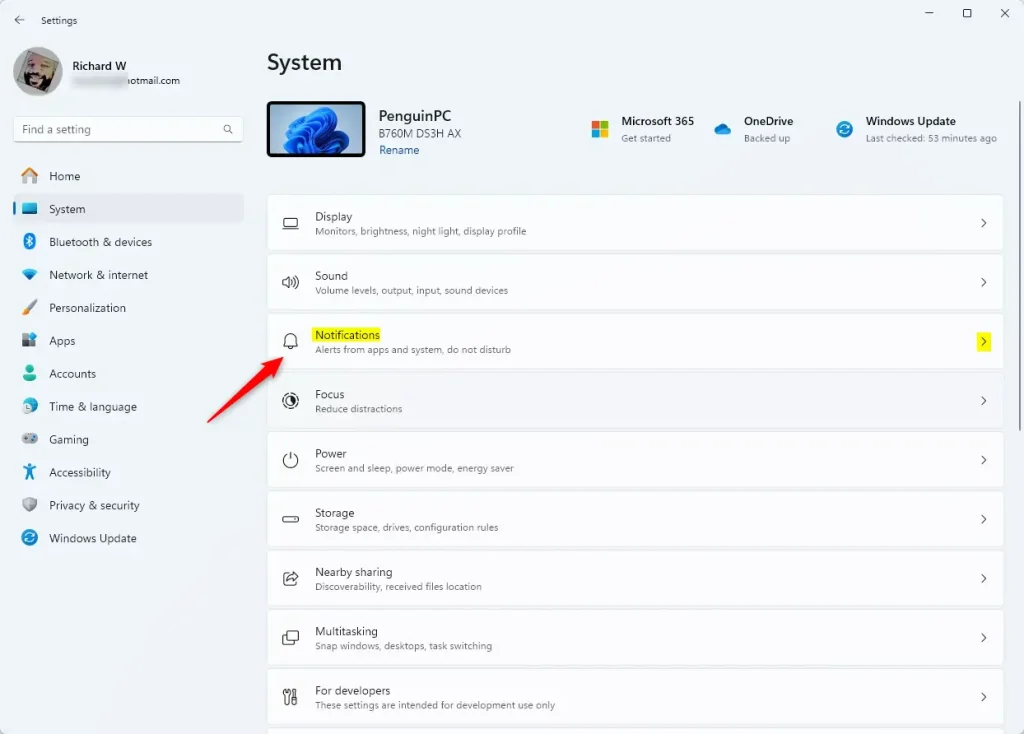
- On the right side, click Notifications. The notification settings page opens.
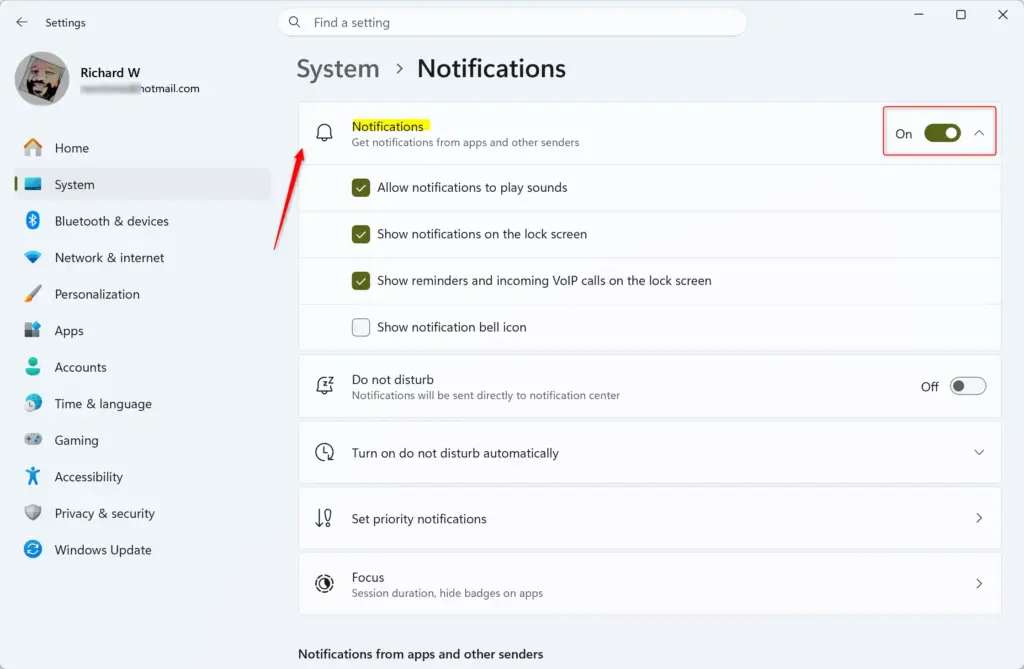
- Click the Notifications option at the top of the page to expand it, if it is not already open. The extra options appear underneath it.
- Find the setting called Play notification sound. Turn this switch On to hear notification sounds, or Off to silence them for all apps. The change applies right away, so you do not need to restart.
It is the same setting and sits in the same place. If the whole Notifications switch is off, the options under it are hidden. Turn it on first to see them.
Close the Settings window. To undo the change later, come back to the same page and flip the switch the other way.
Option 2Control Notification Sounds for Specific Apps Using Settings
Muting individual apps lets you silence noisy programs while keeping sounds for important ones like email or chat. You can change this for any app that appears in the notification list, and the other apps keep playing their alerts.
- Press Windows key + I to open Settings.
- Click System in the left menu, and then click Notifications on the right. The notification page opens.
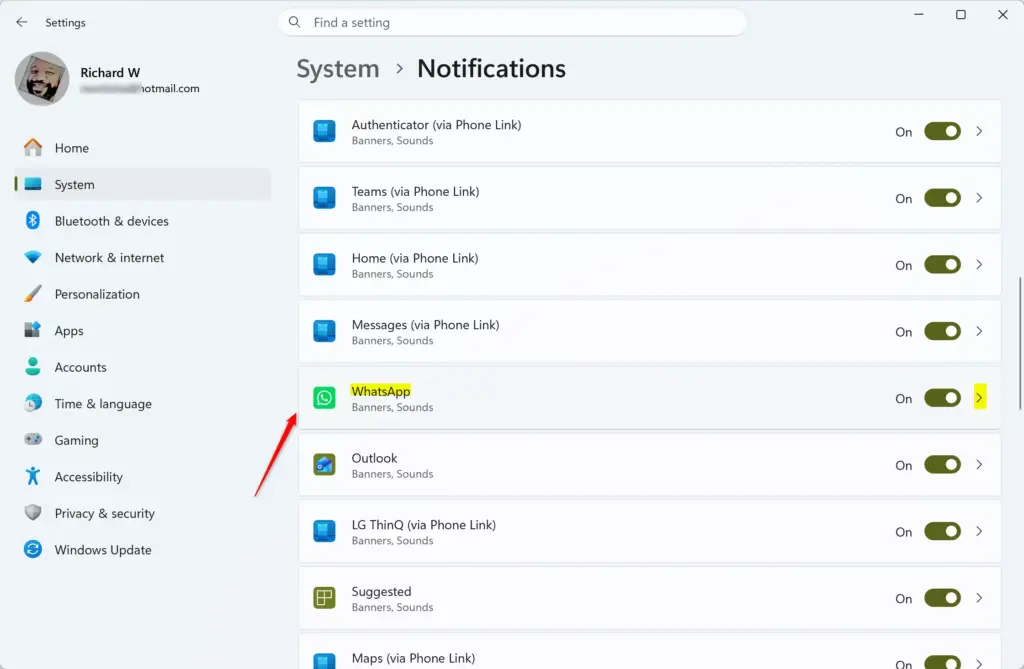
- Scroll down to the list of apps that can send notifications. Click the name of the app you want to adjust (for example, "Mail"). The settings page for that app opens.
- Look for the setting Play a sound when a notification arrives. Turn this switch On to allow sounds for this app, or Off to disable them. The change takes effect immediately.
An app only appears in the list after it has sent at least one notification. If you cannot find it, trigger an alert from that app first, then check the list again.
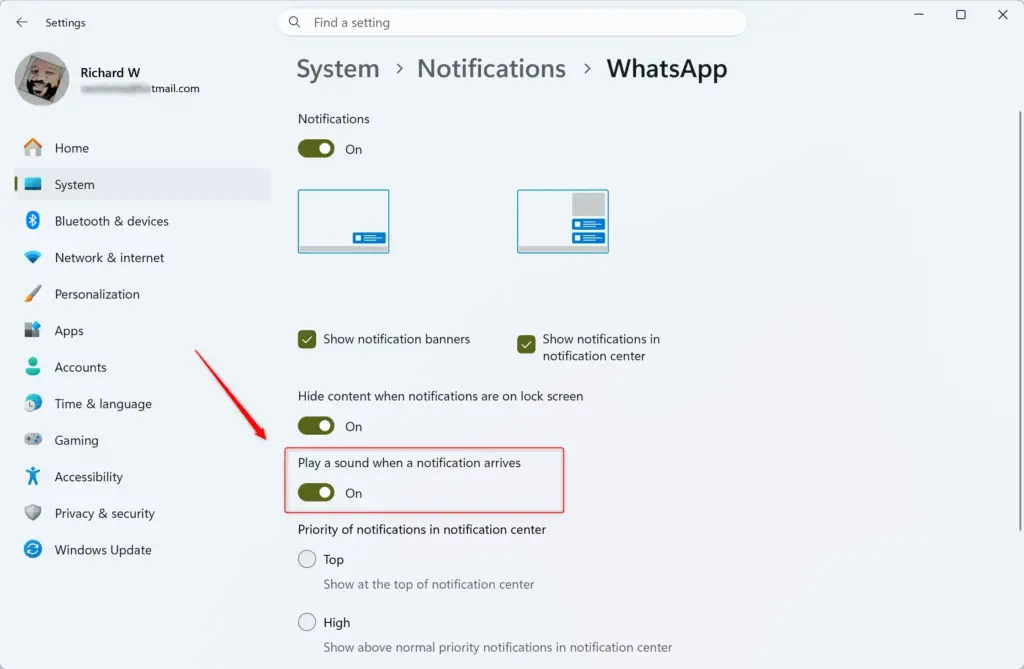
To fix that, turn the app's main notifications switch back on first. The sound switch then becomes available again.
Close Settings when you finish. To reverse the change, open the same app's page and flip the sound switch back.
Option 3Control Notification Sounds for All Apps Using Registry Editor (Advanced)
Using the Registry Editor gives advanced users a way to control alert sounds for every program at once. It is useful when the normal Settings option does not work, for example on a PC where the setting is not behaving as expected. Registry changes affect the whole system, so work carefully.
Before you start, consider backing up the registry. In Registry Editor, click File, then Export, and save a copy. You can double-click that file later to restore your settings.
- Open Registry Editor. Type
regedit.exein the Windows search bar and press Enter. You may need administrator permission to open this program. If a User Account Control prompt appears, click Yes. - Navigate to the following location in the Registry Editor's left pane:
HKEY_CURRENT_USER\Software\Microsoft\Windows\CurrentVersion\Notifications\Settings. When you reach it, its values show in the right pane.
To Turn Off Notification Sounds for All Apps:
Create or modify a DWORD (32-bit) Value (a setting used by Windows to store numerical data) named NOC_GLOBAL_SETTING_ALLOW_NOTIFICATION_SOUND and set its value to 0. To create it, right-click an empty space in the right pane, select New, then DWORD (32-bit) Value. If the value already exists, double-click it to change the data. Sign out and back in, or restart, if the change does not take effect straight away.
To Turn On Notification Sounds for All Apps:
This is the default setting. To ensure sounds are on, delete the registry setting NOC_GLOBAL_SETTING_ALLOW_NOTIFICATION_SOUND. Right-click it, select Delete, and confirm. If the value is not there, sounds are already on by default.
Option 4Control Notification Sounds for Specific Apps Using Registry Editor (Advanced)
This method lets you disable audio alerts for specific apps at a deeper system level. It means editing the registry key of each app, so you control exactly which software makes noise when messages arrive. As with any registry change, consider exporting a backup first.
- Open Registry Editor. Type
regedit.exein the Windows search bar and press Enter. You may need administrator permission to open this program. - Navigate to the following location in the Registry Editor's left pane:
HKEY_CURRENT_USER\Software\Microsoft\Windows\CurrentVersion\Notifications\Settings. - Under the
Settingskey, find and click the specific app's key you want to adjust. The names can look complex, likeMicrosoft.YourPhone_8wekyb3d8bbwe!YourPhoneMessages. Click each key and check its name until you find the right app. The values for the selected key show in the right pane.
To Turn On Play Sound for Notifications from an App:
These steps turn sounds back on for the app you selected.
- In the right pane of the app's key, look for a value named
SoundFile. - If
SoundFileexists, right-click it and select Delete. - If
SoundFiledoes not exist, it means sounds are already enabled for this app, and you have nothing to change. - Click Yes to confirm if prompted. The value disappears from the right pane.
To Turn Off Play Sound for Notifications from an App:
These steps turn sounds off for the app you selected.
- In the right pane of the app's key, look for a value named
SoundFile. - If
SoundFiledoes not exist, right-click in an empty space in the right pane, select New, then select String Value. TypeSoundFileas the name and press Enter. The new value appears in the right pane. - Double-click the
SoundFilevalue to edit it. The edit window opens. - Leave the Value data field completely empty (blank).
- Click OK.
Clearing the sound file value stops that one program from playing an audio alert when new messages arrive. Windows no longer has a sound to play for that app, and your other apps are not affected. To undo it, follow the steps above that delete the value. If the sound still plays after the change, sign out and back in, or restart the PC.
Summary
Manage notification sounds in Windows 11 through the Settings app for a user-friendly experience. For advanced control or to manage settings for all apps at once, use the Registry Editor.
Was this guide helpful?

About the Author
Richard
Tech Writer, IT Professional
Richard is a writer at Geek Rewind who turns complex IT tasks into clear, step-by-step guides. He draws on years of hands-on experience in system administration and enterprise IT operations, focusing on Windows, Linux and WordPress: the problems people actually run into, and the fixes that work. His server and WordPress guides come from systems he runs himself. Richard builds and maintains the platform behind Geek Rewind, from its Ubuntu servers and Nginx configuration to its custom WordPress plugins. Many new tutorials start with readers' questions, and he's always glad to answer them in the comments.




No comments yet — be the first to share your thoughts!