How to Disable Windows Firewall on Windows 11

Windows Defender Firewall (the built-in security tool that blocks unsafe network traffic) stops filtering your internet connection on Windows 11 when you turn it off. Disabling it can help you fix stubborn connection problems or run software that gets blocked by mistake. This guide covers five ways to do it: Windows Security, Command Prompt, PowerShell, Group Policy, and a safer option that allows a single app through.
Turn the firewall back on as soon as you finish troubleshooting. While it is off, nothing filters inbound connections to your PC, which removes a key layer of defense against online threats. Every method below needs an administrator account, and you may see a User Account Control prompt. Click Yes to continue.
Open Windows Security, select Firewall & network protection, and click the active network profile, then switch Microsoft Defender Firewall to Off and approve the User Account Control prompt. The change applies immediately with no restart. For all profiles at once, run netsh advfirewall set allprofiles state off from an administrator Command Prompt. Turn the firewall back on when you finish.
How to Check if Windows Firewall is Active
Check the current status first, so you know what you are changing. You do this in Windows Security Center. A green checkmark on the shield icon means protection is active. A red ‘X’ means the firewall is turned off.
- Click the Start button, type Windows Security, and press Enter. The Windows Security window opens.
- Select Firewall & network protection. You will see each network profile with its own status.
The profile marked “active” is the one your PC is using right now. That is usually the one you want to look at.
Method 1Using Windows Settings (Standard Method)
The Settings app lets you disable Windows Firewall for a specific network profile without needing advanced tools. You open Settings , go to Privacy & security, and then open Windows Security. From there you can turn the firewall off for domain, private, or public networks. This method works on both Home and Pro editions and needs no restart.
- Press Win+I on your keyboard to open Settings. The Settings window appears.

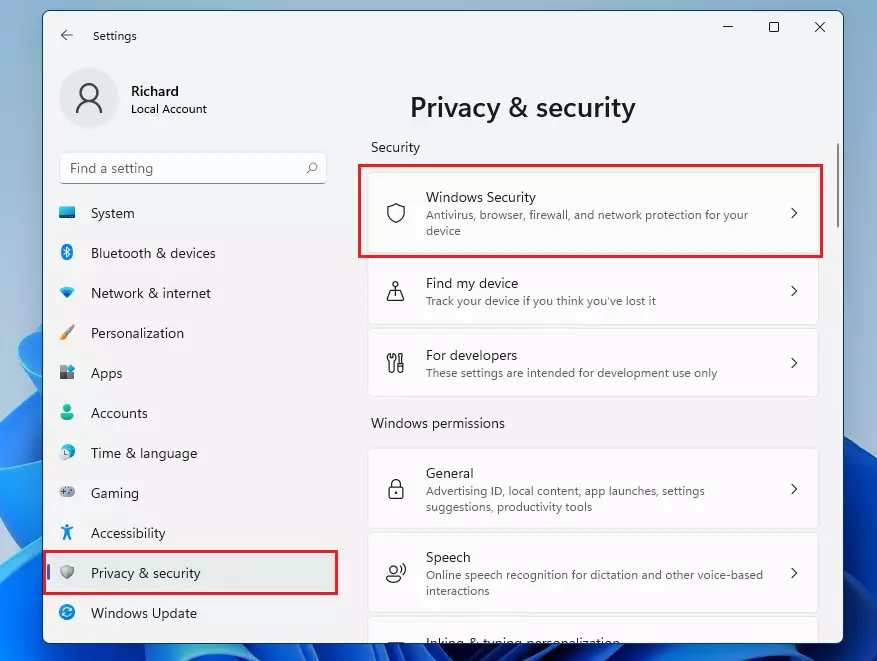
- Go to Privacy & security Windows Security The Windows Security page opens, listing the protection areas.
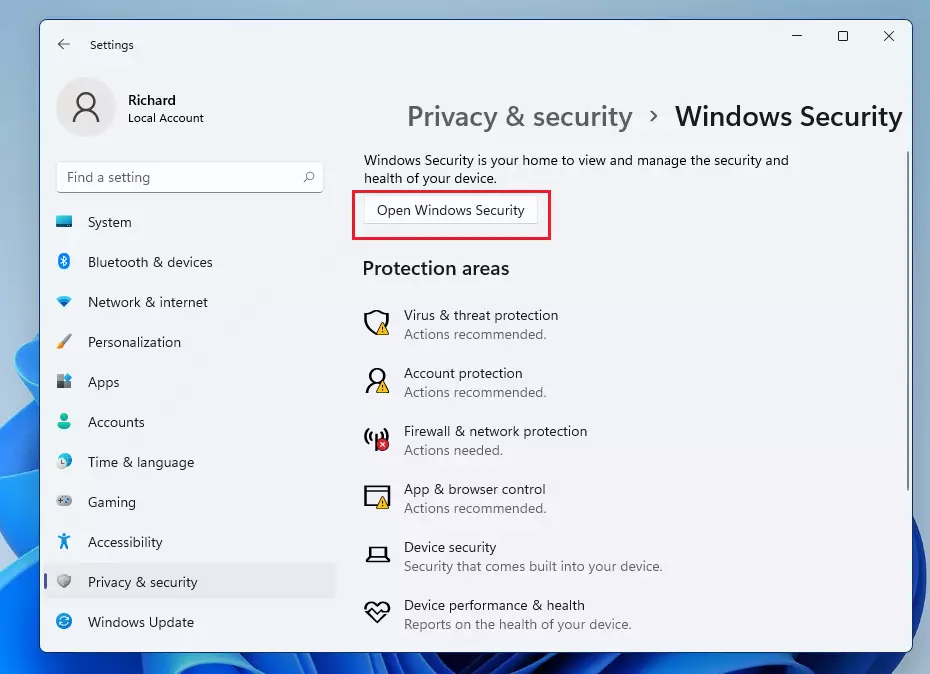
- Click Open Windows Security. A separate Windows Security window opens.
- Select Firewall & network protection. Three profiles appear on screen:
- Domain profile, used on workplace networks.
- Private profile, designated for trusted home networks.
- Public profile, built for untrusted public Wi-Fi hotspots.
If the switches are greyed out, or you see a message that settings are managed by your administrator, a work policy is controlling the firewall. A third-party security suite that took over firewall duties can cause the same thing. Settings won’t let you change it in either case.
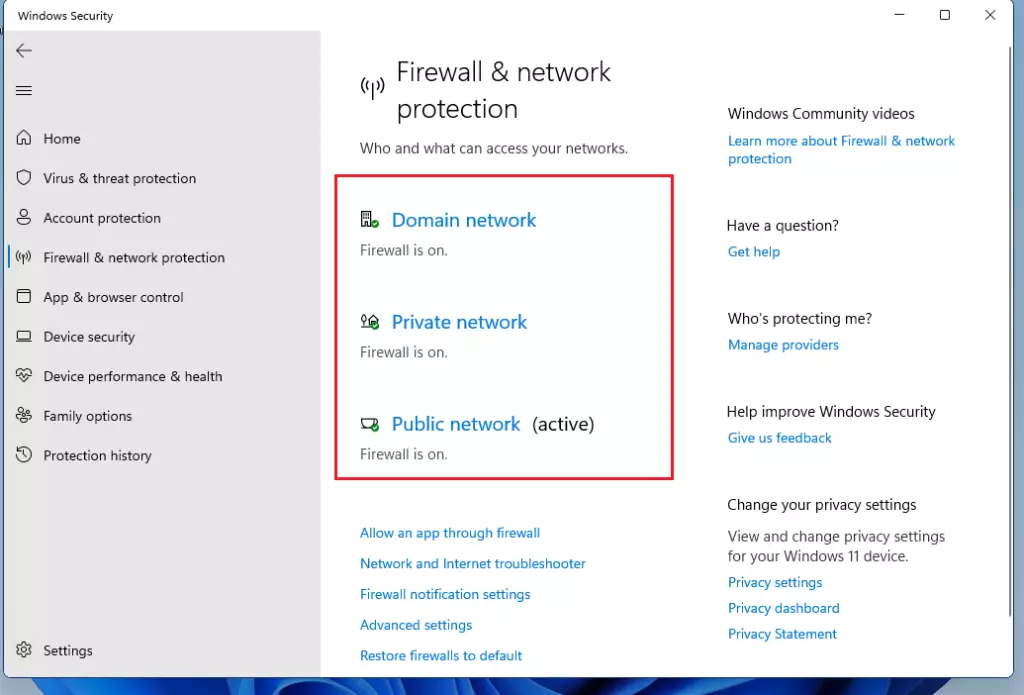
- Click the active network, then toggle the Microsoft Defender Firewall switch to Off. Approve the User Account Control prompt if it appears. The switch now reads Off, and Windows Security shows a warning for that profile.
To undo this, return to the same page and switch it back to On. If the profile page shows a Restore settings button, you can use that as well. Repeat the steps for each profile you turned off.

Method 2Using Command Prompt (Advanced)
A single command in Command Prompt lets you disable Windows Firewall across all network profiles at once. You open the console with administrator rights and run the netsh command. The change takes effect immediately, and you do not need to restart.
netsh advfirewall command handles these settings.It must run from an elevated window, so a normal Command Prompt will return an access error.
- Search for cmd in the Start menu, right-click it, and select Run as administrator. Click Yes on the User Account Control prompt. A black console window opens, and its title bar says Administrator.
- Type this command and press Enter to disable the firewall for all profiles. The console should report that it succeeded.
netsh advfirewall set allprofiles state off
- To turn it back on, use the command below. Run it as soon as you finish testing, and check Windows Security afterwards to confirm the status is green again.
netsh advfirewall set allprofiles state on
Method 3Using PowerShell
PowerShell does the same job and works on every edition of Windows 11. Administrative rights are required for this action. A normal window will show an access denied error.
- Right-click the Start button and select Terminal (Admin) or PowerShell (Admin). Approve the User Account Control prompt. An elevated window opens.
- Run this command to disable the firewall. If it works, the prompt returns with no error message.
Set-NetFirewallProfile -Profile Domain,Public,Private -Enabled False
Method 4Using Group Policy Editor
The Group Policy Editor (a tool for configuring system settings) lets you disable Windows Firewall on Windows 11 Pro and Enterprise editions. It is not included in Windows 11 Home, so on Home the Run command in step 1 will fail. Use one of the other methods there. You open the policy console from the Run dialog box and turn off the firewall for the whole system. Be aware that a policy setting overrides the toggles in Windows Security, which may show as managed by your organization afterwards.
- Press Windows key + R, type
gpedit.msc, and hit Enter. The Local Group Policy Editor opens.
- Navigate to:
Computer Configuration\Administrative Templates\Network\Network Connections\Windows Defender Firewall\Standard Profile. Expand the folders in the left pane until the policy settings appear on the right.
- Double-click 'Windows Defender Firewall: Protect all network connections' and set it to Disabled. Click Apply, then OK. The policy usually takes effect within moments. If Windows Security still shows the firewall as on, restart the PC.
To undo this, open the same policy and set it to Not Configured or Enabled, then click Apply.
Best Practices: Allowing Apps vs. Disabling Firewall
Allowing an app through Windows Firewall is a much safer alternative to turning off protection completely. If one program is being blocked, this is usually the better fix. Permitting trusted programs to communicate through the firewall keeps your computer protected while your software works properly.
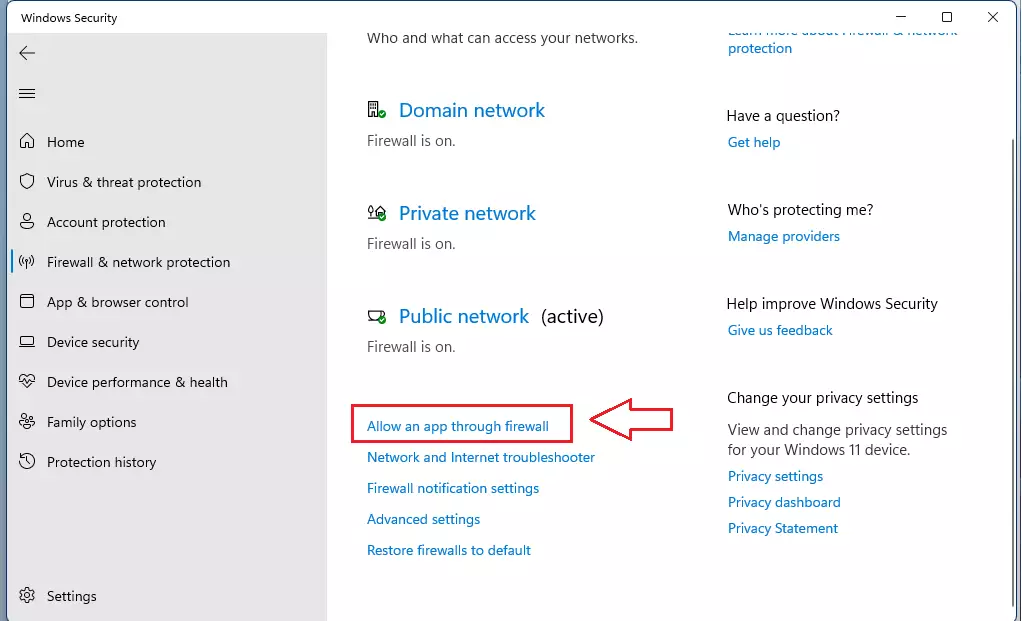
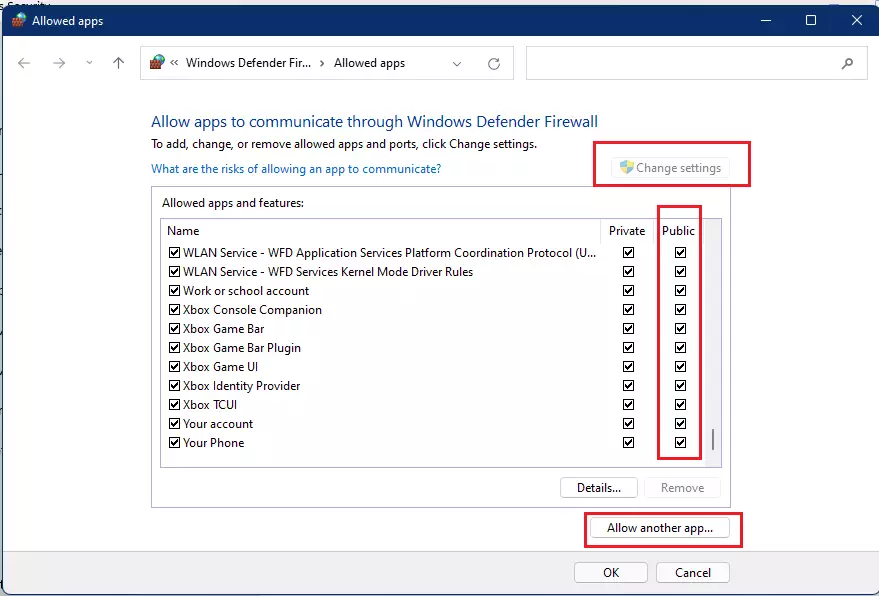
- Go to Firewall & network protection and click Allow an app through the firewall. The Allowed apps window opens with a list of programs and checkboxes for Private and Public networks.
- Click Change settings (administrative privileges are required). The list becomes editable. Select Allow another app to add the program. Use Browse to pick the program's file, click Add, and then tick Private, Public, or both for that app.
Only add programs you trust, and prefer the Private checkbox unless you really need the app to work on public networks. To undo it later, select the app in the list and click Remove.
Summary
Check Windows Security afterwards. You want the green checkmark on the shield icon for every profile you changed.
Have a question about this guide?
Answered by AI from this guide. Good questions may be added to this page — please don't include personal details.
Did this guide fix your problem?

About the Author
Richard
Tech Writer, IT Professional
Richard is a writer at Geek Rewind who turns complex IT tasks into clear, step-by-step guides. He draws on years of hands-on experience in system administration and enterprise IT operations, focusing on Windows, Linux and WordPress: the problems people actually run into, and the fixes that work. His server and WordPress guides come from systems he runs himself. Richard builds and maintains the platform behind Geek Rewind, from its Ubuntu servers and Nginx configuration to its custom WordPress plugins. Many new tutorials start with readers' questions, and he's always glad to answer them in the comments.
No comments yet — be the first to share your thoughts!