How to Turn On or off Microsoft Defender Firewall in Windows 11

Microsoft Defender Firewall in Windows 11 blocks unwanted network traffic and protects your PC from online threats using built-in security rules. Windows 11 turns it on by default. You can turn it off when you need to fix a network problem or install software that the firewall blocks.
You need administrator rights on your PC to change these settings. If you are signed in with a standard account, Windows asks for an administrator password before it makes the change. Turning the firewall off temporarily is a reasonable way to test a network connection. Turn it back on as soon as you finish, because an unprotected PC is exposed to anything on the network.
The firewall has three separate profiles: Domain, Private, and Public. Windows applies the one that matches the network you are connected to. You can switch each profile on or off independently. The steps below work the same on Windows 11 Home and Pro, and none of them needs a restart. Changes take effect immediately.
Open Windows Security, navigate to Firewall & network protection, select your network type, and toggle Microsoft Defender Firewall on or off. Alternatively, use Control Panel , Command Prompt, or PowerShell for adjustments.
Turn On or Off Microsoft Defender Firewall Using Windows Security
- Click the Start button, type Windows Security in the search box, and open the app. The Windows Security home screen appears.
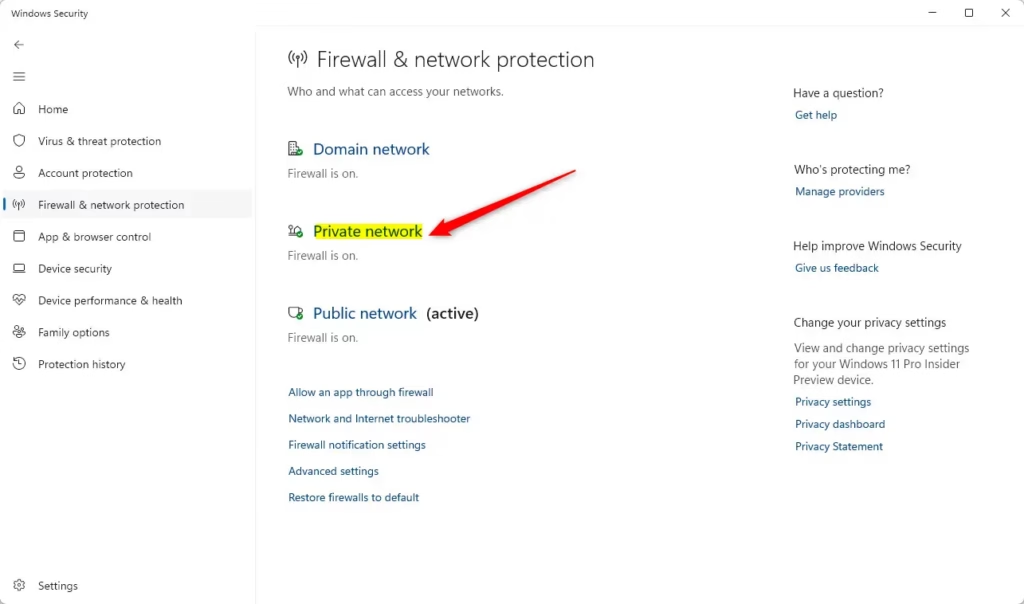
- Click Firewall & network protection. You will see three entries: Domain network, Private network, and Public network. The one marked “active” is the profile Windows is using right now.
- Click the network type you want to change. Most home users want Private network, and a café or hotel Wi-Fi is normally Public network.
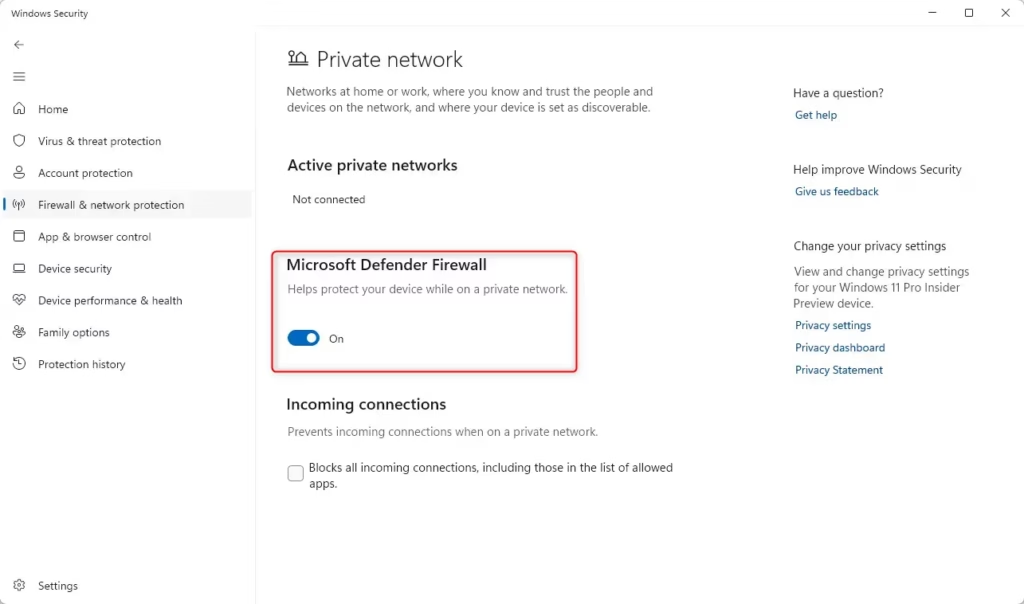
- Under Microsoft Defender Firewall, move the switch to On or Off. When you turn it off, Windows shows a warning, and the network entry gets a red mark on the previous screen.
- If User Account Control appears, click Yes. A standard user has to enter an administrator password here.
- Close Windows Security when you are done.
If the switch is greyed out, or Windows Security says settings are managed by your organization, a Group Policy or a work or school management tool is controlling the firewall. Only your administrator can change it. A third-party security suite can also take over the firewall. In that case, Windows Security says another provider is handling it, and you manage the firewall in that product instead.
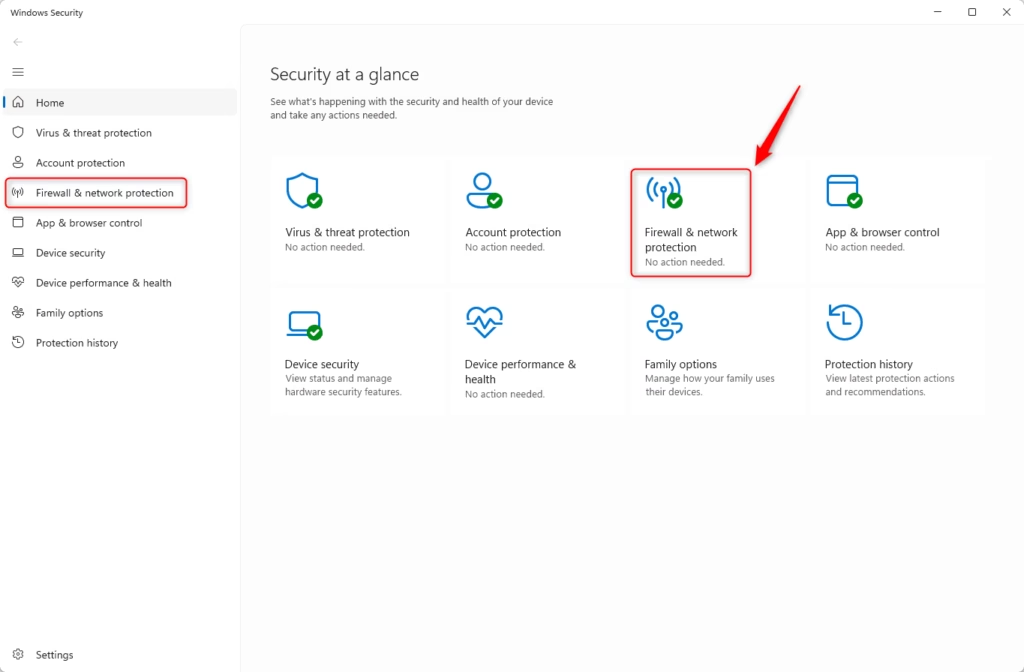
You can turn on or off Microsoft Defender Firewall using Windows Security by opening the app, clicking Firewall & network protection, selecting your network type, and changing the switch. This is the fastest method, and it avoids the older system menus.
To undo the change, repeat the steps and move the switch back to On.
Turn On or Off Microsoft Defender Firewall Using Control Panel
- Press Windows + R to open the Run box, type
control, and press Enter. The classic Control Panel opens. - Click Windows Defender Firewall. Control Panel still uses the older "Windows Defender" name for the same firewall. If you do not see the entry, set View by in the top right to Large icons or Small icons.
- On the left side, click Turn Windows Defender Firewall on or off. A settings page opens with a section for private networks and a section for public networks.
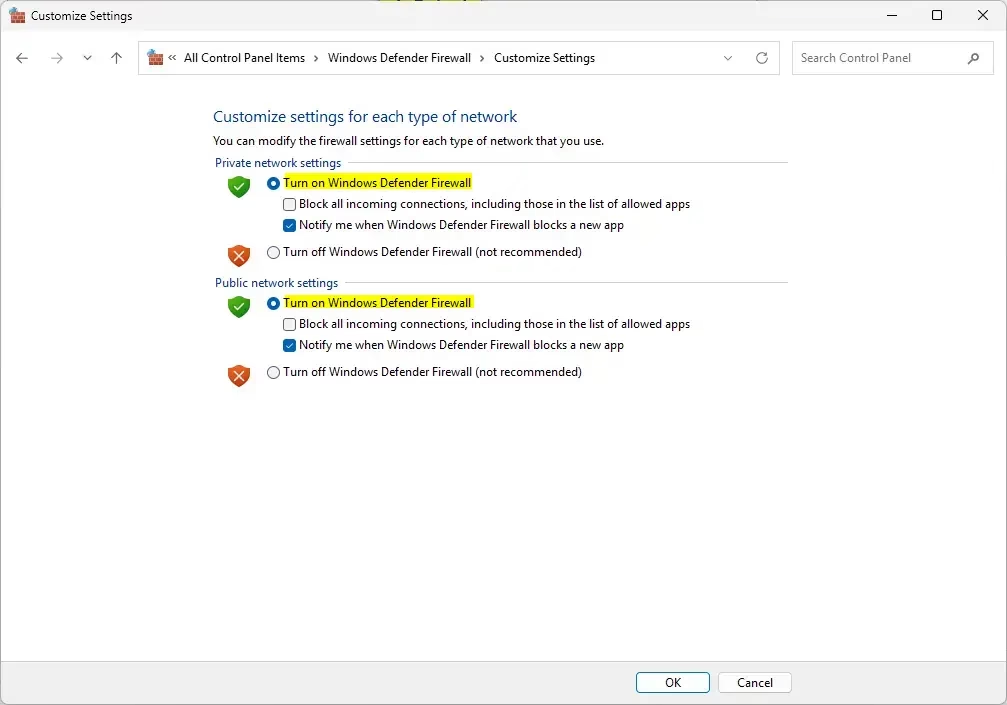
- Choose Turn on Windows Defender Firewall or Turn off Windows Defender Firewall (not recommended) for each network type you want to change.
- Click OK to save your changes. The firewall status page now shows the new state for each profile.
- Close Control Panel if you want.
This page also has a Notify me when Windows Defender Firewall blocks a new app checkbox for each profile. Leave it ticked unless you have a reason not to. If the options are greyed out, a policy or another security product is managing the firewall, as described in the first method.
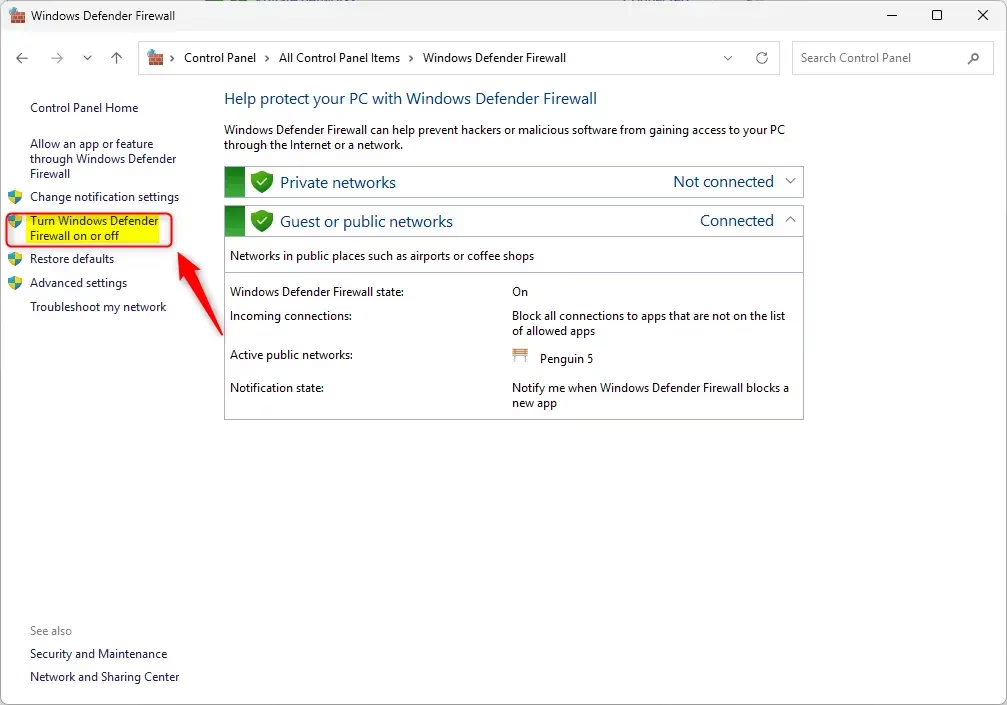
You can turn on or off Microsoft Defender Firewall using Control Panel by opening the classic utility, clicking Windows Defender Firewall, and choosing the turn on or off link on the left side. This approach lets you manage your Windows 11 Defender Firewall for each network type from one page.
To undo the change, open the same page and choose the turn on option for each profile.
Turn On or Off Microsoft Defender Firewall Using Command Prompt
You can turn on or off Microsoft Defender Firewall using Command Prompt by launching the terminal with administrator rights and running specific networking commands. This is a quick option if you prefer typing to clicking, and it works well over a remote session. The commands only work from an elevated window. Without administrator rights they fail with an access error.
- Open Windows Terminal (Admin):
- Right-click the Start button and choose Windows Terminal (Admin). Click Yes if User Account Control appears.
- When the terminal opens, click the down arrow (˅) in the title bar and select Command Prompt. A new tab opens with a Command Prompt.
- Type or paste one of the commands below, then press Enter. Each command reports success when it runs.
Enable Firewall for All Networks (Domain, Private, Public)
netsh advfirewall set allprofiles state onDisable Firewall for All Networks
netsh advfirewall set allprofiles state offEnable Firewall for Current (Active) Network
netsh advfirewall set currentprofile state onDisable Firewall for Current (Active) Network
netsh advfirewall set currentprofile state offEnable Firewall for Specific Network Type
- Domain:
netsh advfirewall set domainprofile state on - Private:
netsh advfirewall set privateprofile state on - Public:
netsh advfirewall set publicprofile state on
Disable Firewall for Specific Network Type
- Domain:
netsh advfirewall set domainprofile state off - Private:
netsh advfirewall set privateprofile state off - Public:
netsh advfirewall set publicprofile state off
Close Windows Terminal after executing the commands. To confirm the result, open Windows Security Firewall & network protection and check the profile you changed. To undo a change, run the matching enable command.
Turn On or Off Microsoft Defender Firewall Using PowerShell
You can turn on or off Microsoft Defender Firewall using PowerShell by opening the command-line tool with administrator privileges and running dedicated networking cmdlets. This option gives you direct control over the firewall profiles and suits scripts and automated setups. As with Command Prompt, it must run elevated.
- Open Windows Terminal (Admin) and select Windows PowerShell. Windows Terminal often opens PowerShell by default. If the tab already says PowerShell, you can use it as it is.
- Type or paste the commands below, then press Enter. If a command succeeds, PowerShell returns to the prompt without printing anything. That is normal.
Enable Firewall for All Network Profiles
Set-NetFirewallProfile -All -Enabled TrueDisable Firewall for All Network Profiles
Set-NetFirewallProfile -All -Enabled FalseEnable Firewall for Specific Network Profile
- Domain:
Set-NetFirewallProfile -Profile Domain -Enabled True - Private:
Set-NetFirewallProfile -Profile Private -Enabled True - Public:
Set-NetFirewallProfile -Profile Public -Enabled True
Disable Firewall for Specific Network Profile
- Domain:
Set-NetFirewallProfile -Profile Domain -Enabled False - Private:
Set-NetFirewallProfile -Profile Private -Enabled False - Public:
Set-NetFirewallProfile -Profile Public -Enabled False
Close Windows Terminal upon completion. You can check the result in Windows Security, and you undo any change by running the matching enable command.
Summary
- Why use the Firewall? It stops hackers and harmful software from reaching your PC.
- Easy to Use: You can turn it on or off through Windows Security, Control Panel, Command Prompt, or PowerShell. None of them needs a restart.
- Different Networks: Firewall settings can be different for your home (Private), work (Domain), or public Wi-Fi (Public) networks.
- Admin Rights Needed: Only users with admin access can change firewall settings. If the options are greyed out, a policy or another security product may be in control.
- Stay Protected: Keep the firewall on. If you turn it off to test something, turn it back on straight afterwards.
Microsoft Defender Firewall protects your PC from unauthorized access by blocking harmful network traffic. You can control it from Windows Security, Control Panel, Command Prompt, or PowerShell. Whichever method you use, check afterwards that the profile for your current network is back on, especially before you connect to public Wi-Fi.
Was this guide helpful?

About the Author
Richard
Tech Writer, IT Professional
Richard is a writer at Geek Rewind who turns complex IT tasks into clear, step-by-step guides. He draws on years of hands-on experience in system administration and enterprise IT operations, focusing on Windows, Linux and WordPress: the problems people actually run into, and the fixes that work. His server and WordPress guides come from systems he runs himself. Richard builds and maintains the platform behind Geek Rewind, from its Ubuntu servers and Nginx configuration to its custom WordPress plugins. Many new tutorials start with readers' questions, and he's always glad to answer them in the comments.


No comments yet — be the first to share your thoughts!