Enable or Disable Microsoft Defender PUA Protection in Windows 11

This tutorial shows you how to turn Microsoft Defender’s protection against potentially unwanted applications (PUA) on or off in Windows 11. It covers five methods, from the simple Edge and Windows Security settings to PowerShell, Group Policy and the registry.
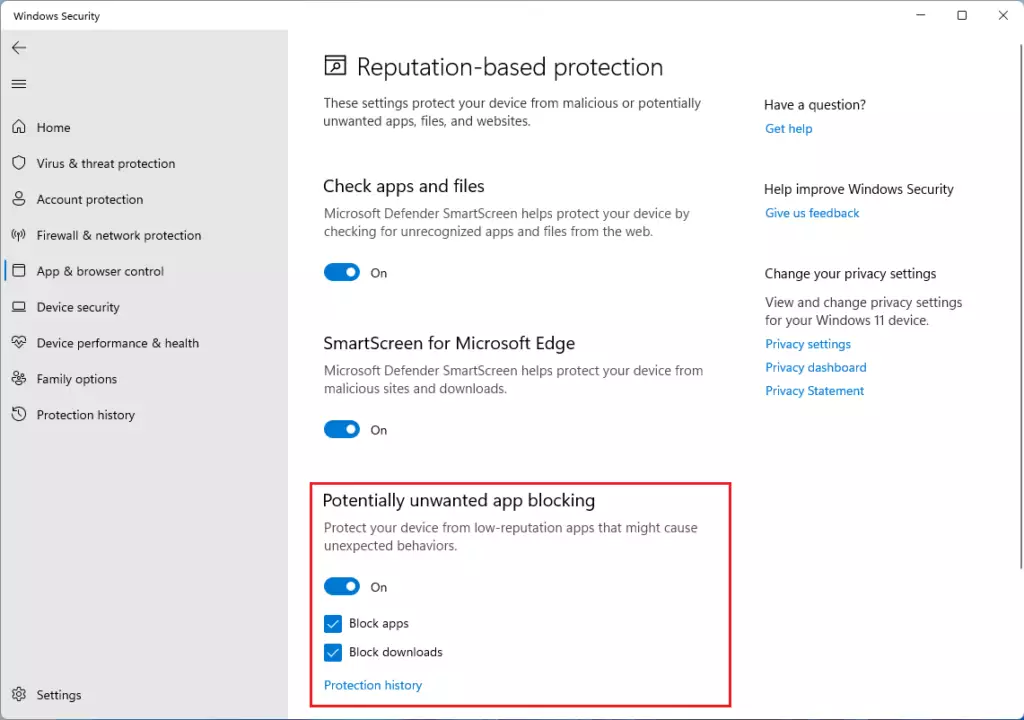
Microsoft Defender PUA protection blocks potentially unwanted applications like adware and bundleware before they download or install. Enable it in Windows Security by opening App & browser control, clicking Reputation-based protection settings, and turning on Potentially unwanted app blocking.
What Are Potentially Unwanted Applications?
Microsoft Defender Antivirus blocks Potentially Unwanted Applications (PUAs). PUAs are not always classed as viruses, but they cause problems. Typical examples are programs that show intrusive ads or bundle extra software you did not ask for. Others slow your PC down. Defender detects these files before they download or install.
When PUA protection is set to block, Defender stops detected files from downloading , moving, running or installing . It moves blocked files to quarantine and shows a notification when it finds one.
Before You Start
Before you change any PUA setting, make sure you are signed in with an administrator account. Windows Security, PowerShell, Group Policy and the registry all need administrator rights. You may also see a User Account Control prompt. If a setting is greyed out, another security product or your organization’s policy is probably managing it.
You can check that PUA protection works by downloading a harmless test file from AMTSO. The file is designed to look like a potentially unwanted application. If your protection is active, Defender or Edge should block it and show a notification. If the file downloads without any warning, check your settings.
To download a test PUA file to check if your protection works: Feature Settings Check AMTSO | Detects Potentially Unwanted Applications (PUAs)
Learn more about PUA protection:
Option 1Microsoft Edge Settings
This method controls whether Microsoft Edge blocks potentially unwanted apps while you download them. It does not change how Defender scans files already on your PC.
- Open Microsoft Edge.
- Click the three dots menu (Settings and more) in the top right corner. You can also press Alt+F on your keyboard. A menu opens.
- Click Settings. The Settings page opens in a new tab.
- Click Privacy, search, and services in the left menu.
- Scroll down to the Security section and find Block potentially unwanted apps.
- Turn the toggle On (default) or Off, depending on what you want. The change applies straight away. You do not need to restart Edge or Windows.
If the toggle is greyed out or Edge says it is managed by your organization, a policy is controlling it. Change it through that policy instead.

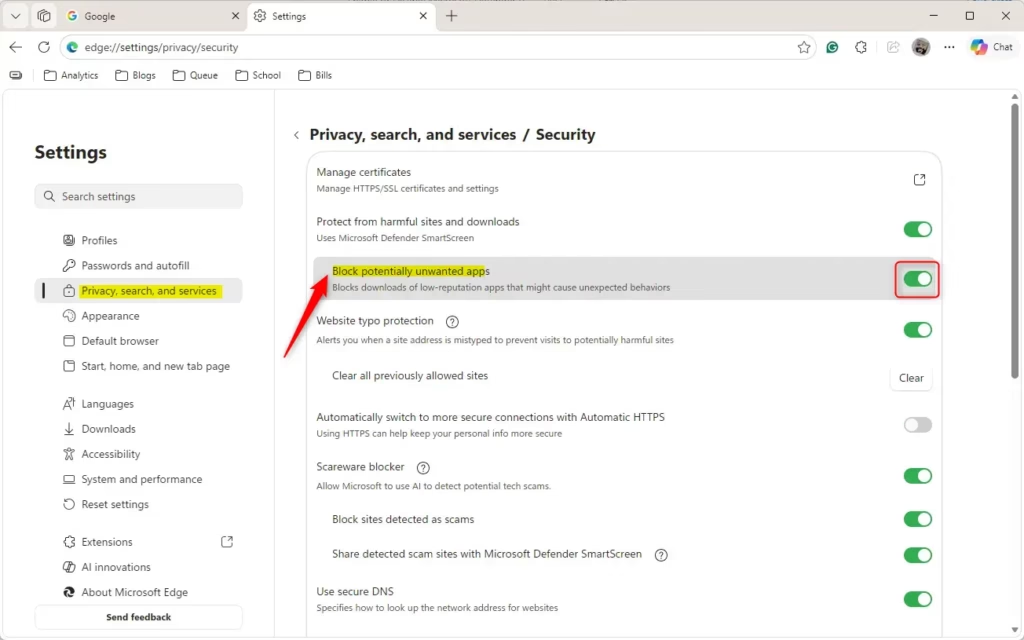
You can turn this protection on or off directly in the Edge settings. Open Settings, go to Privacy, search, and services, and use the Block potentially unwanted apps toggle under Security. It only controls whether Edge blocks unwanted apps during downloads. To undo the change, flip the toggle back.
You can now close the Settings tab.
Option 2Windows Security App
This is the easiest method for most people. It uses the graphical Windows Security app and does not need a browser. It works on Windows 11 Home and Pro.
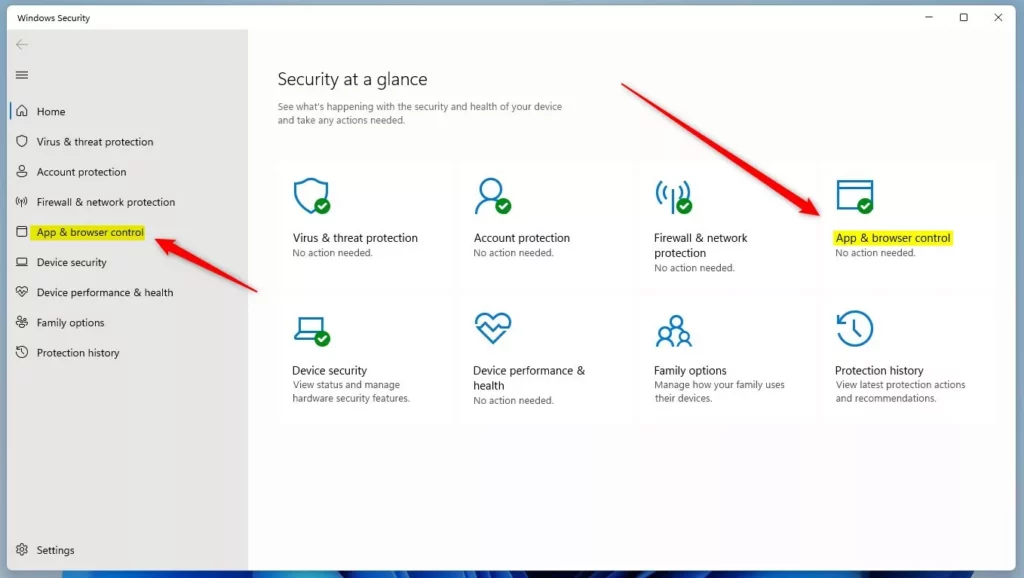
- Open Windows Security. Search for it in the Start menu and click the result.
- Click App & browser control on the left side.
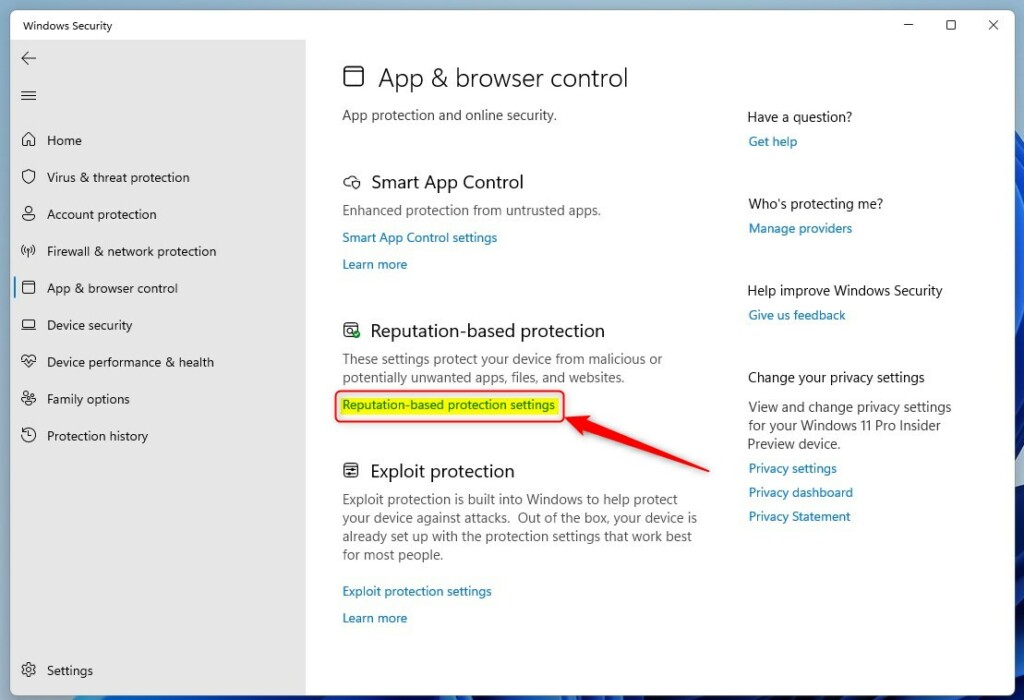
- Click Reputation-based protection settings. The page lists several protections, including Potentially unwanted app blocking.
- Turn Potentially unwanted app blocking On (default) or Off. If a User Account Control prompt appears, click Yes.
When the setting is on, two checkboxes appear under it:
- Block apps: Finds PUA that you have already downloaded or installed. This works in any browser.
- Block downloads: Stops PUA while it downloads in Microsoft Edge.
You can turn each option on or off separately. For the strongest protection, leave both selected. If the toggle is greyed out, another antivirus program may be active, or a policy (Group Policy or the registry) may be managing the setting. You can now close Windows Security.
Option 3PowerShell Command
If you are comfortable with commands, you can set PUA protection from PowerShell with administrator rights. This sets the system-wide Defender setting. It does not change Edge's download blocking.
- Open Windows Terminal as an administrator. Search for it in the Start menu, then click Run as administrator. Click Yes if User Account Control asks.
- Select Windows PowerShell from the dropdown if it is not already the open tab.
- Copy and paste one of the commands below and press Enter. The two commands in each pair are alternatives, so you only need to run one of them. If the command works, PowerShell returns to the prompt without an error message.
Turn off PUA protection (don't block apps):
Set-MpPreference -PUAProtection 0or
Set-MpPreference -PUAProtection DisabledTurn on PUA protection and block apps (default):
Set-MpPreference -PUAProtection 1or
Set-MpPreference -PUAProtection EnabledAudit Mode (detect PUA but don't block them):
Set-MpPreference -PUAProtection 2or
Set-MpPreference -PUAProtection AuditModeIn Audit Mode, Defender records detections but lets the files run. It is useful for seeing what would be caught before you start blocking. To undo any of these changes, run the command for the setting you want back. You can check the result in Windows Security (Option Two). You can now close Windows Terminal.
Option 4Local Group Policy Editor
Windows 11 Pro, Enterprise and Education include the Local Group Policy Editor. It lets you set Defender's PUA detection as a policy. This method does not change the Microsoft Edge download blocking setting.
If you have Windows 11 Home, use Option Five instead.
Note: This method doesn't affect the Microsoft Edge download blocking setting.
- Open the Local Group Policy Editor. Press Windows key + R, type
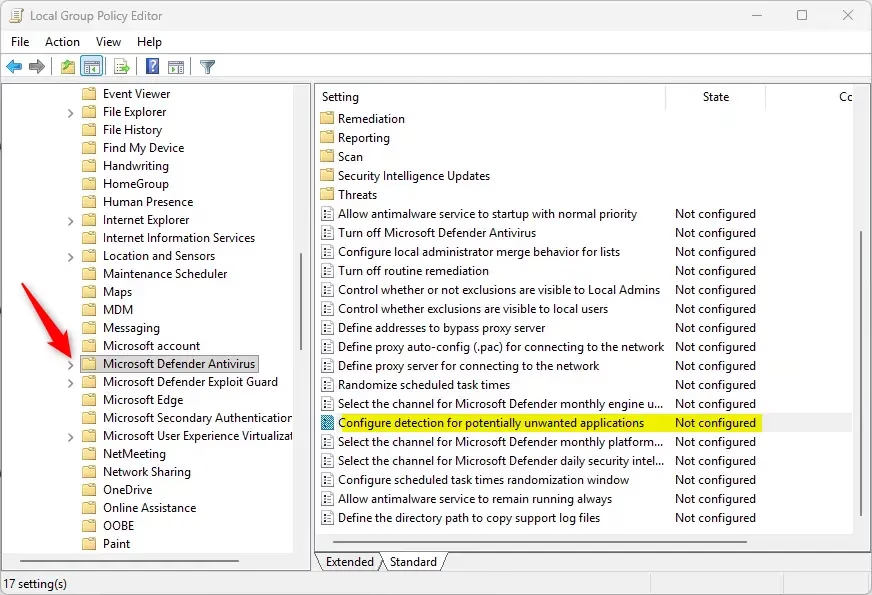
gpedit.msc, and press Enter. The editor opens. - Navigate to this location in the left pane:Code
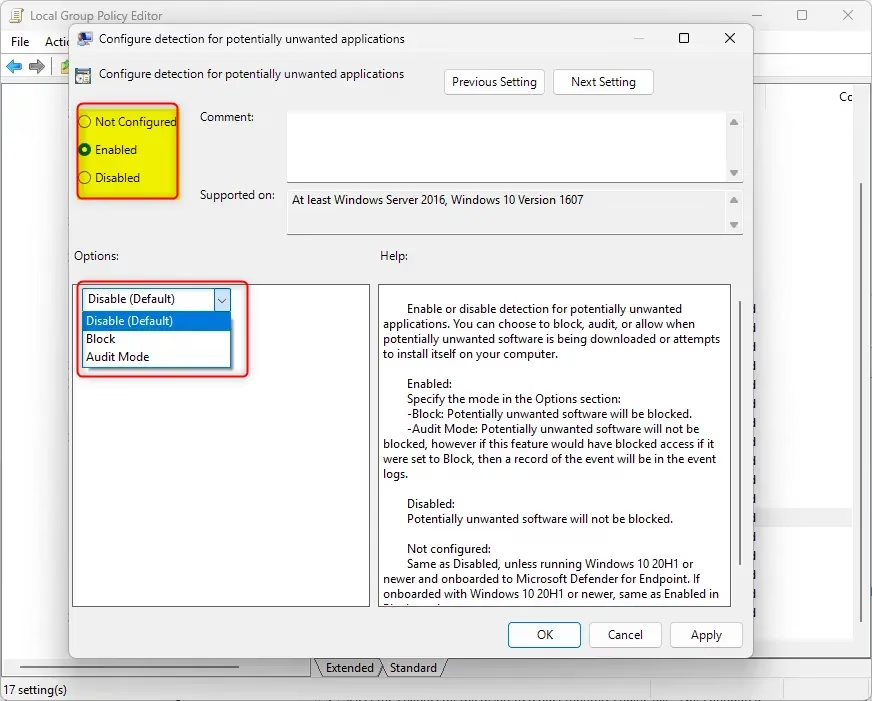
Computer Configuration > Administrative Templates > Windows Components > Microsoft Defender Antivirus - In the right pane, find and double-click Configure detection for potentially unwanted applications. A settings window opens.
- Choose one of the options below.
Always Block PUA (recommended):
- Select the dot next to Enabled.
- In the Options dropdown, select Block.
- Click OK.
Audit Mode (detect but don't block):
- Select the dot next to Enabled.
- In the Options dropdown, select Audit Mode.
- Click OK.
Always Disable PUA Protection:
- Select the dot next to Enabled.
- In the Options dropdown, select Disable.
- Click OK.
Allow Users to Change Settings (default):
- Select the dot next to Not Configured.
- Click OK.
Once a policy is set to Enabled, the matching setting in Windows Security may show as managed by your organization. To hand control back to users, set the policy to Not Configured. You can now close the Local Group Policy Editor.
Option 5Registry Editor
You can also control PUA protection by editing the Windows Registry. This works on every edition, including Windows 11 Home. It is an advanced method and needs administrator access. A wrong registry change can cause problems, so create a restore point or back up the registry first. For example, this command always blocks PUAs: reg add "HKEY_LOCAL_MACHINE\SOFTWARE\Policies\Microsoft\Windows Defender" /v PUAProtection /t REG_DWORD /d 1 /f. This registry edit does not affect Edge's download blocking.
Note: This method doesn't affect the Microsoft Edge download blocking setting.
- Open Windows Terminal or Command Prompt as an administrator.
- Copy and paste the command for the option you want from the list below, then press Enter.
- Check that the command reports success. If you see an access-denied error, the window is not running as administrator.
Always Block PUA:
reg add "HKEY_LOCAL_MACHINE\SOFTWARE\Policies\Microsoft\Windows Defender" /v PUAProtection /t REG_DWORD /d 1 /fAudit Mode (detect but don't block):
reg add "HKEY_LOCAL_MACHINE\SOFTWARE\Policies\Microsoft\Windows Defender" /v PUAProtection /t REG_DWORD /d 2 /fAlways Disable PUA Protection:
reg add "HKEY_LOCAL_MACHINE\SOFTWARE\Policies\Microsoft\Windows Defender" /v PUAProtection /t REG_DWORD /d 0 /fAllow Users to Change Settings (default):
reg delete "HKEY_LOCAL_MACHINE\SOFTWARE\Policies\Microsoft\Windows Defender" /v PUAProtection /fTo go back, run the command for the setting you want. The default option returns control to the user. These values work like the Group Policy settings in Option Four, so Windows Security may show the setting as managed.
Summary
Microsoft Defender helps protect your PC from potentially unwanted applications that slow it down or show unwanted ads. You can manage this protection with Microsoft Edge settings or the Windows Security app. More advanced users can use PowerShell, the Local Group Policy Editor or the Registry Editor.
- Option One uses Microsoft Edge settings (easiest for Edge users)
- Option Two uses the Windows Security app (simple graphical interface)
- Option Three uses PowerShell commands (for advanced users)
- Option Four uses Group Policy Editor (Windows Pro/Enterprise only)
- Option Five uses Registry Editor (for all Windows versions)
For most users, Option Two (Windows Security) is the easiest method. You can choose to block apps, block downloads, or both. You can also use Audit Mode to test PUA detection without blocking anything. Remember that you need administrator access to make these changes. If you used a policy or registry method, remember that it can override what you see in Windows Security.
Have a question about this guide?
Answered by AI from this guide. Good questions may be added to this page — please don't include personal details.
Did this guide fix your problem?

About the Author
Richard
Tech Writer, IT Professional
Richard is a writer at Geek Rewind who turns complex IT tasks into clear, step-by-step guides. He draws on years of hands-on experience in system administration and enterprise IT operations, focusing on Windows, Linux and WordPress: the problems people actually run into, and the fixes that work. His server and WordPress guides come from systems he runs himself. Richard builds and maintains the platform behind Geek Rewind, from its Ubuntu servers and Nginx configuration to its custom WordPress plugins. Many new tutorials start with readers' questions, and he's always glad to answer them in the comments.
No comments yet — be the first to share your thoughts!