How to Enable PUA Protection in Microsoft Edge


PUA (Potentially Unwanted Application) protection in Microsoft Edge blocks software that slows down your PC, shows spammy ads, or installs junk you never asked for. It works as a filter. It stops you from downloading risky programs that fall just short of being full-blown viruses, such as bundleware, adware and fake “optimizer” tools.
Starting with Microsoft Edge version 91 and newer, the browser checks downloads against an updated blocklist. Turning this extra layer on takes a few clicks in Settings. There is also a registry method for admins who want to force the setting for every user on a PC. Both are covered below.
Open Microsoft Edge, press Ctrl+comma to go to Settings , click Privacy, search, and services on the left, scroll to Security, and toggle Block potentially unwanted apps on. The protection activates immediately without restarting the browser.
How to Turn PUA Protection On or Off in Edge
Step 1Open Microsoft Edge
Start by opening the Edge browser on your computer. Any Edge window will do.
Step 2Go to Settings
- Look at the top right corner of the Edge window and click the three horizontal dots button, labeled Settings and more.
- Click Settings in the menu that opens.
You can skip the menu by pressing Ctrl+comma. Either way, Settings opens in a new tab, with a list of categories on the left.

Step 3Find Privacy Settings
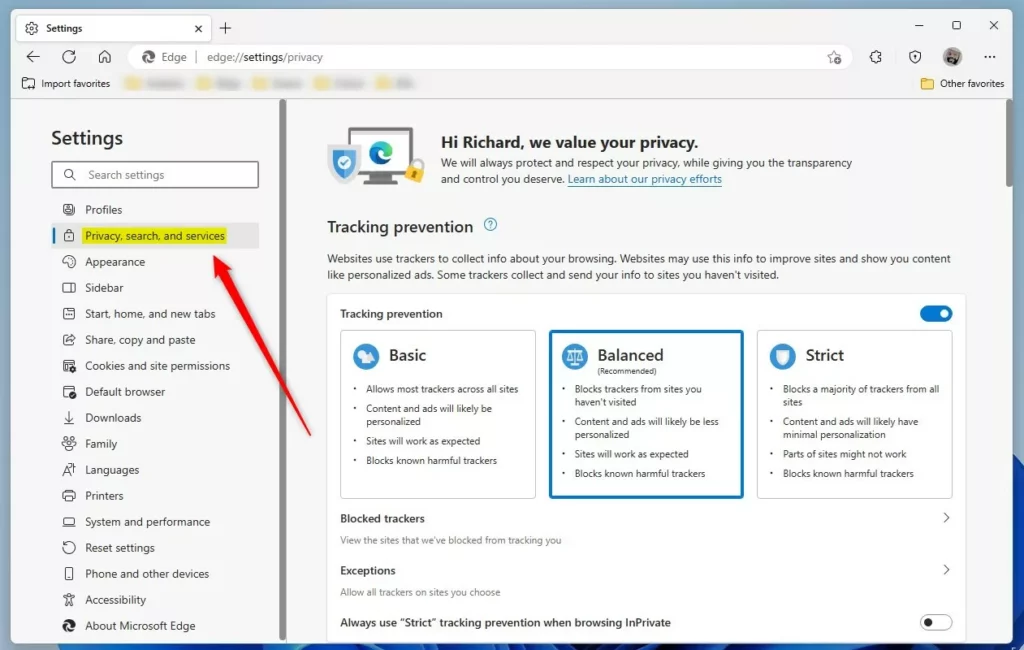
- In the left side panel, click Privacy, search, and services.
The right side now shows the privacy and security options. If you don’t see the left panel, the window may be too narrow. Widen it, or click the menu icon in the top left of the Settings page.
Step 4Change PUA Protection
The PUA setting lives in the security part of this page. It stops bundleware and hidden adware from downloading alongside legitimate software.
- Scroll down the Privacy, search, and services page until you reach the Security section.
- Find the Block potentially unwanted apps switch.
- Click the switch so it turns on.
The switch should now show as on, usually with a colored background. If the switch is greyed out, or the page says some settings are managed by your organization, a policy is controlling it. That policy may have been set through the registry or Group Policy methods later in this tutorial. Change it there, or ask whoever manages the PC.
Both should remain enabled for comprehensive protection.
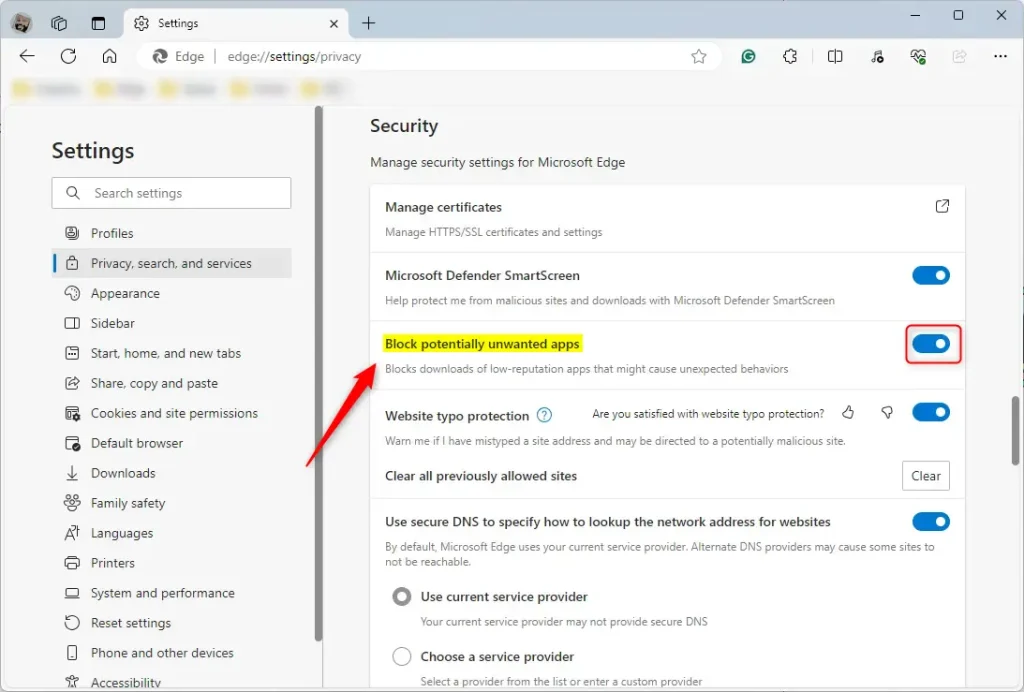
What happens? When you turn it on, Edge blocks unwanted programs. When you turn it off, Edge allows them. The change applies right away, and you don't need to restart the browser.
Step 5Close Settings
You are done. Close the Settings tab. To undo the change, come back to the same page and turn the switch off.
How to Control PUA Using Windows Registry
This method works for all users on your computer, so it suits shared PCs and admins. Because you are editing the registry, take your time and change only the value described below. If you want a safety net, back up the registry first (in Registry Editor, File Export).
Step 1Open Registry Editor (Admin Required) %%SC0%%
- Press Win+R to open the Run box.
- Type regedit and press Enter.
- Click Yes when User Account Control asks for permission.
You need admin rights for this step. If you are signed in with a standard account, Windows asks for an administrator password. Registry Editor then opens, with a folder tree on the left.
Step 2Navigate to the Edge Folder
Go to this location in the registry:
Computer\HKEY_LOCAL_MACHINE\SOFTWARE\Policies\Microsoft\Edge
Expand the folders in the left pane one at a time, or paste the path into the address bar at the top of Registry Editor and press Enter. If the Edge folder does not exist under Microsoft, right-click Microsoft, choose New and then Key, and name it Edge. This is common on PCs where no Edge policy has ever been set.
Step 3Find or Create SmartScreenPuaEnabled
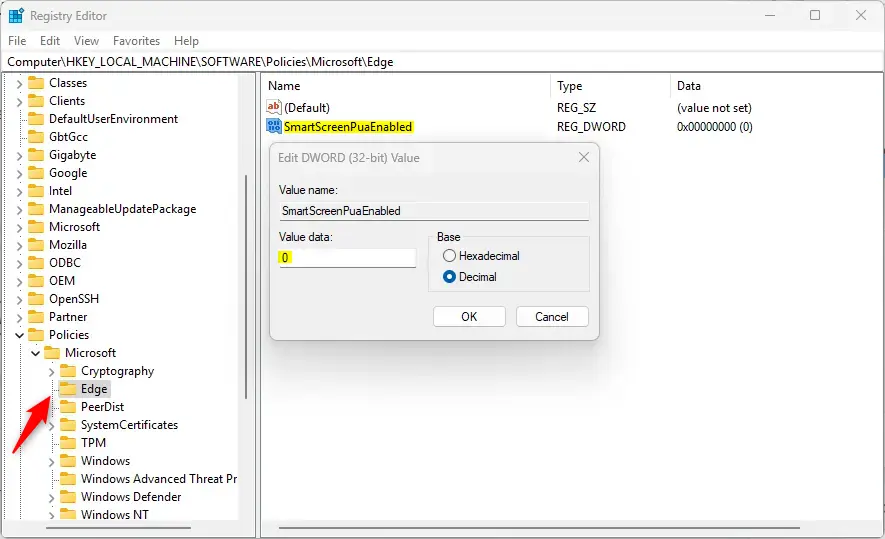
The value you need is SmartScreenPuaEnabled. It sits under HKEY_LOCAL_MACHINE\SOFTWARE\Policies\Microsoft\Edge and is a REG_DWORD entry. It appears in the right-hand panel. If it is missing, you can create it yourself.
If you do not see it:
- Right-click a blank area on the right side.
- Click New and then DWORD (32-bit) Value.
- Name it SmartScreenPuaEnabled and press Enter.
The new entry appears in the list with a value of 0. Pay attention to the spelling, because Edge ignores a misspelled name without any warning. Use the 32-bit DWORD type even if your Windows is 64-bit.
Step 4Set the Value
- Double-click SmartScreenPuaEnabled to open the edit window.
- In the Value data box, type 1 to turn PUA blocking on for everyone, or 0 to turn PUA blocking off for everyone.
- Leave the base set to Hexadecimal and click OK.
The value in the right pane should now show your number. Close Registry Editor when you are done.
Step 5Restart Your Computer
You may need to restart your computer for the changes to take effect. At the very least, close all Edge windows and open the browser again. After that, go back to Settings Privacy, search, and services. The Block potentially unwanted apps switch should now be locked and show that your organization manages it.
PUA protection changes made this way affect all users on your computer. The registry method provides stronger protection than the browser settings. This is because registry changes apply system-wide and override browser configurations, so a user can no longer switch it off from the Settings page.
To Go Back to Normal
To undo the change, go back to the same registry location in Registry Editor. Right-click the SmartScreenPuaEnabled item you created, choose Delete and confirm. This restores the default setting. Edge then goes back to using the switch in its own Settings page. Restart Edge afterward so it picks up the change.
General
For managed devices or organizations: PUA Protection can also be controlled via Group Policy. Open gpedit.msc and look under Computer Configuration Administrative Templates Microsoft Edge for centralized management. The SmartScreen policies are grouped in that area.
Two things to know. The Local Group Policy Editor is not included in Windows 11 Home, so Home users should use the Settings or registry method. On Pro and higher editions, the Microsoft Edge folder only shows up if the Edge administrative templates are installed. If you don't see it, that is the likely reason.
Summary
PUA Protection in Edge stops unwanted apps and bundleware from installing on your computer. You can turn it on through the browser settings menu or the Windows Registry Editor, depending on what works best for your setup.
- Easy way: Use the Edge Settings menu under Privacy, search, and services.
- Advanced way: Use the Windows Registry Editor to change the SmartScreenPuaEnabled value (requires admin rights).
PUA Protection helps protect your computer from potentially unwanted applications. Most people should leave it turned on. Turn it off only if you need to install a specific program that PUA Protection blocks, and turn it back on once the install is done. Always be careful when disabling security features on your computer.
Additional security: Consider enabling Edge's Enhanced tracking prevention and Tracking prevention features for comprehensive protection against unwanted content and tracking.
Have a question about this guide?
Answered by AI from this guide. Good questions may be added to this page — please don't include personal details.
Did this guide fix your problem?

About the Author
Richard
Tech Writer, IT Professional
Richard is a writer at Geek Rewind who turns complex IT tasks into clear, step-by-step guides. He draws on years of hands-on experience in system administration and enterprise IT operations, focusing on Windows, Linux and WordPress: the problems people actually run into, and the fixes that work. His server and WordPress guides come from systems he runs himself. Richard builds and maintains the platform behind Geek Rewind, from its Ubuntu servers and Nginx configuration to its custom WordPress plugins. Many new tutorials start with readers' questions, and he's always glad to answer them in the comments.
No comments yet — be the first to share your thoughts!