Enable or Disable Spellcheck Assistance in Microsoft Edge

Spellcheck assistance in Microsoft Edge is a built-in typing tool that highlights typos with a red squiggly line as you type into web forms and text boxes. You can turn this feature on or off at any time in Edge version 120 and newer.
Controlling this setting lets you manage how much typing data you share with spellcheck engines while you browse the web.
Open Microsoft Edge Settings, navigate to Languages, and toggle “Use grammar and spell check assistance” on or off. You can also choose between Microsoft Editor for advanced help or Basic for spellcheck only.
Enable/Disable Tracking Prevention in Edge
Tracking prevention in Microsoft Edge controls which background trackers load while you browse the web. You can easily turn this feature on or off to manage your online privacy directly from the browser settings menu without needing any extra tools or extensions.
Configuration requires a few specific steps.
Open the Microsoft Edge browser.
Click the three horizontal dots in the top-right corner (or press Alt+F) to open Settings and more (Alt+F), then select Settings.

Choose “Privacy, search, and services” from the left sidebar of the Settings page.
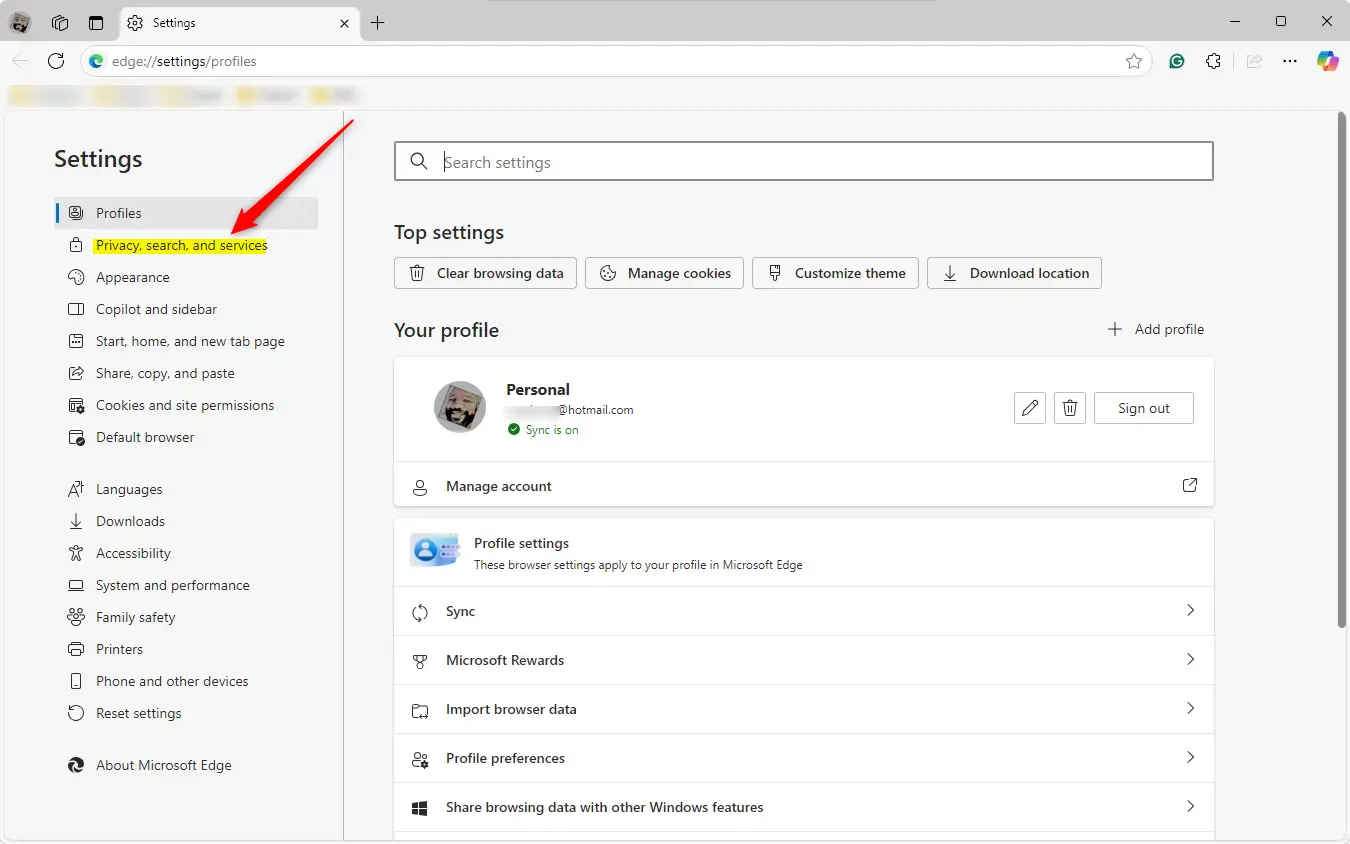
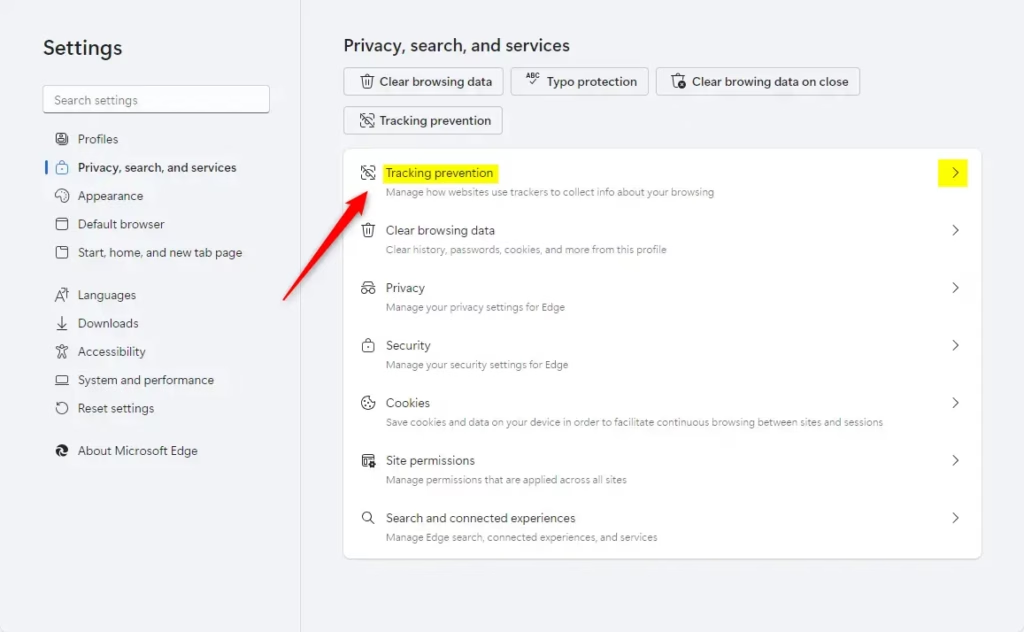
Click the "Tracking prevention" tile to expand its options.
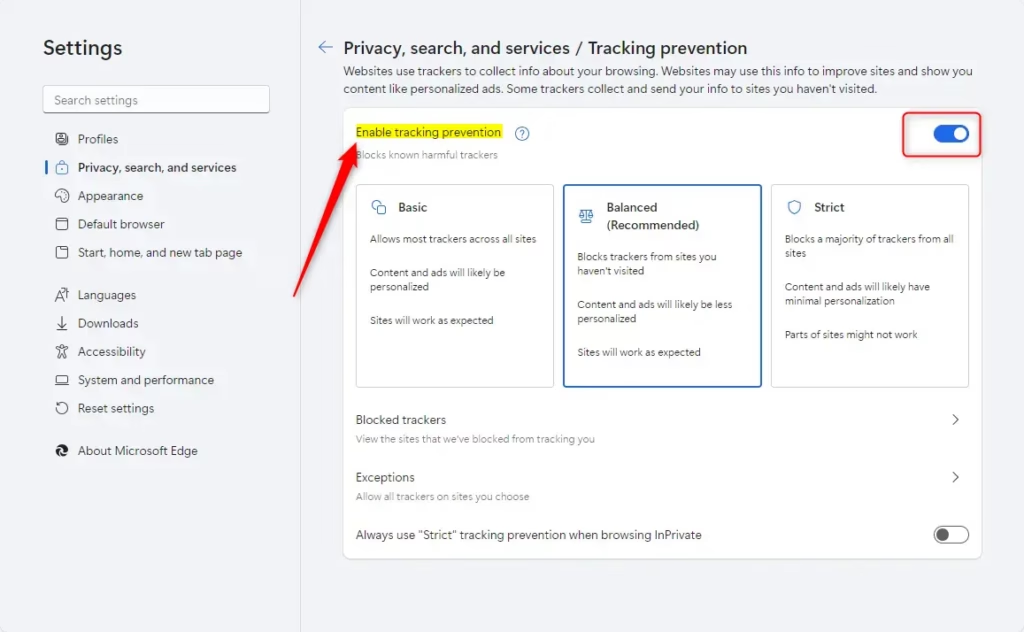
Locate the "Enable tracking prevention" tile on the "Tracking prevention" settings page, then toggle the switch to turn the feature on or off.
Choose one of three blocking levels:
- Basic: Blocks potentially harmful trackers but allows most other trackers and those that personalize content and ads.
- Balanced (Recommended): Blocks potentially harmful trackers and trackers from sites you haven’t visited. Content and ads will likely be less personalized.
- Strict: Blocks potentially harmful trackers and most trackers across sites. Content and ads will likely have minimal personalization.
The browser also supports enabling "Strict" tracking prevention during InPrivate browsing sessions.
The Edge settings tab closes whenever configuration finishes.
Enable or disable Tracking Prevention in Edge via Registry
Managing tracking prevention in Microsoft Edge through the Windows Registry Editor lets you enforce privacy settings across your entire computer. You can use this advanced method to configure the feature for all user accounts by modifying specific keys in the registry.
Press Win + R, type regedit, and press Enter to open the Windows Registry Editor before heading to the target key path below.
Remember to back up your registry before making any changes, or create a System Restore point as a precaution.
ComputerHKEY_LOCAL_MACHINESOFTWAREPoliciesMicrosoftEdge
Right-click Edge > New > DWORD (32-bit) Value and name the new entry TrackingPrevention.
Double-click the TrackingPrevention value and configure its data using the reference table below:
1= Force enable Basic tracking prevention.2= Force enable Balanced tracking prevention.3= Force enable Strict tracking prevention.0= Force disable tracking prevention.
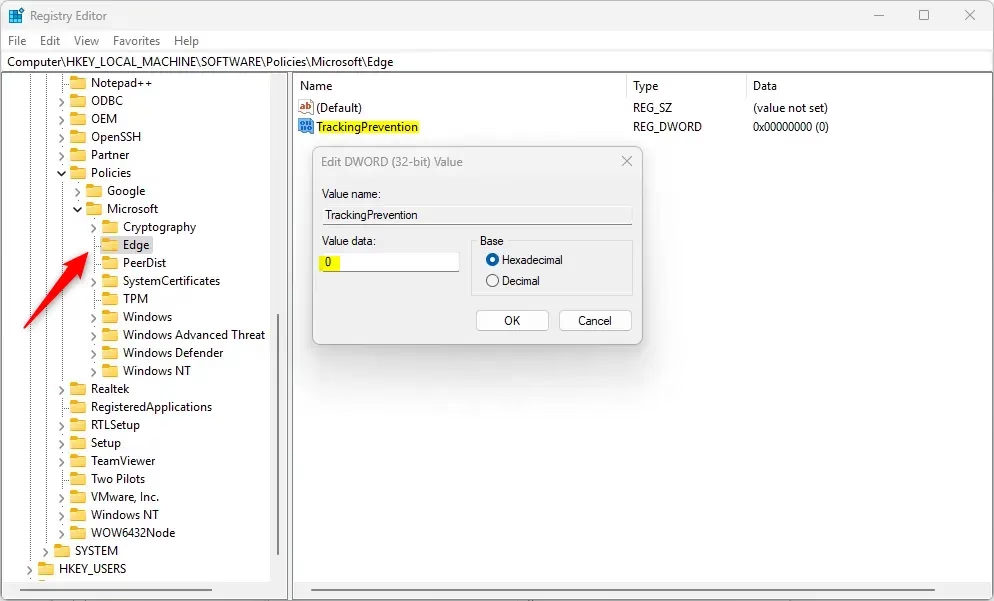
Removing the “TrackingPrevention” value restores default behavior and returns control to Edge's graphical interface.
TrackingPrevention
A computer reboot may prove necessary for applying these updates.
The configuration process ends here.
Reference:
Conclusion:
Microsoft Edge includes built-in tools to keep browsing habits private and block unwanted data collection. Review these key takeaways:
- Privacy Control: Users can enable or disable tracking prevention, tailoring their browsing experience to their preferences.
- Tracking Levels: Edge offers three levels of tracking prevention—Basic, Balanced (Recommended), and Strict, allowing users to choose the right balance between personalization and privacy.
- Registry Editing: For advanced users, tracking prevention can also be managed through the Windows Registry, providing an additional method to enforce settings.
- User Empowerment: By utilizing these features, users can better protect their online data and enjoy a more secure browsing environment.
Applying these configurations strengthens privacy protections and grants greater command over the web browsing experience.
Was this guide helpful?

About the Author
Richard
Tech Writer, IT Professional
Richard is a writer at Geek Rewind who turns complex IT tasks into clear, step-by-step guides. He draws on years of hands-on experience in system administration and enterprise IT operations, focusing on Windows, Linux and WordPress: the problems people actually run into, and the fixes that work. His server and WordPress guides come from systems he runs himself. Richard builds and maintains the platform behind Geek Rewind, from its Ubuntu servers and Nginx configuration to its custom WordPress plugins. Many new tutorials start with readers' questions, and he's always glad to answer them in the comments.




[…] translate videos in Microsoft Edge using its built-in AI-powered translation tool, which can provide real-time audio dubbing and […]