How to Create a System Restore Point in Windows 11

- 20 steps
- Needs administrator rights
A system restore point in Windows 11 is a snapshot of your system files, installed apps, drivers, and registry settings. If a bad update, driver, or program breaks something, you can roll the PC back to that snapshot. The rollback usually takes only a few minutes of your attention, and it leaves personal files such as photos and documents alone.
Making a restore point beforehand can save you a long repair or a full Windows reset when a new program makes the system misbehave. You only need built-in tools and an administrator account. System Restore is available in both Windows 11 Home and Pro, so the steps below are the same for either edition.
Open System Properties by pressing Win+R, typing sysdm.cpl, and pressing Enter. Click the System Protection tab, select your main drive, click Configure, choose Turn on system protection, then click Apply and OK. Click Create, name your restore point, and click Create again. Windows saves the snapshot in seconds.
Why Make a Restore Point?
- It helps you fix problems caused by new apps, drivers, or updates, because you can return to the state before the change.
- You can undo changes that made your PC slow or unstable without hunting for the cause first.
- It saves time because you don’t have to fix everything from scratch or reinstall Windows.
- It’s a good idea to make one before big changes, like installing new software, a hardware driver, or a system tweak. Windows also makes some restore points on its own, but a manual one gives you a known good point with a name you chose.
How to Create a System Restore Point in 🪟 Windows 11
The process has four parts. You open the System Properties window, turn on system protection for your main drive, create the restore point, and, if you ever need it, run System Restore to go back. Everything happens in the same window, so once you find it the rest is quick.
Step 1Open System Settings
- Click the Start button (Windows icon) in the bottom-left corner of your screen, or in the centre of the taskbar if you use the default layout. The Start menu opens with a search box at the top.
- Type System in the search box, then click System from the results. The System page of the Settings app opens.
- On the right side, scroll down and click About. Then click Advanced system settings under Related links. This opens the System Properties window. If Windows asks for administrator approval, accept it. A standard account will need an administrator’s password here.
You can reach the same place another way. Press the Win on your keyboard, type about your pc into the search bar, and press Enter. That opens the About page directly. From there, click the Advanced system settings link under Related links to launch the System Properties window, where you set up restore points.
- Press Win+R on your keyboard to open the Run box. A small box appears in the bottom-left corner of the screen.
- Type
sysdm.cpland press Enter. The System Properties window opens straight away. This is the quickest route if you do this often.
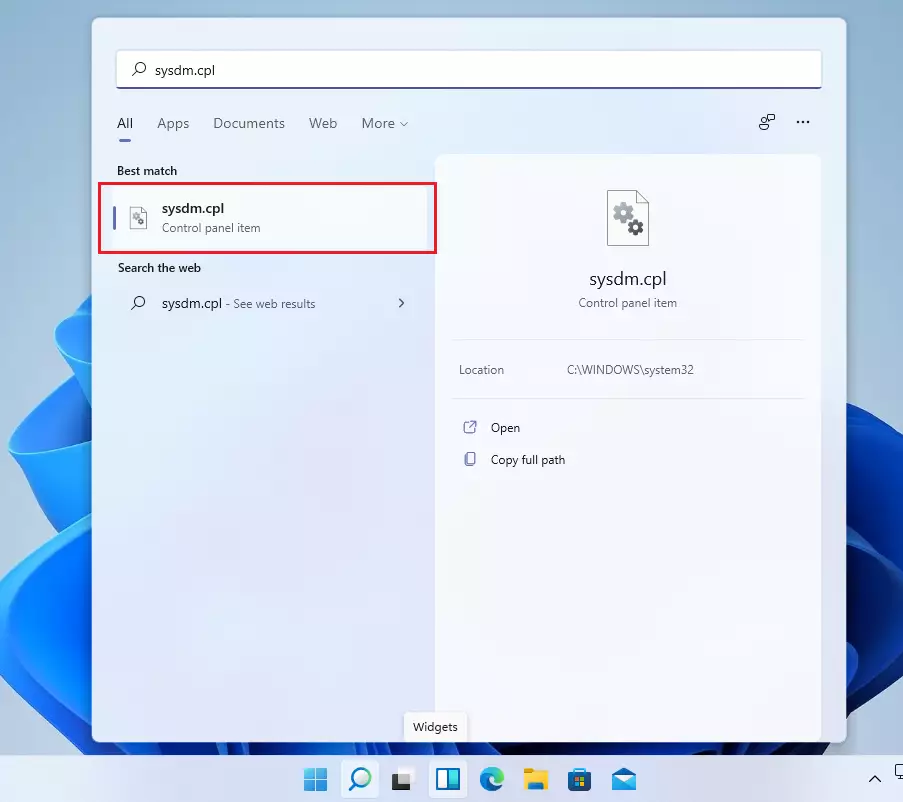
The window opens on the Computer Name tab. The tab you need is System Protection, which is covered next.
Step 2Turn On System Protection
Windows can only create a restore point for a drive that has system protection turned on. On some PCs it is already on for the system drive, and on others it is off, so always check. Open the System Protection tab in the System Properties window, select your main drive, and click the Configure button. Choose the option to turn on system protection, then click Apply and OK to save your changes.
- Click the System Protection tab at the top of the window. You will see a list of drives under Protection Settings.
- Look for your main drive, usually Local Disk (C:) (System), and click it to select it. The Protection column shows On or Off for each drive.
- If it says Protection Off, click the Configure button. A new System Protection dialog opens. If protection already says On, you can skip ahead to creating the restore point.
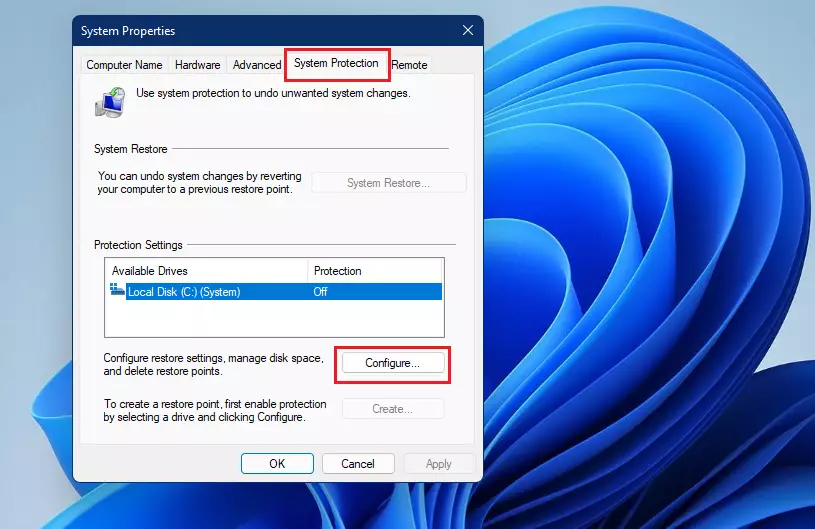
If the Configure button or the options inside it are greyed out, you are probably not signed in as an administrator. Sign in with an administrator account and try again. On a work PC, a group policy can also lock these settings.
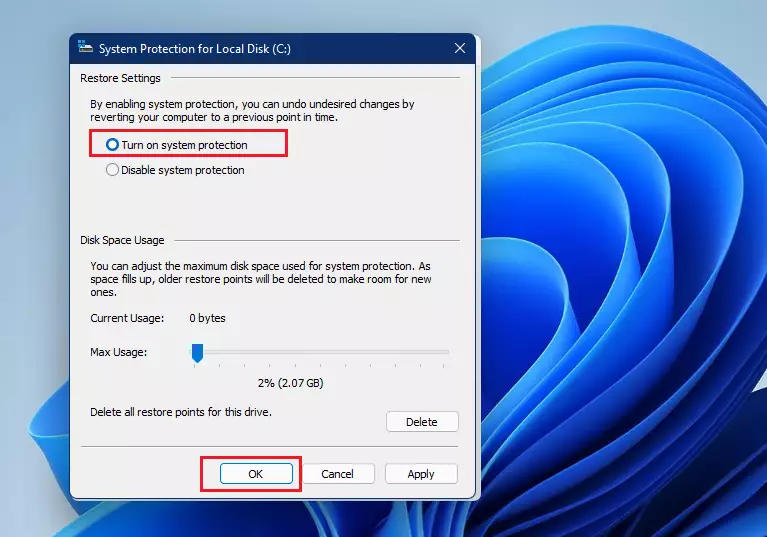
In the dialog that opened, choose Turn on system protection, then set the disk space you want to allow.
- Select Turn on system protection. The Disk Space Usage controls become active.
- You can also adjust how much disk space Windows can use for restore points with the Max Usage slider, but the default is usually fine. When that space fills up, Windows deletes the oldest restore points to make room for new ones. A larger allowance keeps more history. If your drive is nearly full, keep the allowance small.
- Click Apply, then OK to save. You return to the System Properties window, and the drive should now show On. To undo this later, return to the same dialog and choose Turn off system protection. Turning it off also removes your existing restore points for that drive.
Back on the System Protection tab, the Create button is now available. If it is still greyed out, protection is not on for the drive you have selected.
Step 3Create Your Restore Point
- With your system drive selected, click the Create button. A small System Protection dialog opens asking for a description.
- Type a name that helps you remember why you made this restore point (for example, “Before installing new app”). Windows adds the date and time on its own, so you don’t need to type them.
- Click Create again and wait for Windows to finish. A progress message says Creating a restore point. It usually takes under a minute, though it can take longer on a slow disk.
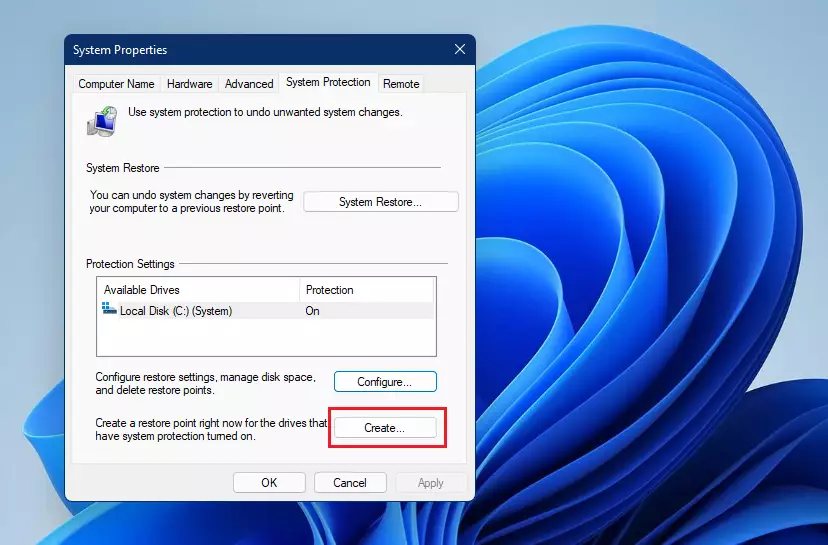
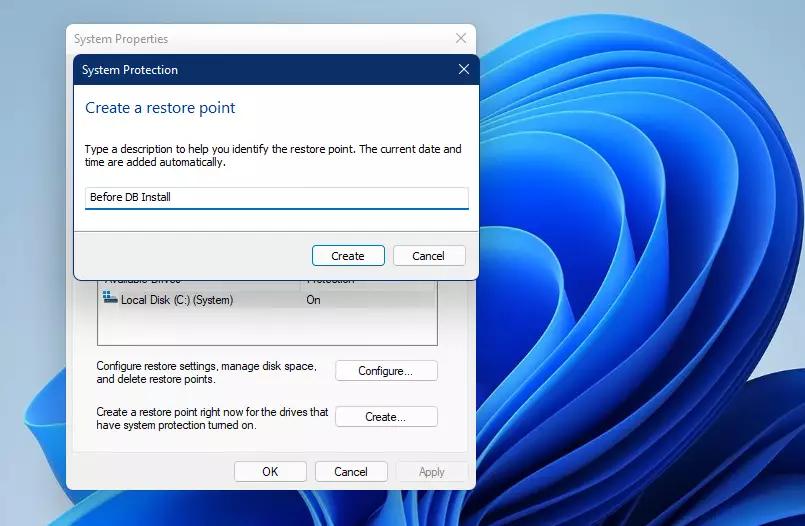
When the bar completes, the dialog changes to show the result.
Windows displays a notification when the restore point finishes generating, saying that the restore point was created successfully. Click Close, and the restore point is saved. You can now install the app, driver, or update you were worried about.
How to Restore Your PC Using a Restore Point
You can use a saved restore point to fix problems and return your system to an earlier working state. Open the System Properties window, click the System Protection tab, and then click the System Restore button. Follow the steps on your screen to pick a restore point and start the fix. Close your open programs and save your work first, because the PC will restart. If Windows no longer starts, you can also reach System Restore from the Windows recovery environment, under Troubleshoot and Advanced options.
- Open the System Properties window again (follow the steps above).
- Click the System Protection tab.
- Click the System Restore button. The System Restore wizard opens. If the button is greyed out, protection is off for that drive, which means there are no restore points to use.
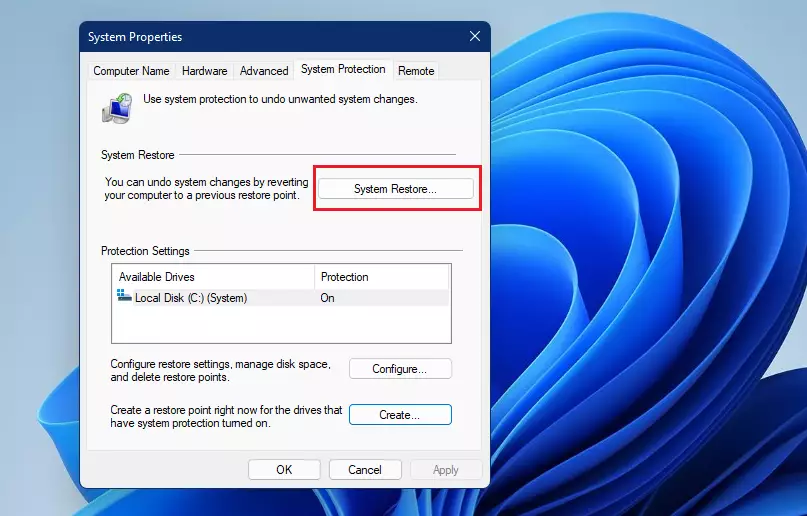
The first wizard page explains what System Restore does. It may offer a Recommended restore, which is the most recent restore point. You can choose that or pick a different one yourself.
Then follow these steps:
- Click Next on the first page. If it offers a choice, select Choose a different restore point first.
- Choose the restore point you want to use. Check the date, time, and description. Pick one from before the problem started. To see what will change, click Scan for affected programs. It lists the apps and drivers that will be removed or restored.
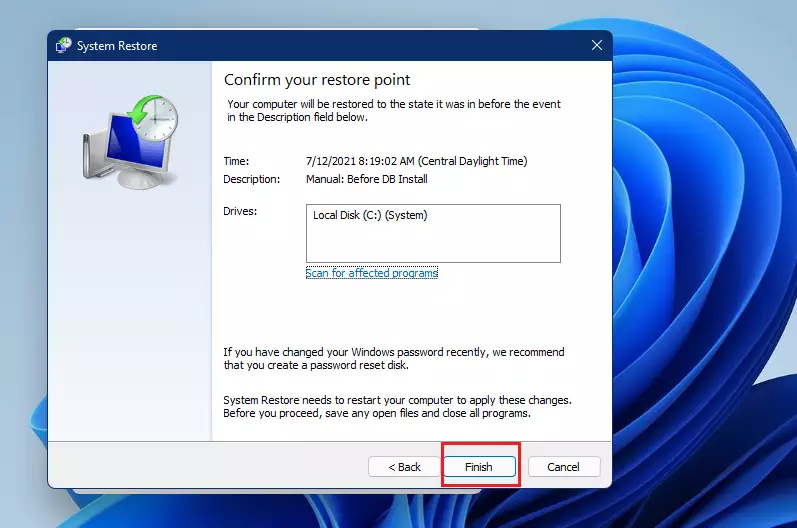
- Click Next and then Finish to start restoring. Windows shows a final warning that the process can’t be interrupted once it begins. Click Yes to continue.
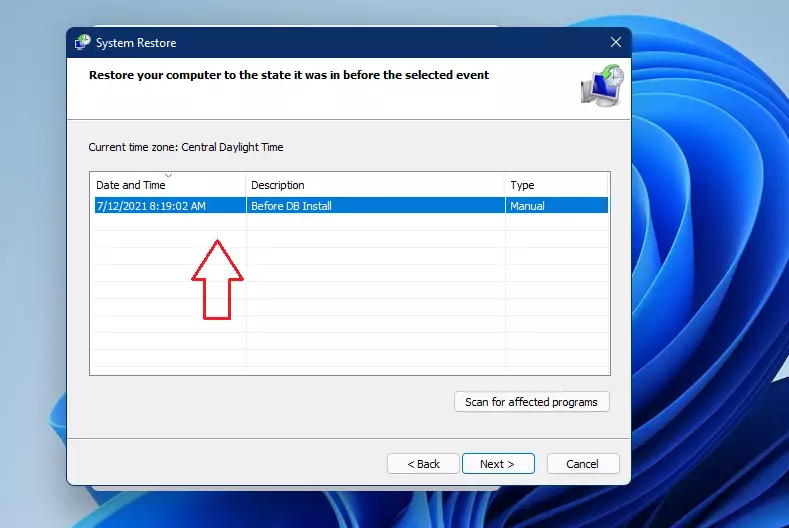
The confirmation page shows the restore point you picked and the drive that will be affected. Read it before you click Finish.
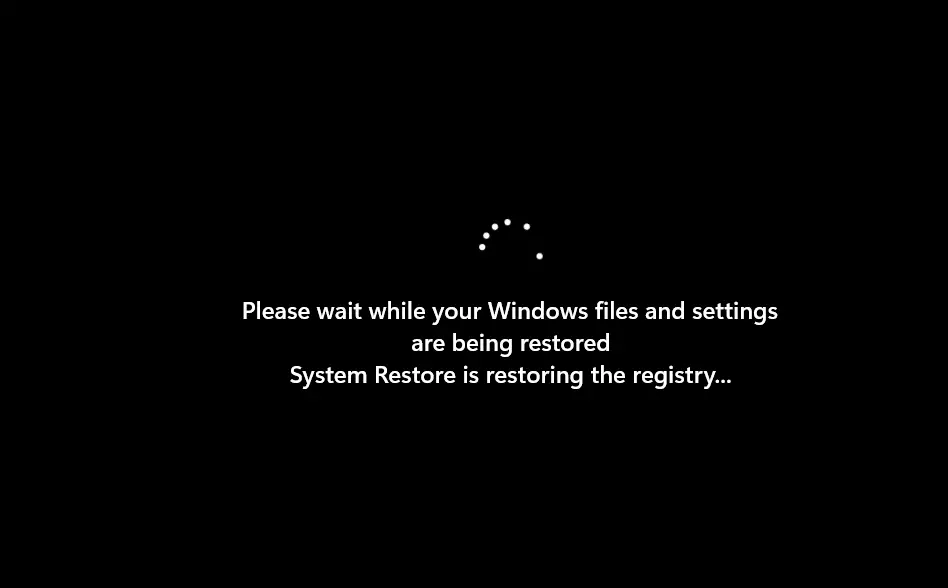
After you confirm, the PC prepares the restore and then restarts.
System Restore works from a snapshot of system files and settings, so it can return you to a working condition if problems appear after installing new software or drivers. Don’t turn off the PC or pull the power during this time, even if the screen looks stuck. When you sign back in, Windows tells you whether the restore succeeded. Your personal files stay as they are, but apps and drivers installed after the restore point are removed. If the result is not what you wanted, open System Restore again and choose Undo System Restore, or pick a different restore point.
If the restore fails, try an older restore point. If none of them work, use the recovery options in Settings as a next step.
Summary
- Making restore points in Windows 11 helps keep your computer safe, as long as system protection is turned on for your system drive.
- It lets you fix problems quickly by going back to a time when your PC worked well. Personal files are not touched, but apps and drivers installed since then are removed.
- Try to create restore points before big changes or updates, and give each one a clear name.
- The process is simple and only takes a few minutes. A restore itself can take up to 30 minutes.
- Using restore points gives you peace of mind and can save you from headaches later. Remember that a restore point is not a backup of your files, so keep separate backups of anything important.
Taking a few minutes to create a restore point gives you an easy way to undo bad updates or software changes. You can roll your system settings back to a time when your computer ran smoothly, which saves you from reinstalling Windows when things go wrong. Make it a habit before any major install, and check once that system protection is on, so the restore point is there when you need it.
Have a question about this guide?
Answered by AI from this guide. Good questions may be added to this page — please don't include personal details.
Did this guide fix your problem?

About the Author
Richard
Tech Writer, IT Professional
Richard is a writer at Geek Rewind who turns complex IT tasks into clear, step-by-step guides. He draws on years of hands-on experience in system administration and enterprise IT operations, focusing on Windows, Linux and WordPress: the problems people actually run into, and the fixes that work. His server and WordPress guides come from systems he runs himself. Richard builds and maintains the platform behind Geek Rewind, from its Ubuntu servers and Nginx configuration to its custom WordPress plugins. Many new tutorials start with readers' questions, and he's always glad to answer them in the comments.
[…] How to Create a System Restore Point in Windows 11 […]