How to Turn On or off Cloud Protection for Microsoft Defender Antivirus in Windows 11

Cloud protection (called Cloud-delivered protection in the app) lets Microsoft Defender Antivirus check suspicious files and behavior against Microsoft’s online servers. It can catch and block brand-new malware and ransomware within seconds, long before a normal definition update would cover them.
Leave it on unless you have a specific reason to turn it off. This tutorial shows four ways to change it: the Windows Security app, the command line, Group Policy and the Registry. You need to be signed in as an administrator for any of them. The Windows Security app is the easiest and works on every edition of Windows 11.
Open Windows Security, go to Virus & threat protection, scroll to Virus & threat protection settings, click Manage settings, then toggle Cloud-delivered protection On or Off. No restart needed.
Option 1Turn On or Off Cloud Protection Using Windows Security
- Click the Start button or press the Windows key, then open Windows Security.
- Click Virus & threat protection. The Virus & threat protection page opens, showing your current threats, scan options and protection updates.
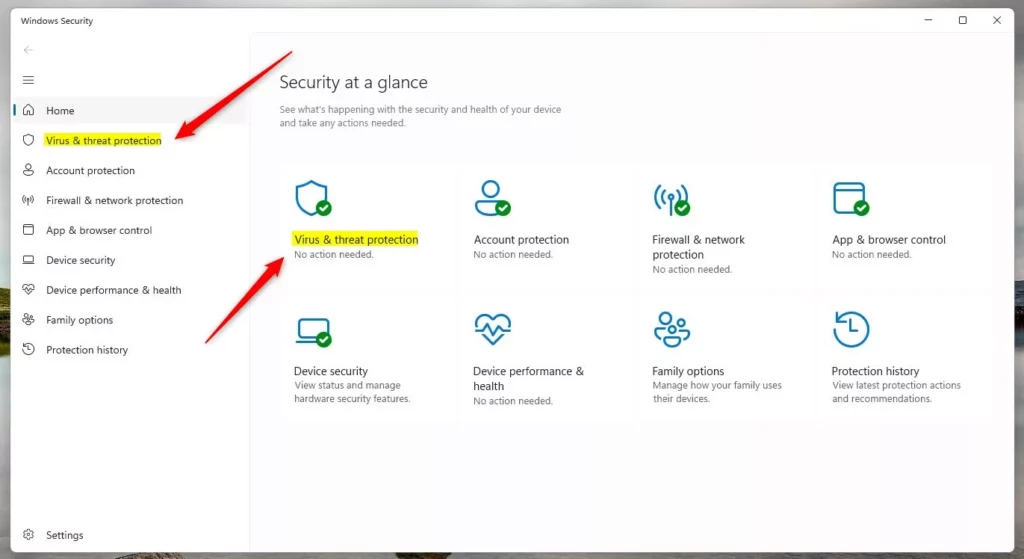
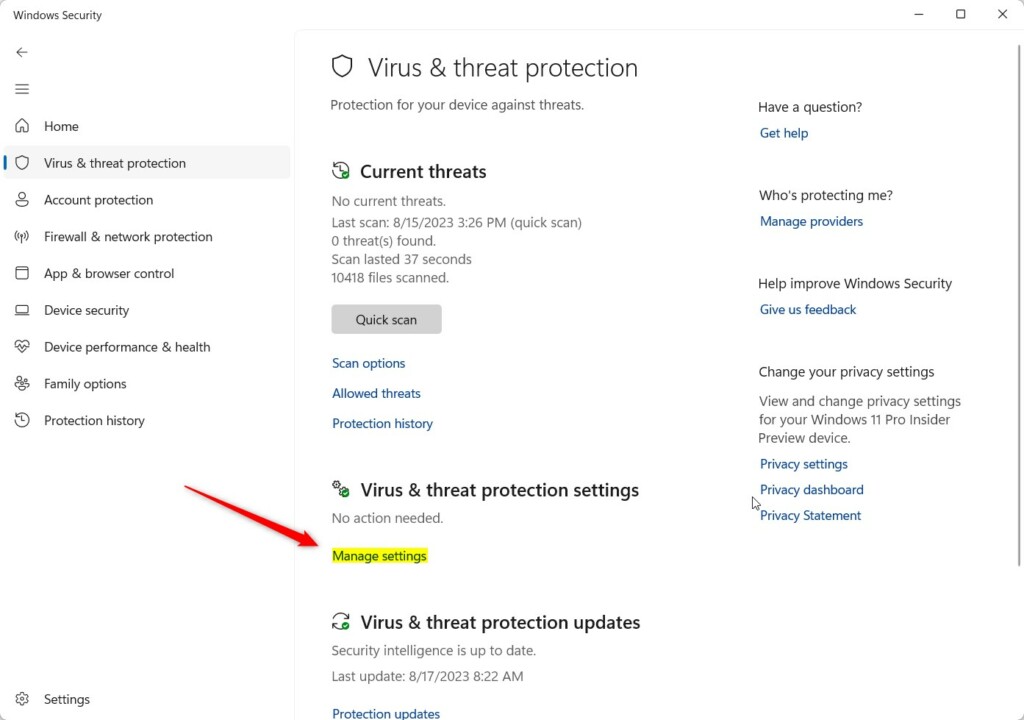
The next step is on the same page. Scroll down to the section called Virus & threat protection settings.
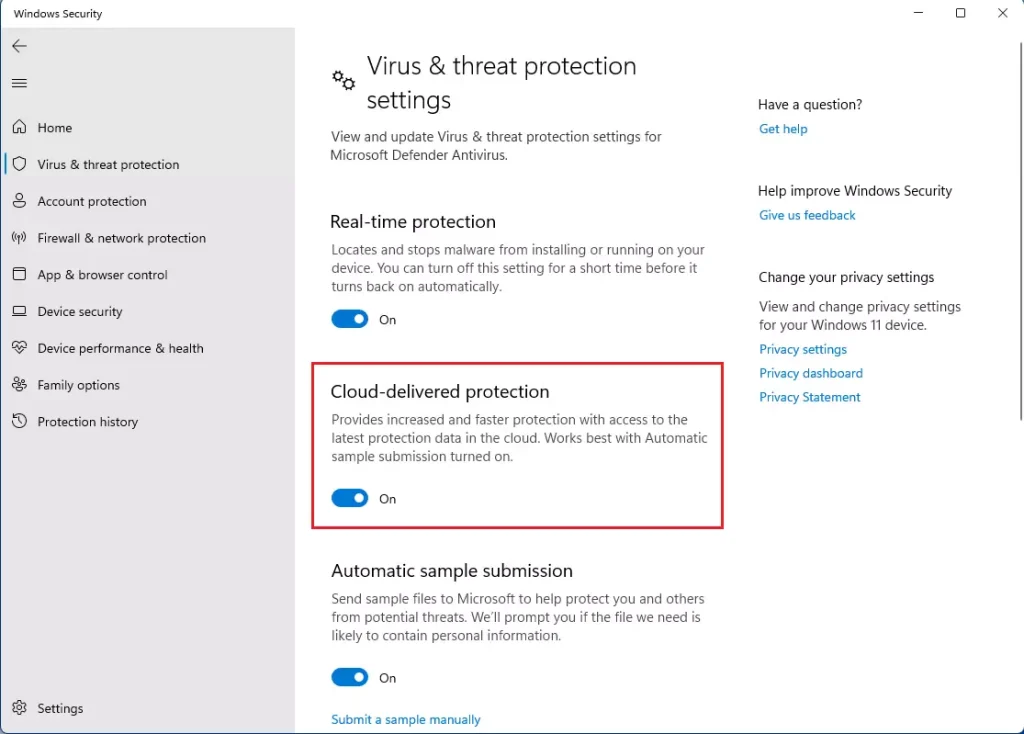
- Under Virus & threat protection settings, click Manage settings. A list of switches opens, including Real-time protection, Cloud-delivered protection and Automatic sample submission.
If the switches are greyed out, or you see a message that some settings are managed by your organization, a Group Policy or a device management policy is controlling them. Use Option 3 below to check the policy.
- Find Cloud-delivered protection and toggle it On (recommended) or Off.
- If a User Account Control prompt appears, click Yes. The switch should now show the state you chose.
You can now close Windows Security. No restart is needed for this method. To undo the change, repeat the steps and flip the switch back.
Option 2Turn On or Off Cloud Protection Using Commands
Run the terminal as an administrator, or the commands will fail with an access error.
- Open Windows Terminal (Admin). You can choose either PowerShell or Command Prompt inside the terminal.
- Type or paste one of the commands below and press Enter to run it. Use the command that matches what you want (on or off), and the one written for the shell you opened.
To Turn On Cloud Protection (Default)
PowerShell Set-MpPreference -MAPSReporting 2or
PowerShell Set-MpPreference -MAPSReporting AdvancedTo Turn Off Cloud Protection
PowerShell Set-MpPreference -MAPSReporting 0or
PowerShell Set-MpPreference -MAPSReporting DisabledPowerShell normally prints nothing when the command works. If you get an error, check that the window title says Administrator. If Tamper Protection is on, Windows may ignore or revert changes made this way. In that case, use the Windows Security app instead. To undo the change, run the command for the opposite setting.
Close Windows Terminal when finished.
Option 3Enable or Disable Cloud Protection Using Local Group Policy Editor
Please note: The Local Group Policy Editor is only available on Windows 11 Pro, Enterprise, or Education editions. On Windows 11 Home, gpedit.msc will not open, so use one of the other methods.
- Press Windows + R, type
gpedit.msc, and press Enter to open the Local Group Policy Editor. The editor window opens with a folder tree on the left. - Navigate to:
Computer Configuration > Administrative Templates > Windows Components > Microsoft Defender Antivirus > MAPS - Double-click the cloud protection policy in that folder to open its settings window.
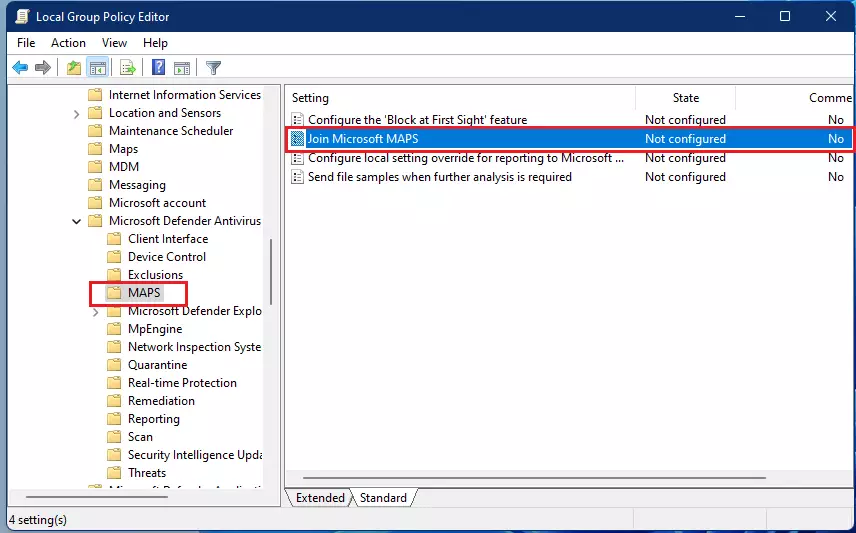
To Enable Cloud Protection
Choose one of the policy states below and click OK.
Set the policy to Not Configured (this is the default). This allows you to use Options 1 and 2 to manage cloud protection.
To Disable Cloud Protection
Setting the Microsoft Defender Antivirus cloud protection policy to Enabled actually disables cloud protection. This setting also blocks users from changing Options 1 and 2, preventing accidental changes to the security configuration. The switch in Windows Security will be greyed out while this policy is in force.
To undo it, set the policy back to Not Configured. Close the Group Policy Editor when done.
Option 4Enable or Disable Cloud Protection Using the Registry
It's a good idea to back up your registry before making any changes. In Registry Editor, you can do this with File Export. Save the file somewhere you can find it, and double-click it later to restore the saved settings.
To Enable Cloud Protection (Default)
reg delete "HKLM\SOFTWARE\Policies\Microsoft\Windows Defender\Spynet" /v SpynetReporting /fTo Disable Cloud Protection
reg add "HKLM\SOFTWARE\Policies\Microsoft\Windows Defender\Spynet" /v SpynetReporting /t REG_DWORD /d 0 /fAfter making changes, restart your computer for them to take effect. Make sure to sign in as an administrator, and reopen Windows Security afterwards to confirm that Cloud-delivered protection shows the state you wanted.
Summary
- Cloud-delivered protection helps Microsoft Defender find new threats quickly by using online cloud technology.
- You can turn this feature on or off using Windows Security, Commands, Group Policy Editor, or the Registry. The Group Policy Editor is only available on Pro, Enterprise and Education.
- Make sure you are an administrator to change these settings.
- Choose the method that feels easiest or most comfortable for you. For most people that is the Windows Security app.
- If the setting is greyed out in Windows Security, check for a Group Policy or registry setting that is controlling it.
- Keep your antivirus protection up to date to stay safe from new threats.
Windows Defender cloud protection helps your computer catch new threats faster by checking online security data. You can turn this setting on or off using the Windows Security app, the command line, Group Policy Editor, or the Registry Editor, as long as you are signed in as an administrator on your PC.
Was this guide helpful?

About the Author
Richard
Tech Writer, IT Professional
Richard is a writer at Geek Rewind who turns complex IT tasks into clear, step-by-step guides. He draws on years of hands-on experience in system administration and enterprise IT operations, focusing on Windows, Linux and WordPress: the problems people actually run into, and the fixes that work. His server and WordPress guides come from systems he runs himself. Richard builds and maintains the platform behind Geek Rewind, from its Ubuntu servers and Nginx configuration to its custom WordPress plugins. Many new tutorials start with readers' questions, and he's always glad to answer them in the comments.

No comments yet — be the first to share your thoughts!