How To Secure Your Windows 11 PC: Essential Security Settings
Securing your Windows 11 PC with its built-in tools stops online dangers like viruses and malware. Windows 11 comes with features like Microsoft Defender Antivirus, which checks for threats in real-time.
These security settings are important because your PC holds your personal photos, documents, and financial information. Keeping them safe is like locking your doors at night.
Windows 11 offers tools such as Microsoft Defender Antivirus and Windows Hello to protect your digital life. Regularly updating your system is also key to fixing security weaknesses.
Secure your Windows 11 PC by keeping it updated via Settings > Windows Update. Enable Windows Security (Microsoft Defender) for real-time antivirus protection. Ensure your firewall is active in Windows Security under Firewall & network protection.
What happens when you don’t secure your PC?
- Malware Infections: Viruses, ransomware, and spyware can infect your computer. They can steal your data, slow down your system, or even lock your files until you pay a ransom.
- Data Theft: Hackers can gain access to your accounts, steal your passwords, and access your personal files.
- Identity Theft: Stolen personal information can be used to open fraudulent accounts or commit crimes in your name.
- Financial Loss: If your banking or credit card information is compromised, you could lose money.
- System Damage: Malware can corrupt your system files, making your computer unstable or unusable.
Not securing your Windows 11 PC leaves it open to serious threats. Malware like viruses and ransomware can steal your data or lock your files, while hackers can steal passwords and personal information, leading to identity theft.
Essential Security Settings in 🪟 Windows 11
Windows 11 comes with built-in security features. You just need to know where to find them and how to use them effectively. Let’s go through the most important ones.
1Keep Windows Updated
Keeping your Windows 11 PC updated is the most important security step you can take. These updates fix security weaknesses and close potential entry points for hackers, acting like essential repairs for your digital defenses.
Regularly updating your Windows 11 PC closes security weaknesses. These updates act as repairs for digital vulnerabilities, preventing unauthorized access. Without these vital updates, external threats can easily compromise your computer system.
What happens when you update? Your system becomes more robust against new threats. You get the latest security features and bug fixes.
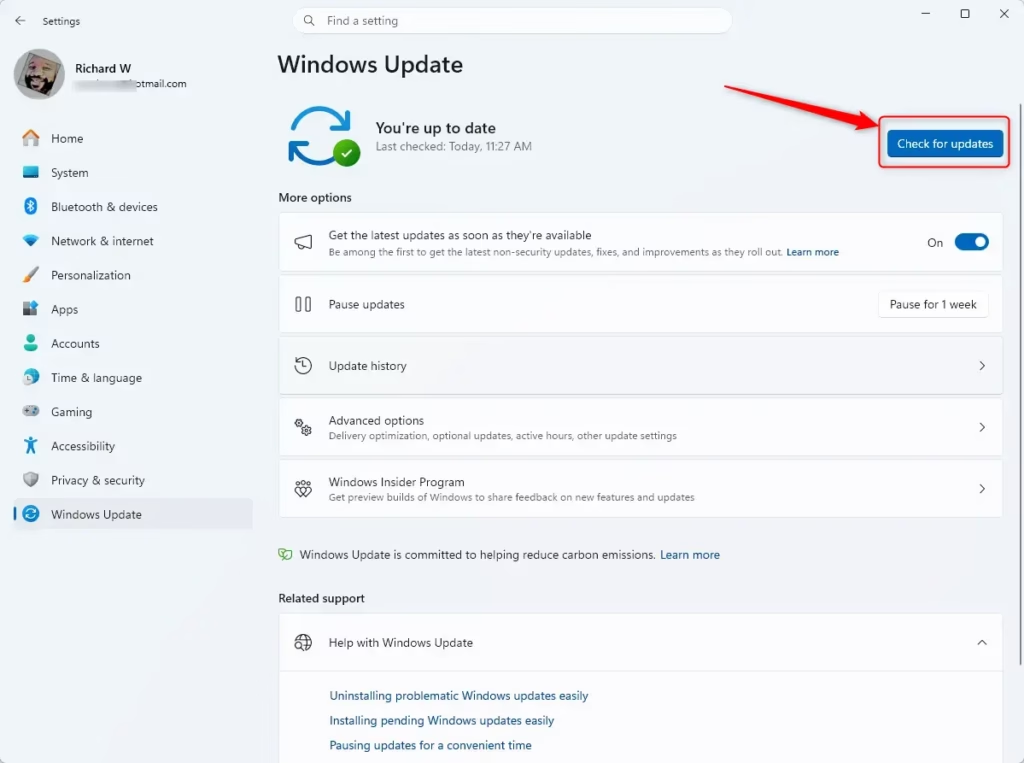
How to check for updates:
- Click the Start button.
- Type “ Check for updates” and select it from the results.
Windows 11 automatically checks for new software updates. If updates exist, Windows 11 will ask you to download and install these updates to improve security and performance.
Restart your PC if prompted. This is necessary for some updates to take effect.
2Enable and Configure Windows Security (Microsoft Defender)
Enable and configure Windows Security because it actively scans for and blocks viruses and malware as they try to enter, protecting you in real-time.
Windows Security actively scans your computer for malicious software and blocks threats in real-time. This protection feature also shields you from dangerous websites.
Enabling the Windows 11 security feature provides continuous protection. This security feature scans files, detects threats, and quarantines or removes them. Protection updates automatically every 24 hours.
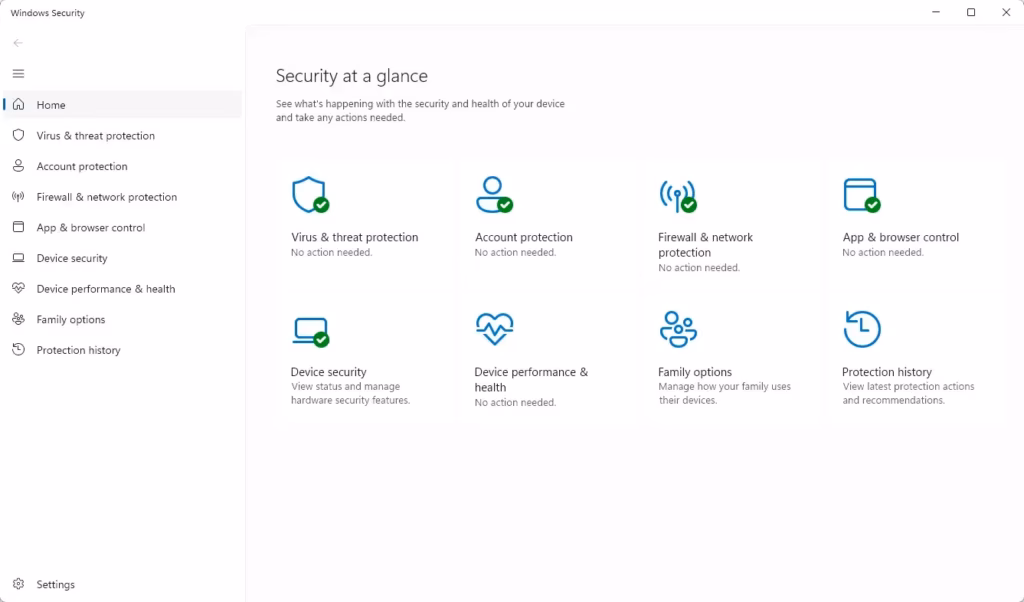
How to access and configure Windows Security:
- Click the Start button.
- Type “Windows Security” and select it.
You’ll see several sections like Virus & threat protection, Firewall & network protection, and Account protection.
- Virus & threat protection: Ensure “Real-time protection” is turned on. You can also run a scan (Quick, Full, or Custom) from here.
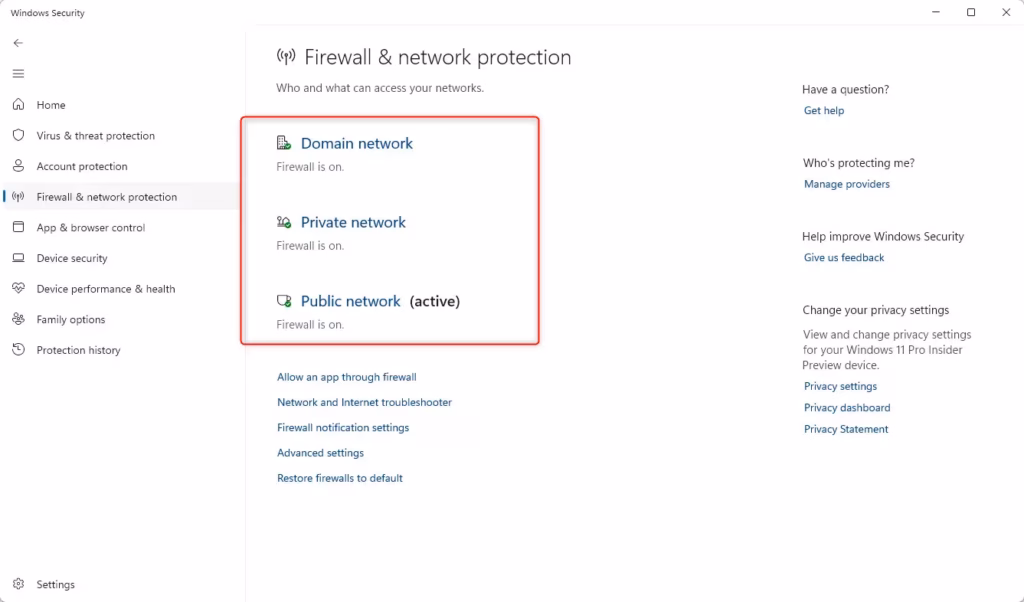
- Firewall & network protection: Make sure the firewall is on for your current network type (Domain, Private, Public). The firewall controls which applications can access the network.
- Account protection: This helps protect your sign-in information.
- App & browser control: This feature helps protect against potentially unwanted applications and malicious sites.
3Use a Strong Password and Consider Windows Hello
Using a strong, unique password for your Windows 11 PC is vital because it’s the main key to your computer. It stops people from getting in without permission and makes it much harder for hackers to guess or break into your system.
A strong password prevents unauthorized access to your Windows 11 PC and personal data. This security measure is vital because it acts as the first line of defense against hackers trying to steal sensitive information.
What happens when you use a strong password? It becomes much harder for attackers to guess or crack your password, keeping your system secure.
Tips for a strong password:
- Make it long (at least 12 characters).
- Use a mix of uppercase and lowercase letters.
- Include numbers and symbols (e.g., !, @, #, $).
- Avoid common words, personal information (birthdays, names), or simple patterns (like “123456”).
- Consider using a password manager to create and store complex passwords.
Windows Hello: A More Secure and Convenient Option
Windows Hello provides secure sign-in options for Windows 11 PCs. This feature uses your unique characteristics, such as a facial scan, fingerprint scan, or a personal identification number (PIN), to verify your identity, offering a stronger alternative to traditional passwords.
Biometric data, such as face or fingerprint scans, offers a more secure login method than passwords for Windows 11 PCs. Passwords are easy to forget, steal, or guess. A personal identification number (PIN) also typically provides better security than a standard password.
What happens when you use Windows Hello? You can log in quickly and securely without typing a password. It adds a strong layer of protection.
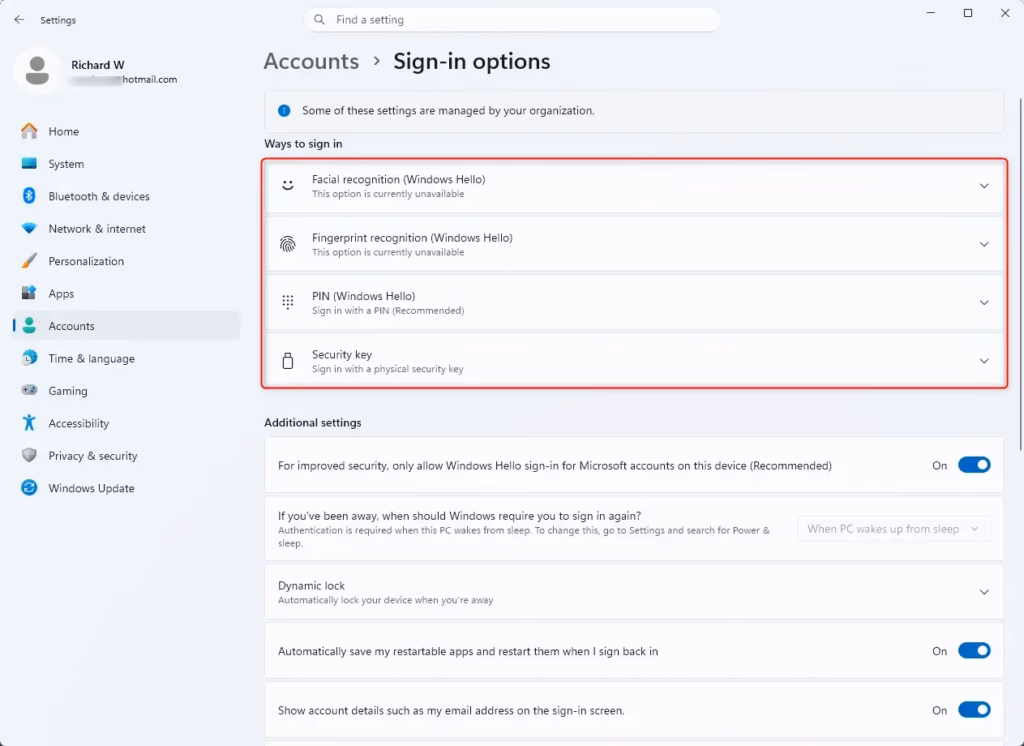
How to set up Windows Hello:
- Click the Start button.
- Go to Settings (the gear icon).
- Select Accounts.
- Click on Sign-in options.
Under “Ways to sign in,” you’ll see options like Windows Hello Face, Windows Hello Fingerprint, and PIN. Follow the on-screen instructions to set up your chosen method. You’ll likely need to set a PIN first if you haven’t already.
4Enable Secure Boot
Enabling Secure Boot on your Windows 11 PC helps make sure only safe, trusted software starts when you turn it on. This prevents harmful programs, like rootkits (a type of malware that hides its presence), from loading before your main operating system even gets a chance to run.
Secure Boot’s importance lies in preventing malicious software, such as rootkits, from loading when a computer starts. Rootkits are a type of malware that proves very difficult to detect and remove once loaded.
Secure Boot verifies the digital signature of the Windows 11 operating system and its drivers when the computer starts. If Secure Boot finds any suspicious digital signatures, Secure Boot stops the operating system and drivers from loading. This protection starts at the earliest stages of the computer’s booting process, keeping the PC safe.
How to check and enable Secure Boot:
- Access UEFI/BIOS Settings: This is usually done by restarting your PC and pressing a specific key repeatedly during startup (often F2, F10, F12, or DEL). The exact key varies by manufacturer.
- Find the Secure Boot setting: Look for a “Security” or “Boot” tab in your UEFI/BIOS settings.
- Enable Secure Boot: If it’s disabled, change the setting to “Enabled.” You might need to change the “OS Mode” or “CSM” (Compatibility Support Module) setting to “UEFI” or disable CSM for Secure Boot to be available.
- Save and Exit: Save your changes and exit the UEFI/BIOS setup. Your PC will restart.
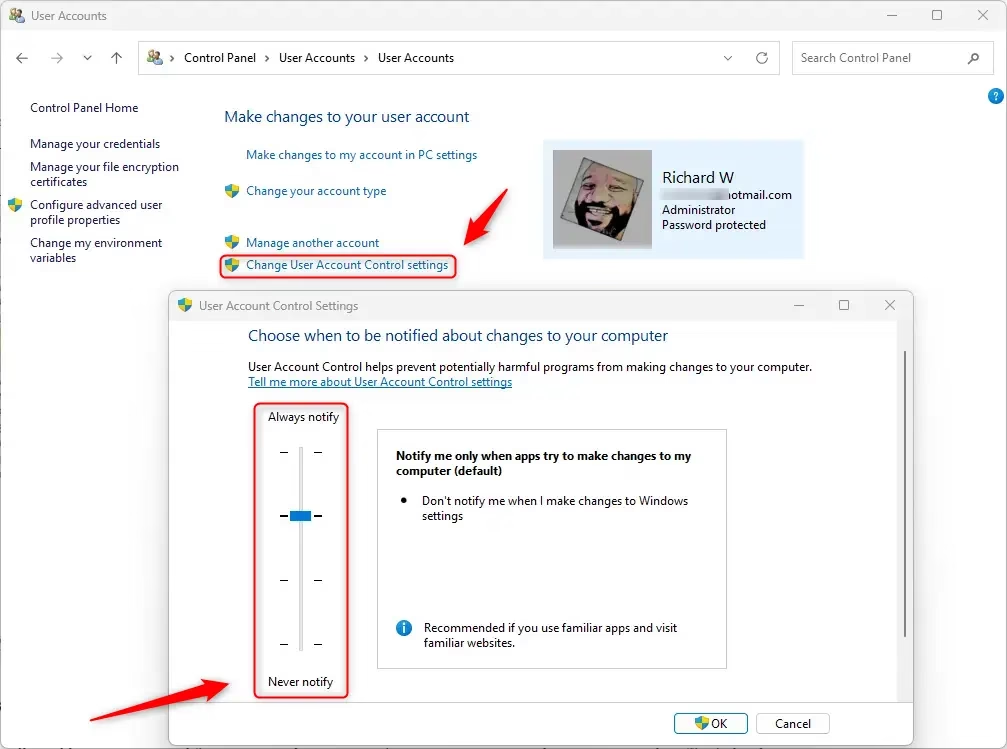
5Manage User Account Control (UAC)
Managing User Account Control (UAC) (a Windows security feature) is important because it asks for your permission before any program makes significant changes, stopping unwanted or malicious actions from happening without your knowledge.
User Account Control acts as a gatekeeper for your Windows 11 PC. This security feature stops malicious software or accidental user actions from making major changes without your explicit permission.
User Account Control (UAC) active protection presents a warning screen before allowing a program to make changes. This UAC warning screen offers a chance to cancel the action if the user did not intend for it to happen.
How to adjust UAC settings:
- Click the Start button.
- Type “UAC” or “Change User Account Control settings” and select it.
You’ll see a slider with four levels. The default setting is usually the second one from the top (“Notify me only when apps try to make changes to my computer (default)”).
Firewall settings protect your Windows 11 PC from unwanted network connections. Experts recommend keeping firewall settings at the default or the highest setting. Lowering the firewall setting reduces your PC’s security by allowing more connections.
Click OK. You may be prompted for administrator permission to change this setting.
6Use a Firewall
A firewall acts like a security guard for your computer’s internet connection. Using one is important because it watches the information going in and out, blocking any unwanted or unauthorized access from the internet or other networks.
Blocking unauthorized network access is important for computer security. This blocking action prevents outsiders from accessing your computer from the internet or other networks. The firewall also stops malicious programs from sending your data out to unauthorized recipients.
What happens when the firewall is on? It creates a barrier between your PC and the outside world, blocking suspicious connections and potential threats.
How to check if Windows Firewall is on:
- Click the Start button.
- Type “Windows Defender Firewall” and select it.
On the main screen, you’ll see the status for your network types (Domain, Private, Public). Ensure they are turned on (green checkmark).
If a firewall is off, click “Turn Windows Defender Firewall on or off” on the left-hand side.
Select “Turn off Windows Defender Firewall (not recommended)” for Private and Public networks.
Click OK.
Advanced Security Measures for Extra Protection
Beyond the basic settings, there are other steps you can take to further harden your Windows 11 PC. These might involve more technical steps, but they offer significant security benefits.
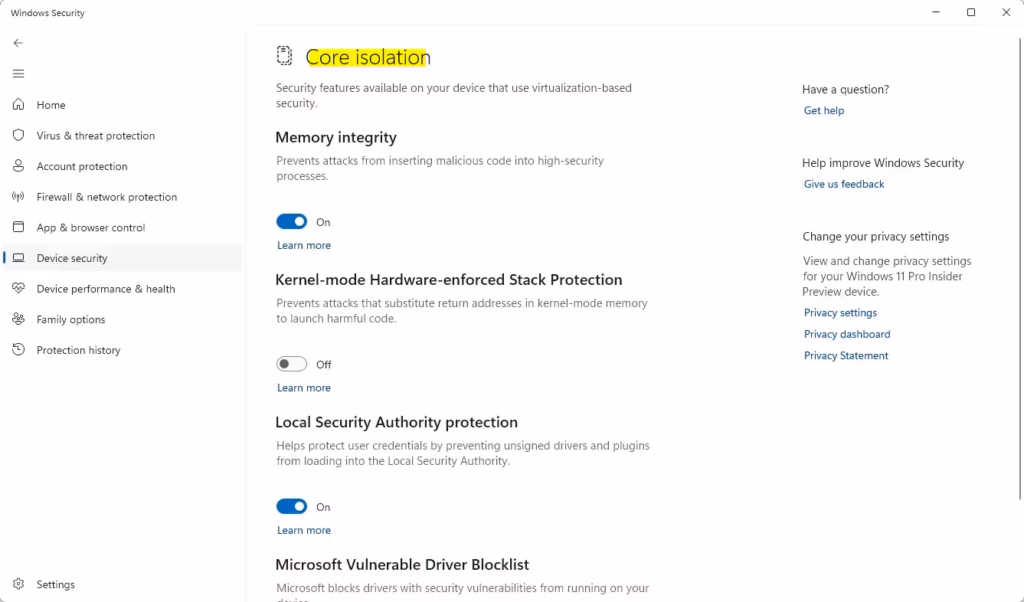
7Enable Core Isolation and Memory Integrity
Enabling Core Isolation and Memory Integrity adds a powerful security layer to Windows 11. This feature uses your computer’s hardware to create a safe, separate space for sensitive system parts, protecting them from advanced malware.
Windows 11’s enhanced security layer protects against advanced threats, including kernel-level malware (malware that targets the core of the operating system) and rootkits. This defense ensures that critical data and system functions remain inaccessible even if the main system gets infected with malware. This protection is vital for maintaining Windows 11 system integrity.
Memory Integrity protection uses Windows to create a secure, separate area for computer memory. Drivers and applications operating within this protected area undergo verification. Windows prevents any untrusted drivers or applications from running in the isolated memory space.
How to enable Core Isolation and Memory Integrity:
- Click the Start button.
- Go to Settings.
- Select Privacy & security.
- Click on Windows Security.
- Click on Device security.
- Under “Core isolation,” click Core isolation details.
- Toggle the switch for Memory integrity to On.
You will likely need to restart your PC for these changes to take effect.
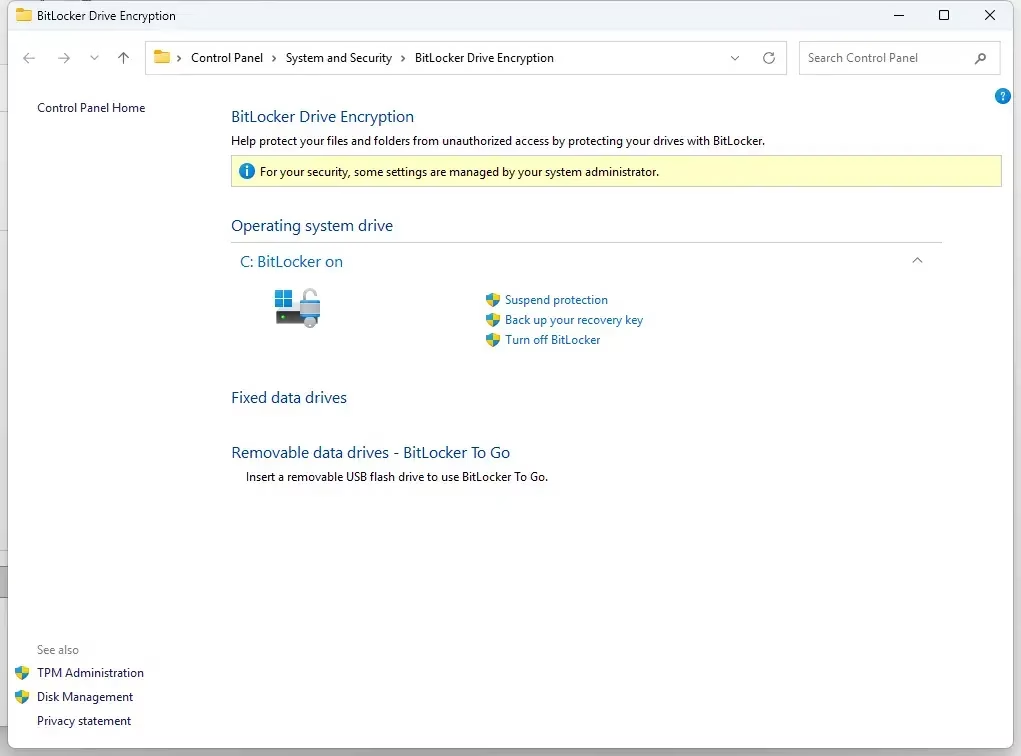
8Use BitLocker Drive Encryption
BitLocker drive encryption makes your entire hard drive unreadable to anyone without the correct password or key. This is particularly important for protecting files on Windows 11 Pro, Enterprise, or Education editions if your computer is lost or stolen.
BitLocker drive encryption prevents unauthorized access to files on a lost or stolen Windows 11 laptop. BitLocker protects sensitive data even if the hard drive is removed from the computer.
What happens when BitLocker is enabled? All data written to the drive is automatically encrypted. Upon starting your PC, you’ll need a password or a USB key to unlock the drive before Windows can load.
How to enable BitLocker:
- Click the Start button.
- Type “Manage BitLocker” and select it.
- Select the drive you want to encrypt (usually the C: drive).
- Click Turn on BitLocker.
- Follow the on-screen prompts. You’ll be asked to choose how to unlock your drive (password, USB flash drive).
Your Windows 11 PC’s recovery key is crucial for regaining access if you forget your password or lose your USB key. Back this recovery key up and save it in a safe, separate location.
BitLocker will then start encrypting your drive. This can take a significant amount of time depending on the size of your drive.
Note: BitLocker is not available in Windows 11 Home edition. For Home users, consider third-party encryption software.
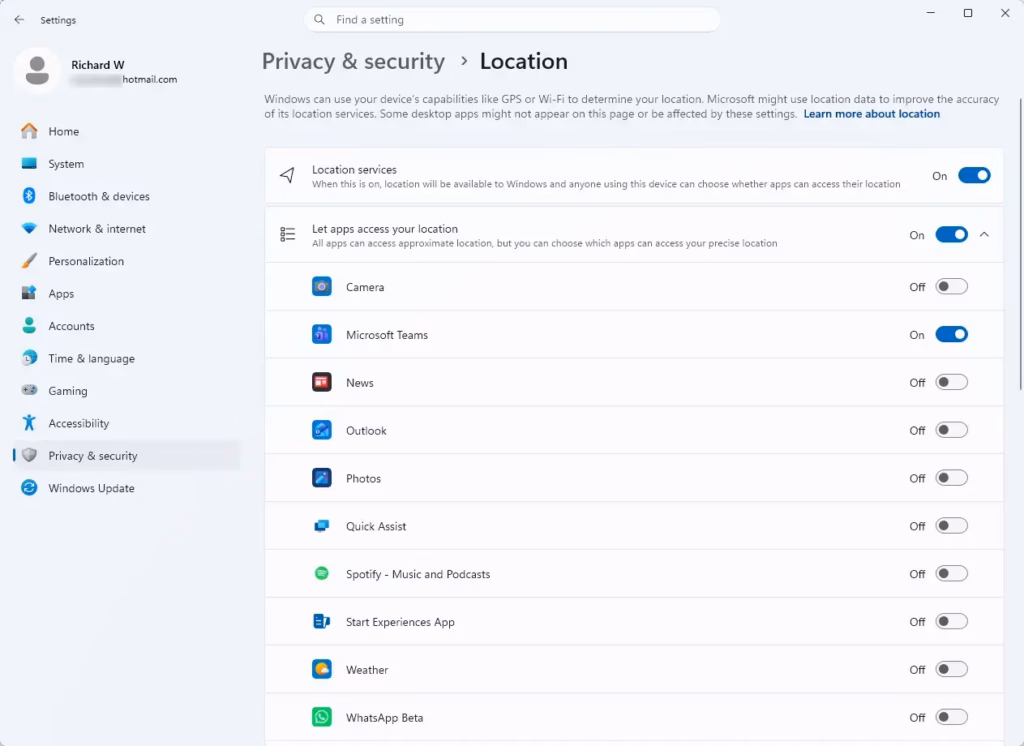
9Regularly Review App Permissions
Regularly reviewing app permissions on Windows 11 is important to keep your personal information safe. It makes sure that apps only get access to the parts of your computer they truly need, like your location or camera, preventing privacy risks.
App permissions are important because some programs might ask for more access than they need. This permission overreach can create a privacy risk or become a security problem if the program is hacked.
What happens when you manage permissions? You control which apps can access specific hardware or data, enhancing your privacy and security.
How to review app permissions:
- Click the Start button.
- Go to Settings.
- Select Privacy & security.
Scroll down to App permissions. Here you’ll find categories like:
- Location: See which apps can access your location.
- Camera: See which apps can use your camera.
- Microphone: See which apps can use your microphone.
- Account info: See which apps can access your name, picture, and other account details.
Click on each category and review the list of apps. Turn off permissions for any app that doesn’t need access or that you don’t want to have access.
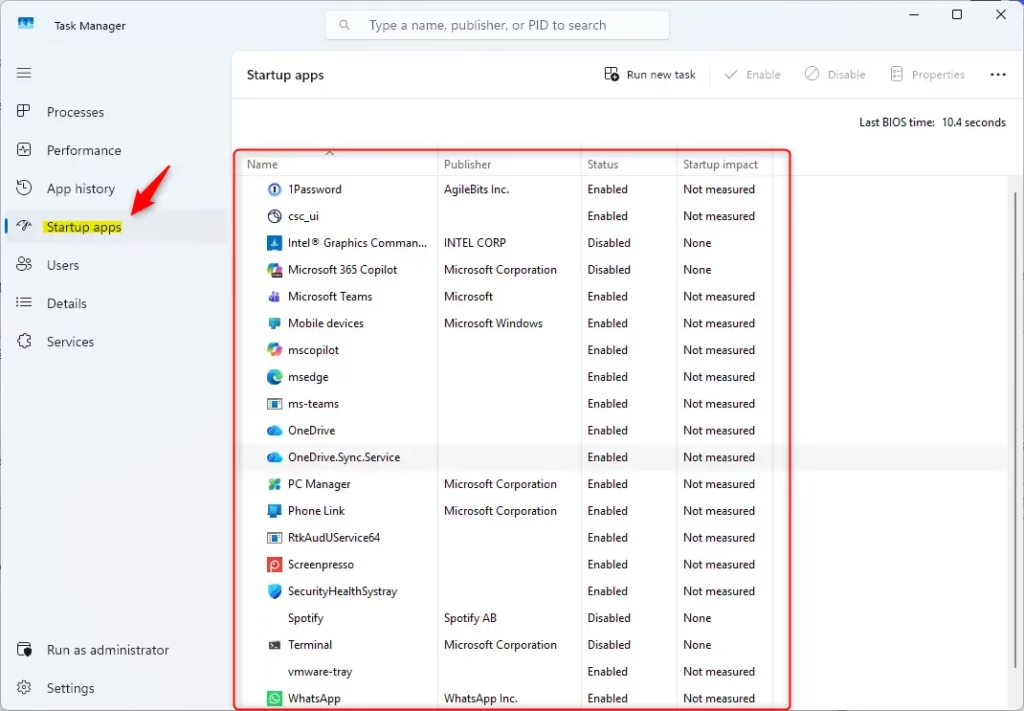
10Understand and Manage Startup Programs
Understanding and managing which programs start automatically when you turn on your Windows 11 PC is important. Too many can slow it down, and worse, a bad program could be set to launch automatically, creating a security risk.
Unnecessary startup programs slow down your PC by using up system resources. Malware often hides by starting automatically with Windows. Controlling startup programs improves PC performance and security.
What happens when you manage startup programs? You can disable programs you don’t need to run at startup, speeding up boot times and reducing the attack surface.
How to manage startup programs:
- Right-click the Start button.
- Select Task Manager.
- Click on the Startup apps tab (you might need to click “More details” first if you see a simplified view).
Review the list of applications. For each app, look at the “Startup impact” column.
Startup apps that run automatically with Windows can slow down your computer and create security risks if you do not need them. To secure your Windows 11 PC, find unnecessary startup apps listed in the Task Manager. Select an app you do not need to start with Windows, then click the Disable button. This prevents the app from opening automatically.
Disabling unknown programs on Windows 11 requires careful verification. Before turning off an unknown program, search the internet for the program’s name to understand its function and security risks. This internet search prevents accidentally removing important software, such as Windows operating system core files, which is crucial for PC stability.
Protecting Against Phishing and Social Engineering
Technical settings are crucial, but human error is often the weakest link in security. Phishing and social engineering attacks trick you into revealing sensitive information or downloading malware.
11Be Wary of Suspicious Emails and Links
Being wary of suspicious emails and links is crucial for your online safety. Fake emails, called phishing, can trick you into clicking bad links that steal your passwords or downloading files that install harmful malware onto your PC.
Clicking a bad link takes people to a fake website that steals login details. Opening a bad file puts harmful software on the computer. Protecting user accounts and the Windows 11 operating system from unauthorized access and harmful software is important.
Clicking a bad link or attachment can lead to your personal data being compromised,
Conclusion
Securing your Windows 11 PC with essential settings like keeping it updated and using Windows Security is vital to protect your personal information from cyber threats. These steps help reduce risks like malware infections and data theft.
Furthermore, advanced measures such as enabling Core Isolation, using BitLocker for encryption, and being vigilant about app permissions provide additional layers of defense. Remember, your online safety not only relies on the technology but also on your awareness and habits. Stay informed about potential threats and be cautious about suspicious emails and links.
Proactive security steps better protect digital information against intrusions. Routine security practices safeguard digital lives. For instance, enabling the Windows Firewall on Windows 11 blocks unauthorized network access.
How to make 🪟 Windows 11 most secure?
One of the ways to help stay protected is to use Microsoft Defender Antivirus. Imagine clicking a suspicious link. Microsoft Defender Antivirus will detect the threat, block the download, and notify you, helping prevent data theft or system damage.
Does 🪟 Windows 11 require an antivirus?
Windows 11 includes built-in antivirus protection, and for careful users, that may be enough. If you shop, bank, download frequently, or share your PC, an extra antivirus layer can add helpful web and scam protection.
Was this guide helpful?

About the Author
Richard
Tech Writer, IT Professional
Richard, a writer for Geek Rewind, is a tech enthusiast who loves breaking down complex IT topics into simple, easy-to-understand ideas. With years of hands-on experience in system administration and enterprise IT operations, he’s developed a knack for offering practical tips and solutions. Richard aims to make technology more accessible and actionable. He's deeply committed to the Geek Rewind community, always ready to answer questions and engage in discussions.


No comments yet — be the first to share your thoughts!