How to Enable Microsoft Defender in Windows 11

Microsoft Defender in Windows 11 is the built-in security tool that protects your PC from viruses, ransomware, and spyware at no extra cost. It runs in the background and blocks threats the moment they try to run on your system.
If Defender gets switched off by mistake, turning it back on takes less than 2 minutes in the Windows Security app. Keep real-time protection active so your files and downloads are checked every day. If you can’t turn a setting on, the notes in each section explain the usual reasons.
Open Settings Privacy & security Windows Security, then click Open Windows Security. In the Windows Security app, check Firewall & network protection and Virus & threat protection are both on, switching any toggles to On if needed. A green checkmark means Defender is active.
How to Turn On Microsoft Defender
To confirm Microsoft Defender is on and protecting the computer, you need to check a few areas. The steps below walk through opening the Windows Security app, then reviewing the firewall, real-time protection, and app and browser control. The whole check takes a few minutes, and you only need a standard account to look. Turning some settings on may ask for administrator approval.
Step 1Open Windows Settings
- Press the Win+I on your keyboard to open Settings . Alternatively, click the Start button (the Windows icon on the bottom left), then click Settings.
The Settings window should open, with a list of categories down the left side.

Step 2Go to Privacy & Security
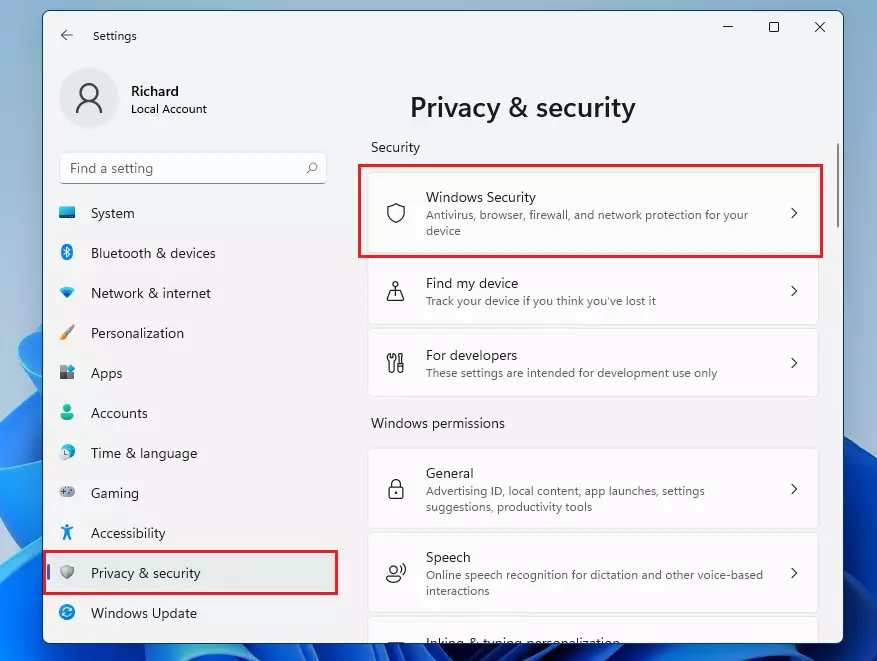
- In the Settings window, click Privacy & security on the left side.
The right side now shows the privacy and security options for your PC.
- Click Windows Security from the options on the right side.
A page opens with an overview of your protection areas. This page is only a launcher. The actual settings live in the Windows Security app, which you open next.
Step 3Open Windows Security
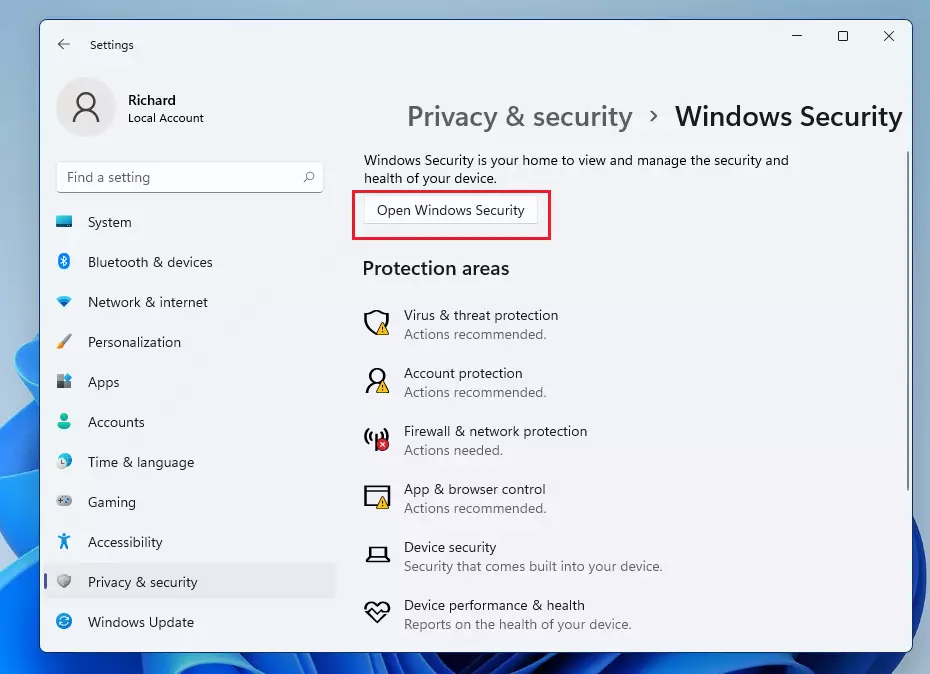
- Click the button that says Open Windows Security.
The Windows Security app opens in its own window. Its home screen shows a tile for each protection area. A green check mark on a tile means that area needs no action. A yellow warning or red X means something is off or needs attention, so open that tile and follow the prompt.
Step 4Check Firewall & Network Protection
Keeping these turned on helps Microsoft Defender block online threats. The firewall controls which connections are allowed in and out of your computer on each type of network, which protects your personal files from attackers while you browse.
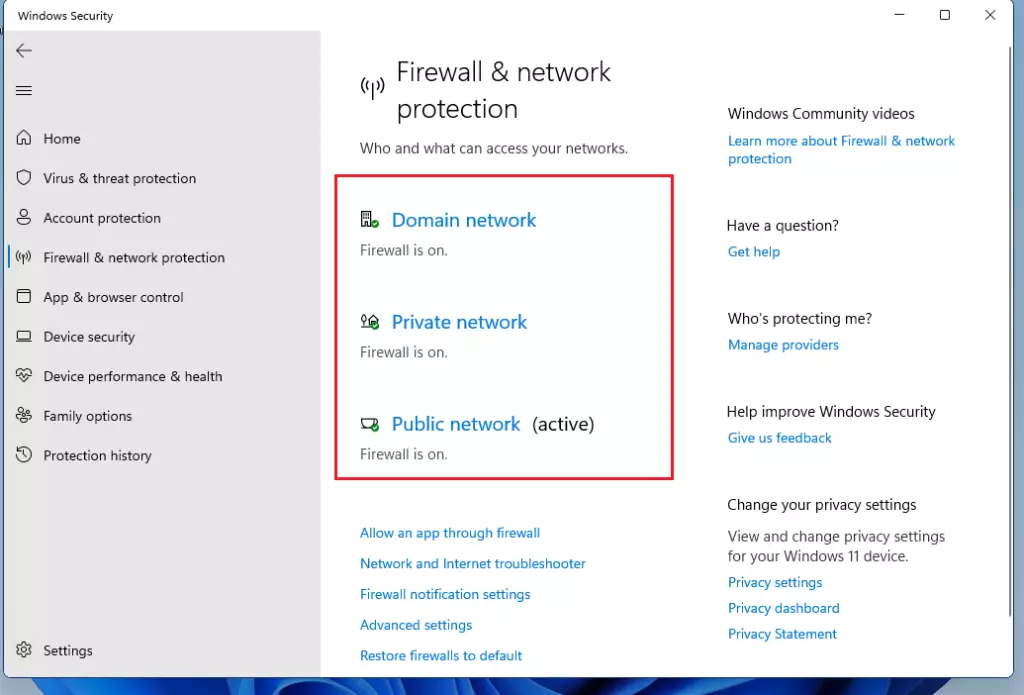
Click Firewall & network protection in the Windows Security app. Three distinct network profiles appear here:
- Domain network: Usually for work or school networks where the PC is joined to a domain. On a home PC this profile normally stays unused.
- Private network: Your home or trusted networks.
- Public network: Networks in public places like coffee shops or airports. This profile is the most restrictive, so keep it on.
- Click each network profile in turn.
- Check that Microsoft Defender Firewall is turned On. If it is off, switch the toggle to On. You may need to click Yes if a User Account Control prompt appears.
The profile page should now show the firewall as on, with no warning message. The active profile is labeled "(active)". If the toggle is greyed out, or you see a message that settings are managed by your organization, a policy is controlling the firewall. This is common on work PCs, so ask your IT administrator. A third-party security suite can also take over firewall duties and show a message saying so. To undo the change, switch the toggle back to Off, but leave it on unless another firewall is doing the job.
Step 5Turn On Real-time Protection
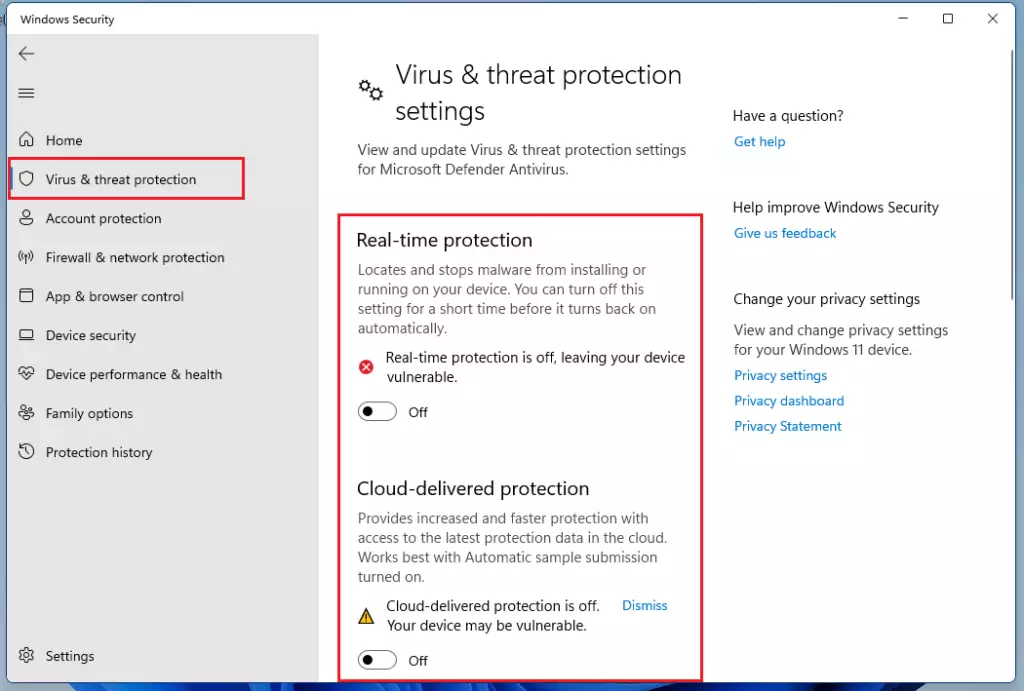
Real-time protection stops viruses and malware as they happen by scanning files and downloads when you open or save them. Paired with cloud-delivered protection, it can defend against brand-new threats the moment they appear online.
- In the Windows Security app, click Virus & threat protection in the left menu.
- On the right side, click Manage settings under Virus & threat protection settings.
The settings page opens with a list of toggles, starting with Real-time protection.
Microsoft Defender's Real-time protection and cloud-delivered protection features stop threats quickly. Enabling these layers gives immediate defense against new viruses and malware that Microsoft's security team detects in the cloud.
- Switch Real-time protection to On. Click Yes if User Account Control asks for permission.
- Switch Cloud-delivered protection to On.
- Scroll down and check that Tamper Protection is On. This stops other programs from quietly changing your Defender settings.
Each toggle should now read On, and the warning banner at the top of the page, if there was one, should disappear. No restart is needed. If you ever turn real-time protection off for a short task, Windows turns it back on by itself after a while. To turn it off yourself, use the same toggle.
If these toggles are greyed out or missing, another antivirus program is probably installed and has taken over. Defender steps back automatically when a third-party antivirus registers itself with Windows. Settings can also be locked by your organization on a managed PC. This applies to both Home and Pro editions.
Step 6Optional - Check App & Browser Control
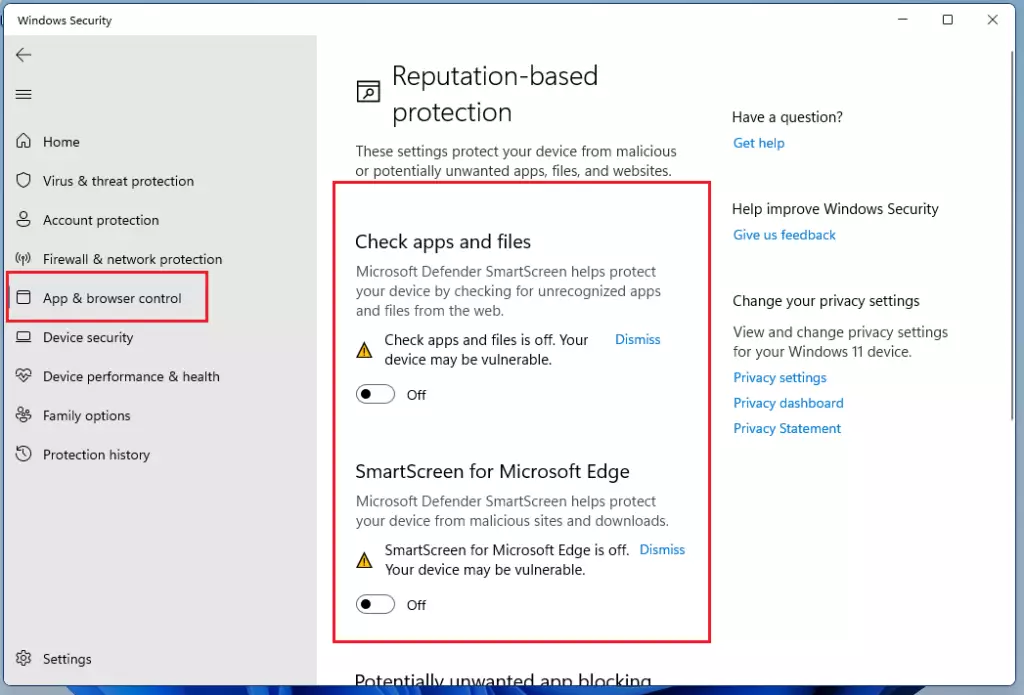
- Click App & browser control in the left menu to guard against unsafe apps and websites.
- Look at the Reputation-based protection settings and make sure they are on. These use SmartScreen to warn you about suspicious apps, files, and websites.
If a setting is off, an option to turn it on appears. Use it, then confirm the page shows no warnings.
Important Tips
- Keep Microsoft Defender turned on unless you have another antivirus program installed. Running only one real-time antivirus gives the best results.
- If you have other antivirus software, you may sometimes need to turn Microsoft Defender off to avoid conflicts. Windows usually does this for you when the other product installs. If you remove that product later, come back and check that Defender has switched itself back on.
- Make sure your Windows and security software are always updated to protect your PC from the latest threats. Defender gets its protection updates through Windows Update, so check Settings Windows Update now and then.
Summary
- Microsoft Defender helps protect your Windows 11 PC from viruses and malware.
- Use Windows Settings to find and open Windows Security.
- Turn on firewall and real-time protection for the best security.
- Keep Defender active unless you have another trusted security program.
- Regularly check your security settings to stay safe.
Microsoft Defender helps protect your Windows 11 PC from viruses and malware when you keep your firewall and real-time protection turned on. Use the Windows Security app to check your status regularly, and keep Defender active unless you use another trusted antivirus program. These simple checks keep your computer safe from online threats without extra software.
Was this guide helpful?
100% of readers found this helpful (1 votes)

About the Author
Richard
Tech Writer, IT Professional
Richard is a writer at Geek Rewind who turns complex IT tasks into clear, step-by-step guides. He draws on years of hands-on experience in system administration and enterprise IT operations, focusing on Windows, Linux and WordPress: the problems people actually run into, and the fixes that work. His server and WordPress guides come from systems he runs himself. Richard builds and maintains the platform behind Geek Rewind, from its Ubuntu servers and Nginx configuration to its custom WordPress plugins. Many new tutorials start with readers' questions, and he's always glad to answer them in the comments.

No comments yet — be the first to share your thoughts!