How to Find Your System’s VRAM in Windows 11

Video RAM (VRAM) is the dedicated memory your graphics card uses to render 3D games, video effects, and high-resolution textures on Windows 11. Checking this specification lets you confirm whether your PC can run demanding software before you install it .
You can find your exact VRAM amount in a few clicks through the Display settings in the Settings app, without downloading any extra tools. This guide also covers two other built-in ways to check, the difference between dedicated and shared memory, and what you can do if you want more VRAM.
Open Settings and navigate to System Display Advanced display Then, click Display adapter properties for Display 1 and check the Adapter Information tab for “Dedicated Video Memory.” Alternatively, run dxdiag and view the Display tab for “Display Memory (VRAM).
Why check your VRAM?
VRAM (Video Random Access Memory) is the dedicated memory your graphics card uses for game textures and video effects. It sits on the graphics card itself, next to the GPU, so the card can reach image data quickly without borrowing from your main system RAM.
Game and app requirements often list a minimum VRAM, such as 4 GB or 8 GB. If your card has less than that, you may see stuttering, lower texture quality, or a game that refuses to start. This is why it is worth knowing your number before you buy or install something heavy.
What happens when you are done?
The steps below show the amount of dedicated video memory installed on your graphics card. Knowing the difference between dedicated and shared memory also helps when you troubleshoot performance problems or check whether your hardware meets an application’s requirements.
You don’t need administrator rights for any of these checks. Nothing here changes a setting on your PC, so there is nothing to undo.
How to find your VRAM in 🪟 Windows 11
The short version: open the Settings app and go to System Display Advanced display Under the display information for your connected monitor, open the display adapter properties. The amount next to Dedicated Video Memory is how much memory your graphics card has for games and heavy visual tasks. The full steps follow.
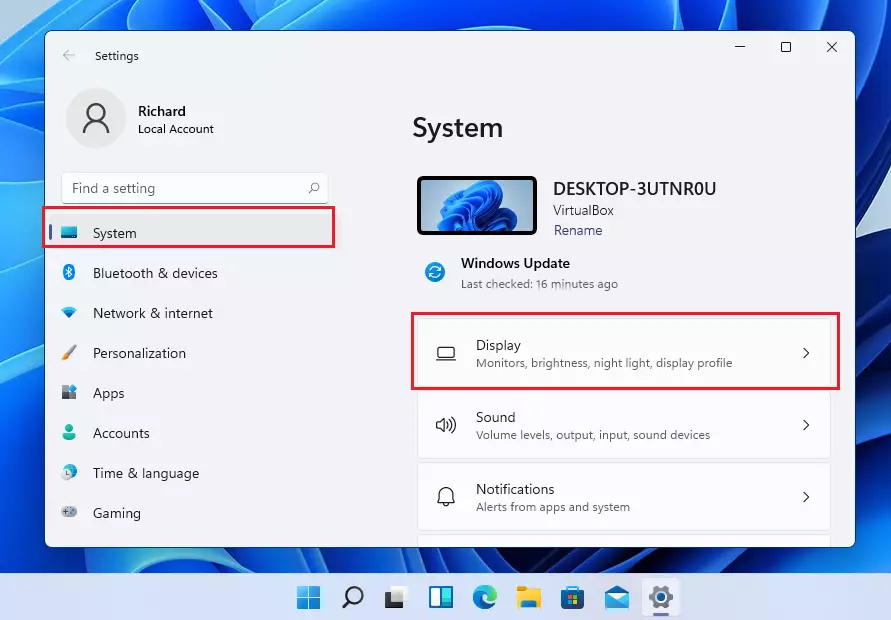
- Open Settings by pressing Windows key + I on your keyboard, or click Start and then Settings. The Settings window opens with the System page selected.

- In the System menu, click the Display tile on the right side of the window. You will see your monitor settings, such as brightness, scale, and resolution.
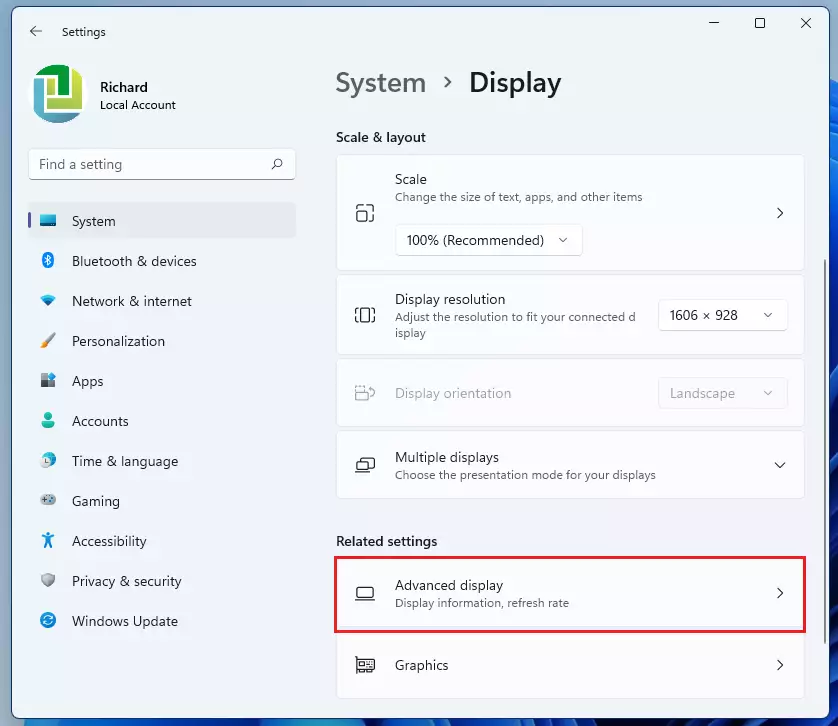
- Scroll down to the Related settings section and click Advanced display. A page opens showing details about your monitor.
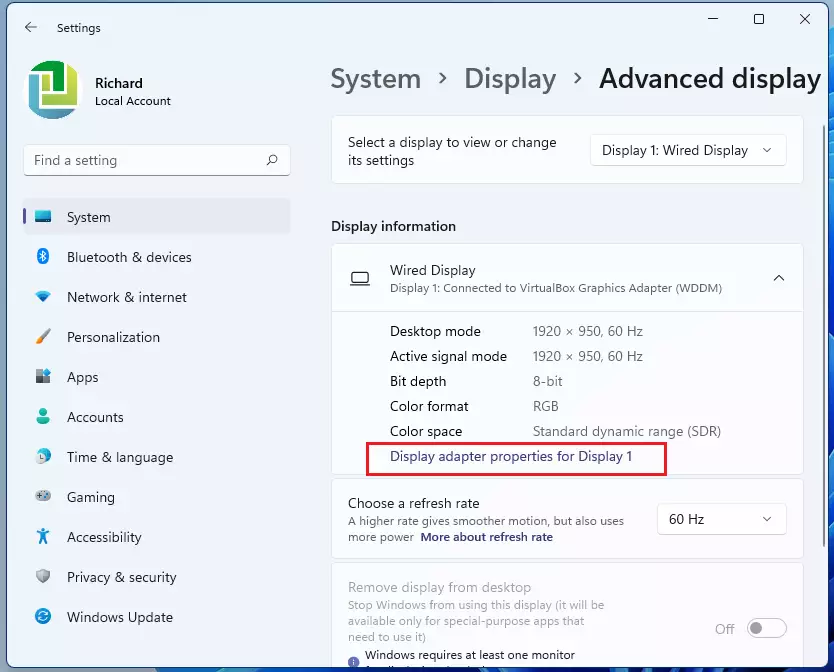
- Under the Display information section, click Display adapter properties for Display 1. If you have more than one monitor, use the drop-down at the top of the page to pick the display first. The link then shows the matching display number.
- Look at the Adapter tab in the window that opens. Under Adapter Information, your Dedicated Video Memory is listed. The same section also shows Total Available Graphics Memory and Shared System Memory, which are explained below.
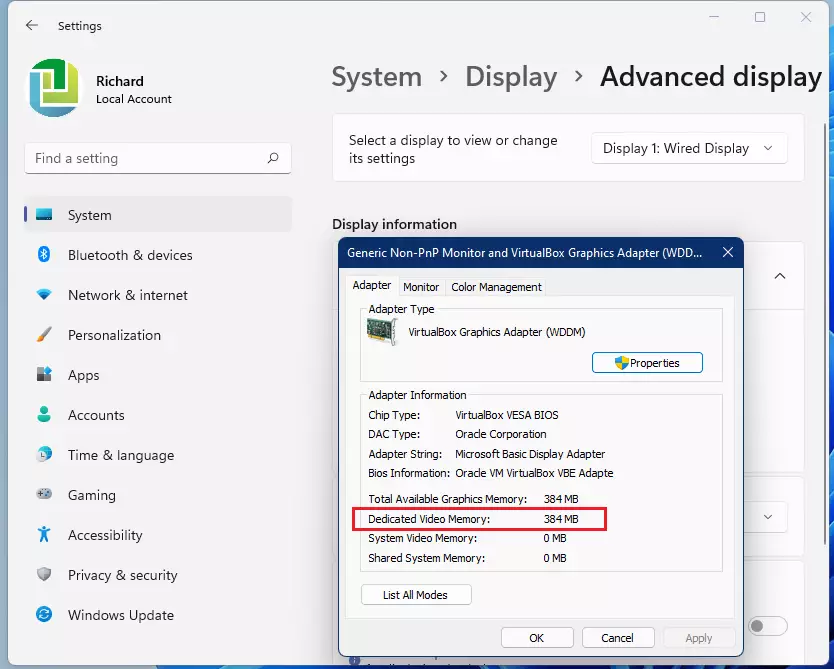
If you see a different name, such as Intel graphics, you are likely using integrated graphics. Integrated graphics often show a small dedicated number, because they rely mostly on shared system memory.
On a laptop with two graphics chips, this window shows only the one that drives the selected display. If the number looks lower than your card's specification, check it with dxdiag or Task Manager as described below.
Using the DirectX Diagnostic Tool (dxdiag)
The DirectX Diagnostic Tool, often shortened to dxdiag, offers a second way to check your graphics card's VRAM. It is useful for confirming the number from Settings, and it lists the card and driver details in one place.
- Click Start and search for dxdiag, then open the result. If a prompt asks about checking for digitally signed drivers, you can answer either way. The tool opens and gathers information for a few seconds.
- Click the Display tab. On a PC with more than one graphics chip, there may be several Display tabs, so check each one.
- In the Device section, find Display Memory (VRAM). That is your dedicated video memory.
Understanding Dedicated vs. Shared Memory
When you look at your graphics memory, you will see two types:
- Dedicated Video Memory is built directly into your graphics card. It is the fastest and is the number game requirements usually refer to.
- Shared System Memory is a portion of your normal RAM that your computer can use for graphics when needed. It is slower than dedicated memory, and it is not extra VRAM on the card.
The Total Available Graphics Memory figure is simply the two added together. On a PC with a dedicated card, judge it by the dedicated number. On integrated graphics, dedicated memory is small and the shared amount does most of the work.
Checking VRAM with Task Manager
Task Manager shows your VRAM usage in real time, displaying both dedicated and shared memory amounts. This is the best check when a game stutters, because you can see whether the card is running out of memory.
- Press Ctrl + Shift + Esc to open Task Manager. If you see a small window, click More details.
- Click the Performance tab.
- Click GPU 0 in the left pane. If you have two graphics chips, GPU 1 is listed as well, and each has its own numbers.
- Look at the bottom of the graph area for Dedicated GPU memory, Shared GPU memory, and GPU Memory. Each shows memory in use out of the total available.
If no GPU entry appears, your graphics driver may be out of date or missing. Updating the driver from your card maker usually fixes it.
Can you increase VRAM?
Increasing the physical VRAM on a dedicated graphics card is typically not possible. The memory is soldered onto the card, so the only real fix is a card with more VRAM.
For integrated graphics, you might be able to allocate more system RAM through your computer's BIOS (the firmware that controls hardware during startup). The setting name differs between manufacturers, and many PCs and laptops don't offer it at all. Windows also adjusts shared memory automatically, so raising the number may not change performance much. If you do change a BIOS option, note the original value first so you can put it back.
Summary
Video RAM, or VRAM, is dedicated memory that your graphics card uses to render images, videos, and games quickly without slowing down your main computer memory. You can check your available amount at any time through the Settings app or the built-in diagnostic tool to see if your hardware meets the requirements for new programs.
- VRAM is dedicated memory for your graphics card.
- Checking VRAM helps you diagnose slow performance in games or video editing.
- You can view your VRAM through Settings System Display Advanced display.
- The dxdiag tool and Task Manager are excellent ways to verify your graphics memory.
- If your VRAM is too low, you may need to upgrade your graphics hardware.
Was this guide helpful?

About the Author
Richard
Tech Writer, IT Professional
Richard is a writer at Geek Rewind who turns complex IT tasks into clear, step-by-step guides. He draws on years of hands-on experience in system administration and enterprise IT operations, focusing on Windows, Linux and WordPress: the problems people actually run into, and the fixes that work. His server and WordPress guides come from systems he runs himself. Richard builds and maintains the platform behind Geek Rewind, from its Ubuntu servers and Nginx configuration to its custom WordPress plugins. Many new tutorials start with readers' questions, and he's always glad to answer them in the comments.
No comments yet — be the first to share your thoughts!