Guide to Managing Columns in Windows 11 Task Manager
Windows 11 Task Manager lets you show or hide specific details about running programs.
The Task Manager is a helpful tool that shows you what’s currently running on your computer, like open apps, background processes, and how much power your PC is using. It’s been around for a long time, with a major update in Windows 11 build 22557 bringing a fresh look.
This redesign makes it easier to find common actions and matches your Windows 11 theme, including a dark mode.
You can change which columns appear in Task Manager to see the exact information you need. This includes details like CPU usage, memory use, and disk activity.
Open Task Manager by pressing Ctrl+Shift+Esc, then right-click on any column header. From the pop-up menu, select the columns you want to add or remove to customize your view.
Add or remove columns in the Task Manager app
As described above, the latest Windows 11 includes a redesigned Task Manager app that matches the new Windows 11 design principles.
Let’s explore how to add or remove columns using the new Task Manager app.
First, open the Task Manager app or press the keyboard shortcut (Ctrl + Shift + Esc).
When the Task Manager app opens, you will see separate pages on the left menu. The left menu pages are Processes, Performance, App history, Startup apps, Users, Details, and Services.
Adding and removing columns on these pages are identical except for the Performance, Details, and Services pages.
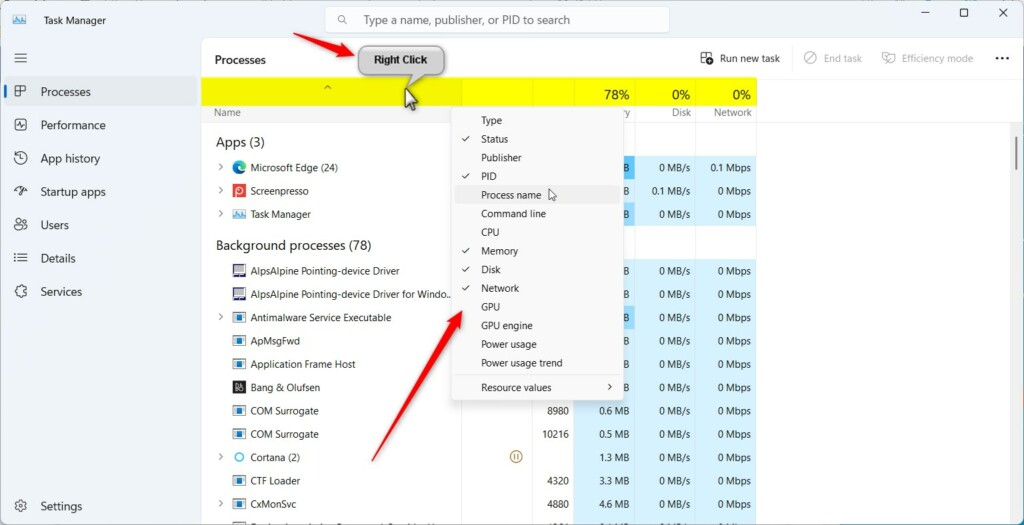
To add or remove columns on these pages, open the page, then right-click on any column title name.
Then select to check (add) or uncheck (remove) items you want to appear as columns for that page.
Do this for the Processes, App history, Startup apps, and Users pages. You can also drag and drop column names to the order you want them in.
Add and remove columns on the Details page
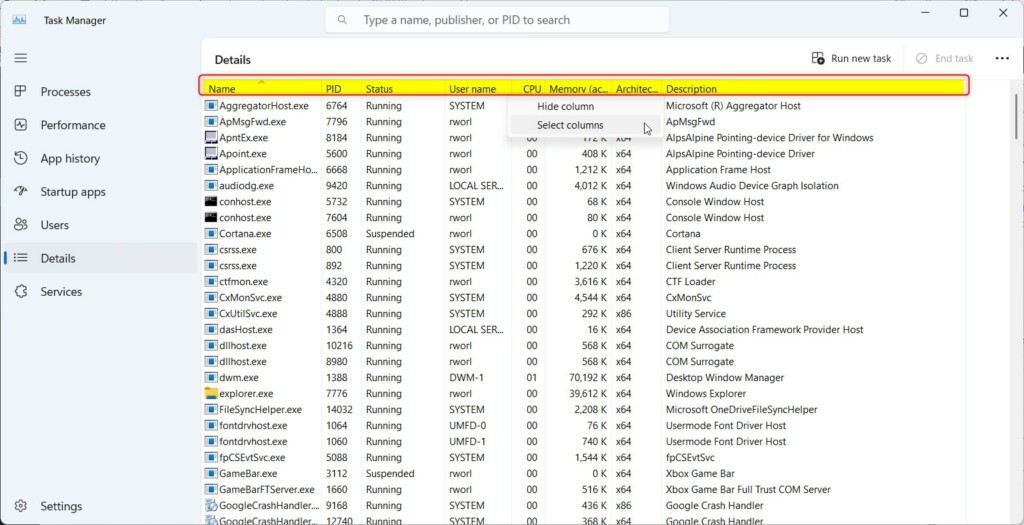
The Details page has a different way to add or remove columns.
To add or remove columns on the Details page, click on the Details page to open. Then right-click on a column name and click “Select column.”
In the pop-up window, select the column you want to add to the Details page. You can also drag and drop column names to the order you want them in.
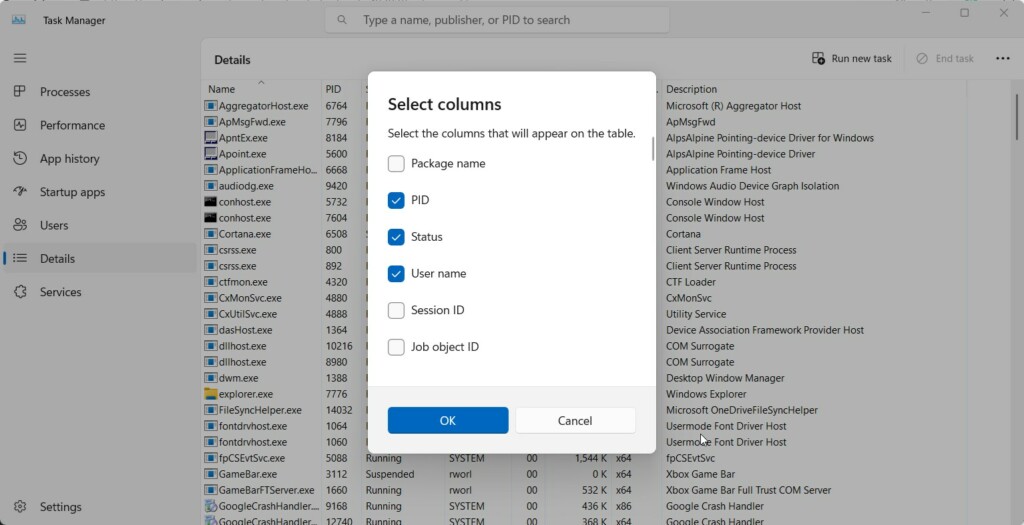
To remove a column, right-click the column name and select “Hide column.” Alternatively, uncheck the columns you want to hide or remove on the pop-up window above.
That should do it!
Conclusion:
- The redesigned Task Manager in Windows 11 matches the new design principles of the operating system, featuring a new navigation bar, settings page, and command bar.
- Users can add or remove columns in the Task Manager app by right-clicking on column titles and selecting the desired actions.
- Different pages within the Task Manager may have specific ways to add or remove columns, with the Details page requiring a specific click action.
- The tutorial provided comprehensive steps for customizing the columns in the Task Manager app, including visual references for clarity.
- With this guide, users can efficiently personalize the Task Manager app to display relevant information based on their preferences.
Was this guide helpful?

About the Author
Richard
Tech Writer, IT Professional
Richard, a writer for Geek Rewind, is a tech enthusiast who loves breaking down complex IT topics into simple, easy-to-understand ideas. With years of hands-on experience in system administration and enterprise IT operations, he’s developed a knack for offering practical tips and solutions. Richard aims to make technology more accessible and actionable. He's deeply committed to the Geek Rewind community, always ready to answer questions and engage in discussions.


No comments yet — be the first to share your thoughts!