How to Enable or Disable Control Panel and Settings in Windows 11
This tutorial will show you how to turn the Control Panel and Settings on or off for specific users or all users in Windows 11.
You can disable Control Panel and Settings by editing Group Policy or the Registry. For Group Policy, navigate to User Configuration > Administrative Templates > Control Panel, then double-click “Prohibit access to Control Panel and PC settings” and set it to Enabled. For Registry, run specific commands to add or delete the “NoControlPanel” value.
Why Would You Want to Do This?
You might want to disable Control Panel and Settings in Windows 11 to boost security or stop accidental changes, especially if you manage computers for others.
What You Need to Know First
Microsoft is moving toward the Settings app because it looks better and works smoother. The Control Panel is still available for backwards compatibility, but the Settings app is the way forward.
Option 1Using Local Group Policy Editor
Windows 11 Pro, Enterprise, and Education users can disable the Control Panel and Settings using the Local Group Policy Editor. This tool lets you block access to both Control Panel and Settings for anyone using the computer, helping you restrict what they can change.
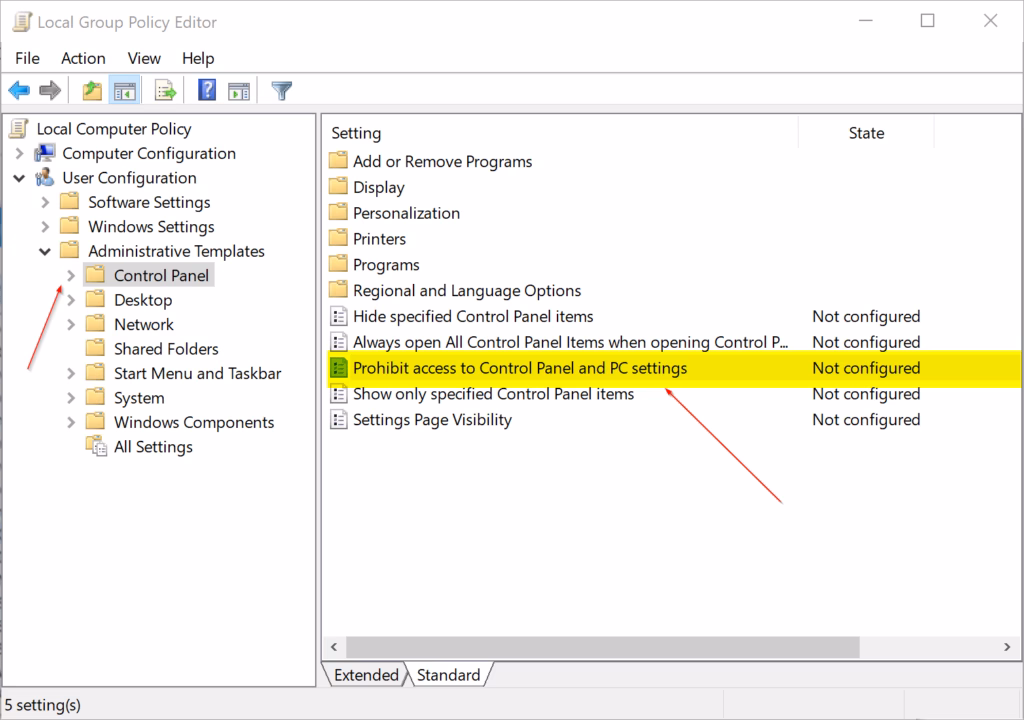
- Open the Local Group Policy Editor. You can do this by pressing the Windows key and typing
gpedit.msc, then pressing Enter. - In the left side panel, navigate to this path:
User Configuration > Administrative Templates > Control Panel - Look at the right side panel. Find the policy called Prohibit access to Control Panel and PC settings and double-click it to open it.
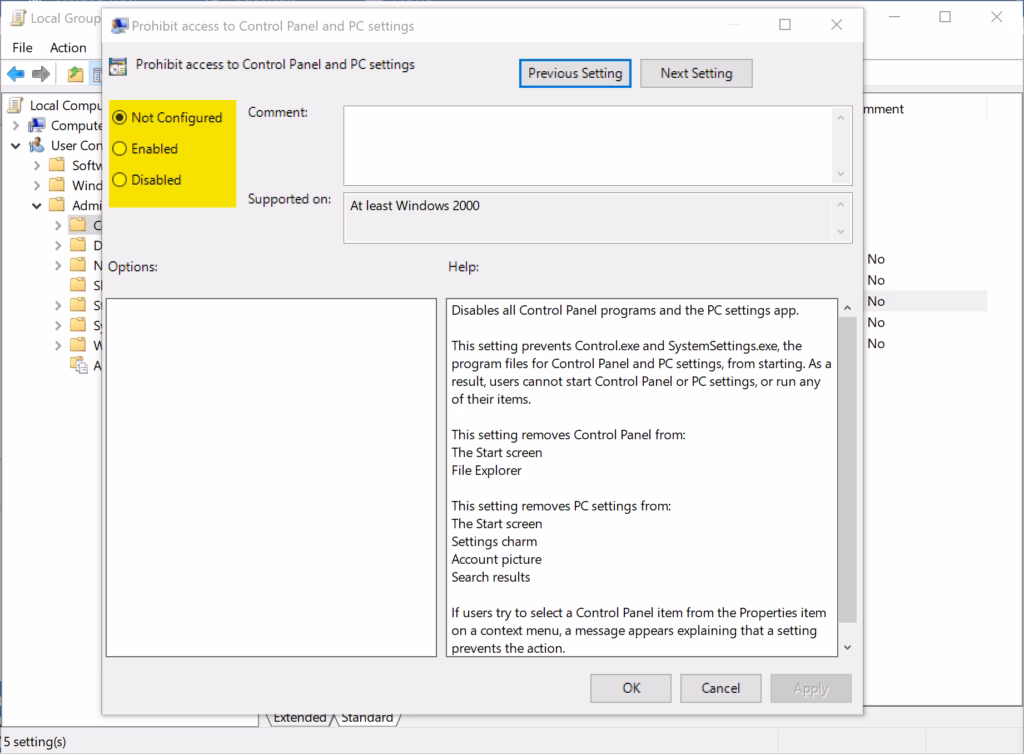
To Enable Control Panel and Settings
This is the normal setting.
- Select the dot next to Not Configured.
- Click OK.
- Close the Local Group Policy Editor.
To Disable Control Panel and Settings
- Select the dot next to Enabled.
- Click OK.
- Close the Local Group Policy Editor.
Option 2Using the Registry
This method works on all versions of Windows 11.
⚠️ Admin privileges required for the following steps.
To Enable Control Panel and Settings for All Users
This is the normal setting.
Open Windows Terminal as an administrator and run the command below.
reg delete "HKEY_CURRENT_USER\Software\Microsoft\Windows\CurrentVersion\Policies\Explorer" /v NoControlPanel /f
reg delete "HKEY_LOCAL_MACHINE\SOFTWARE\Microsoft\Windows\CurrentVersion\Policies\Explorer" /v NoControlPanel /f
To Disable Control Panel and Settings for All Users
You can disable the Control Panel and Settings for all users on your Windows 11 computer with the Registry editor. This method uses a specific command to turn off access to both Control Panel and Settings for everyone, ensuring your restrictions are applied system-wide.
reg add "HKEY_CURRENT_USER\Software\Microsoft\Windows\CurrentVersion\Policies\Explorer" /v NoControlPanel /t REG_DWORD /d 1 /f
reg add "HKEY_LOCAL_MACHINE\SOFTWARE\Microsoft\Windows\CurrentVersion\Policies\Explorer" /v NoControlPanel /t REG_DWORD /d 1 /f
Close the Registry Editor when you’re finished.
Summary
You’ve learned how to enable or disable Control Panel and Settings in Windows 11, using either the Group Policy Editor or the Registry.
Why does the Control Panel still exist in 🪟 Windows 11?
Control Panel still exists "for compatibility reasons and to provide access to some settings that have not yet migrated" to the Settings app. But Microsoft is encouraging people to "use the Settings app, whenever possible" since that will soon be the only option.
How do I disable Control Panel items?
Navigate to User Configuration > Administrative Templates > Control Panel. Locate and double-click the “Hide specified Control Panel items” policy. Select Disabled or edit the list of hidden items under the Show button.
Was this guide helpful?

About the Author
Richard
Tech Writer, IT Professional
Richard, a writer for Geek Rewind, is a tech enthusiast who loves breaking down complex IT topics into simple, easy-to-understand ideas. With years of hands-on experience in system administration and enterprise IT operations, he’s developed a knack for offering practical tips and solutions. Richard aims to make technology more accessible and actionable. He's deeply committed to the Geek Rewind community, always ready to answer questions and engage in discussions.


No comments yet — be the first to share your thoughts!