How to Silence Notifications Automatically with Do Not Disturb in Windows 11

Do Not Disturb in Windows 11 stops notifications automatically when you are busy. The feature blocks pop-up banners in the corner of your screen based on what you’re doing — it can turn on when you present, play games, watch full-screen videos, or follow a schedule you set.
Open Settings , go to System Notifications, then expand “Turn on do not disturb automatically” to pick which situations should silence your alerts. Each option you tick tells Windows when to hold back notifications so they don’t interrupt you.
These steps work the same on Windows 11 Home and Pro, and you don’t need administrator rights to change them.
Open Settings with Win+I, then go to System Notifications and expand “Turn on do not disturb automatically”. Tick the situations you want, such as During these times, When duplicating my display, or When playing a game, and Windows silences banners and sounds only when those conditions apply. Notifications still collect in Notification Center.
What automatic Do Not Disturb does
Do Not Disturb hides notification banners and mutes notification sounds. The notifications themselves are not deleted — they go quietly into Notification Center instead. Notification Center is the panel that opens when you click the date and time at the right end of the taskbar . You can read your messages there whenever you are ready.
You can switch Do Not Disturb on by hand at any time. Automatic rules do the same thing without you having to remember. Each rule switches Do Not Disturb on when its condition starts and off again when it ends.
Windows 11 offers these automatic rules:
- During these times runs Do Not Disturb on a daily or weekly schedule.
- When duplicating my display covers the moments you mirror your screen to a projector or second display.
- When playing a game covers full-screen games.
- When using an app in full-screen mode covers any app you run full screen, such as a slideshow or a video.
- For the first hour after a Windows feature update keeps post-update prompts quiet while Windows settles in.
Before you start: check your 🪟 Windows 11 version
The labels in this article match current Windows 11 builds, where the feature is called Do not disturb. Older Windows 11 builds call it Focus assist and put it in a separate page under System. The rules are similar, but the layout differs.
Then follow the steps below.
Turn on automatic Do Not Disturb
This section opens the page where the automatic rules live. Do the first four steps once, then pick the rules you want in the sections that follow.
- Press Win+I to open Settings.

Windows 11 Start menu with Settings gear icon highlighted. - Click System in the left pane.
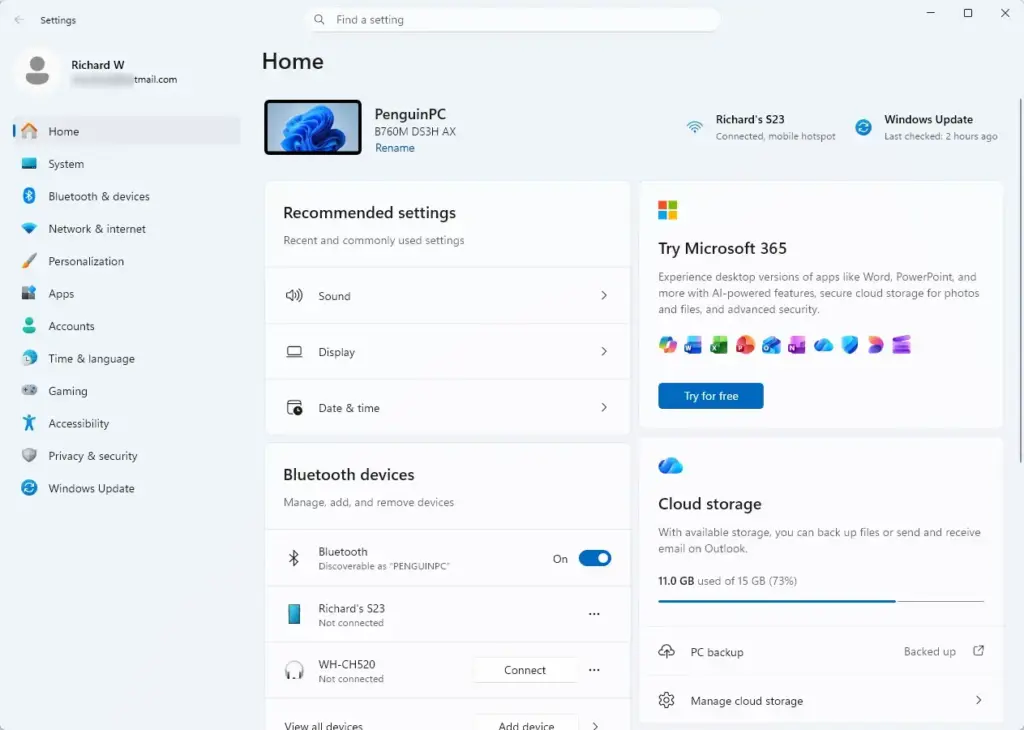
Settings › Home - Click Notifications. You should see a list that starts with a Notifications toggle, followed by a Do not disturb toggle.
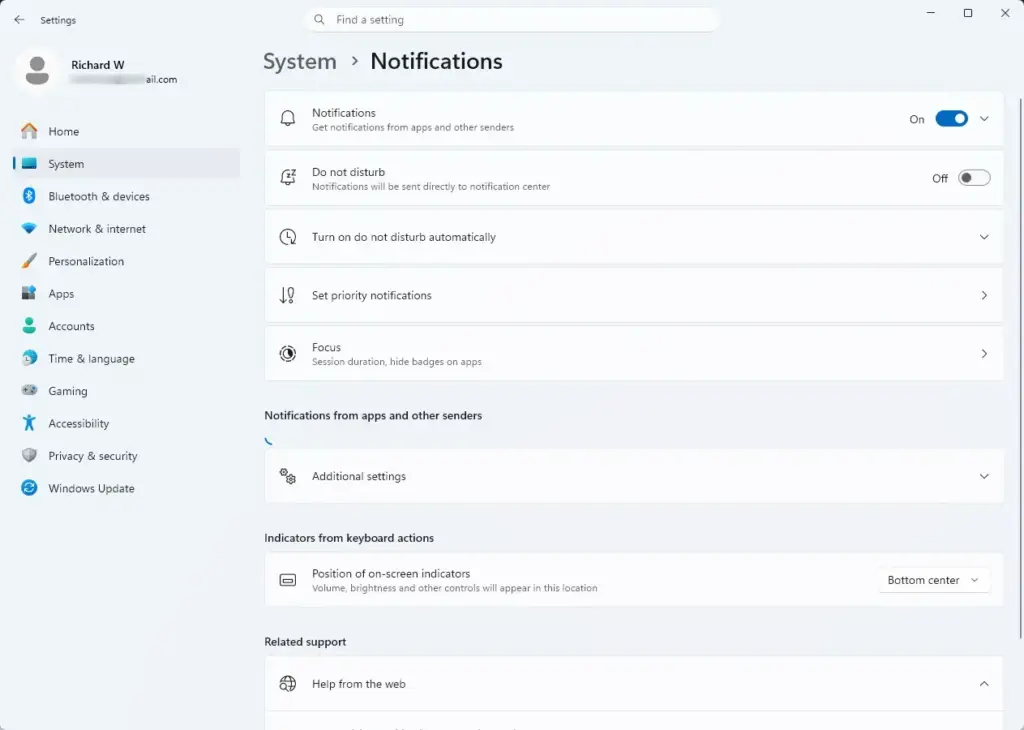
Settings › System › Notifications - Click the Turn on do not disturb automatically row to expand it. A list of rules with tick boxes appears.
That toggle is the manual switch. If you turn it on, Do Not Disturb stays on until you turn it off yourself.
If the Turn on do not disturb automatically row is missing, see the troubleshooting section below.
Silence notifications on a schedule
Use this rule for fixed quiet hours, such as overnight or during a regular meeting block.
- In the expanded Turn on do not disturb automatically list, tick During these times.
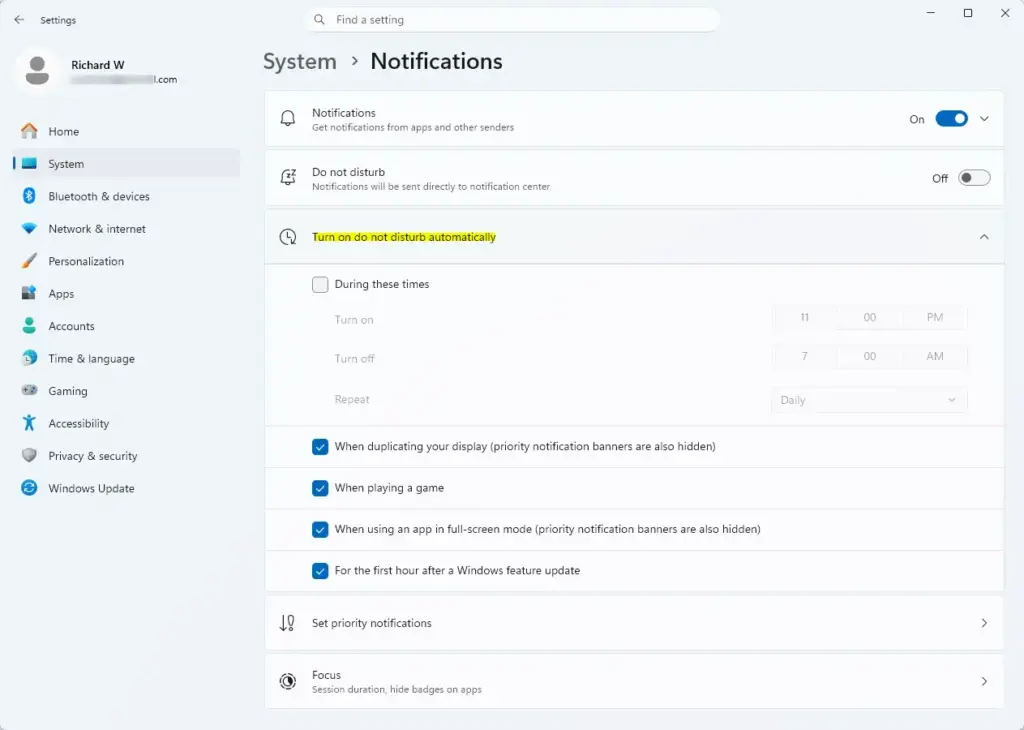
Settings › System › Notifications › Turn on do not disturb automatically - Set the start time and end time. Use the hour and minute pickers shown for each.
- Choose how often the schedule repeats, for example every day or on certain days only.
When the clock reaches your start time, Do Not Disturb switches on without any prompt. At the end time it switches off, and banners and sounds return.
Two points about schedules:
- A schedule that crosses midnight (for example, 22:00 to 07:00) treats the whole period as one unbroken quiet time.
- Windows follows the time and time zone set on your PC. If your schedule fires at the wrong hour, check the time settings under Settings Time & language Date & time.
Silence notifications when you present
Use this rule so a message from a colleague does not pop up on a projector or shared screen.
- In the same expanded list, tick When duplicating my display.
This rule works with display mirroring only. It does not work with screen sharing in a meeting app. To trigger it, press Win+P and choose Duplicate. If you present by sharing a window in a video call app, Windows does not count that as duplicating your display. Use the full-screen rule below, or switch Do Not Disturb on manually before the call.
Silence notifications while gaming
Use this rule so chat and mail banners do not cover a game.
- Tick When playing a game.
Windows decides that you are playing a game from how the game runs. It works best with full-screen games. A game in a window may not trigger it. If a windowed game keeps showing banners, switch it to full screen or turn on the full-screen rule below.
Silence notifications in full-screen apps
This rule is broader than the gaming rule. It covers any app you run full screen, such as a slideshow, a video player or a browser in full-screen view.
- Tick When using an app in full-screen mode.
To test it, open a video or a browser and press F11 to enter full screen. Then trigger a notification, for example by sending yourself a message. No banner should appear. Press F11 again to leave full screen, and the quiet period ends.
Silence notifications after a Windows feature update
Use this rule if you do not want post-update prompts to interrupt the first session after an update.
- Tick For the first hour after a Windows feature update.
This rule only matters after a feature update, which is the large, once-a-year kind of update, not a monthly security patch. Until the next feature update, it does nothing.
Check that Do Not Disturb is running
You can confirm the state at any time without opening Settings.
- Click the date and time at the right end of the taskbar, or press Windows key + N, to open Notification Center. The notifications panel opens.
- Look at the bell icon at the top of the panel. When Do Not Disturb is on, the bell appears changed or crossed out. When it is off, the bell looks normal.
The same bell icon is a quick manual toggle — click it to turn Do Not Disturb on or off instantly. Click it to turn Do Not Disturb on or off on the spot. This is useful for a one-off quiet period that does not fit any rule.
While a rule is active, missed notifications wait in Notification Center. Open it after your meeting or game to catch up.
Let important notifications through
Automatic Do Not Disturb silences everything by default. On current Windows 11 versions, you can allow certain notifications to break through Do Not Disturb.
- Open Settings System Notifications.
Settings › System › Notifications - Look near the Do not disturb toggle for a link named Set priority notifications. Click it if it is there.
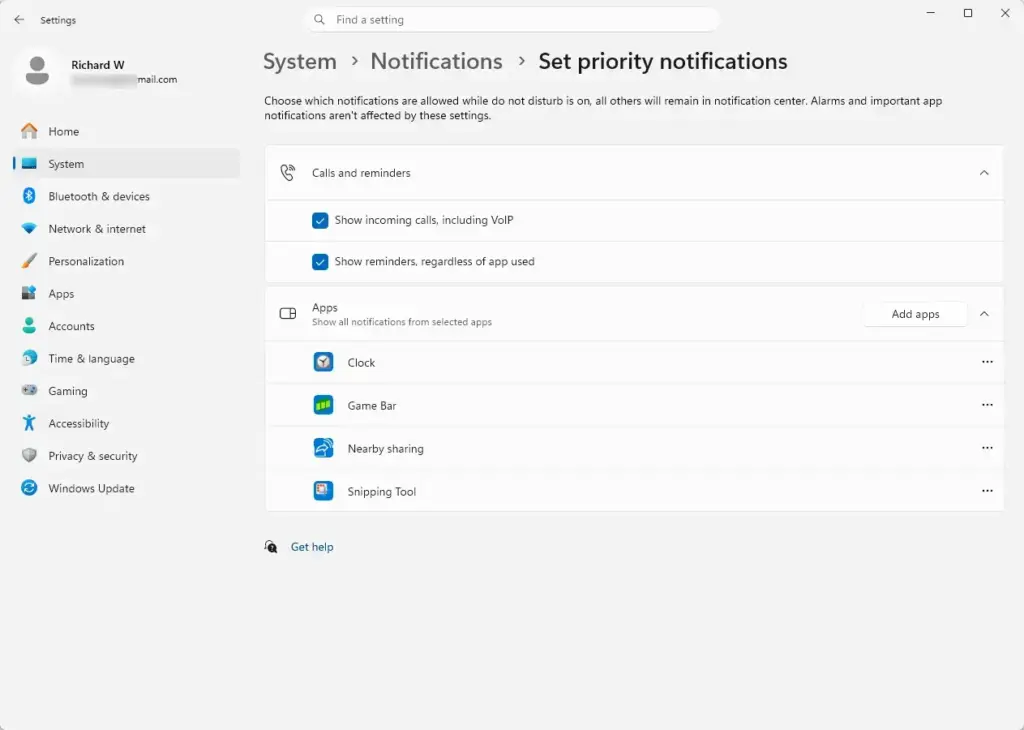
Settings › System › Notifications › Set priority notifications - Choose the items that should still break through, such as calls, reminders, or specific apps.
If you do not see Set priority notifications, your build does not include it. The only option on those builds is to treat Do Not Disturb as all or nothing.
Silence only one app instead
If one app causes most of the interruptions, you do not need Do Not Disturb at all. A per-app switch is quieter and permanent.
- Open Settings System Notifications.
- Scroll to the list of apps under Notifications from apps and other senders.
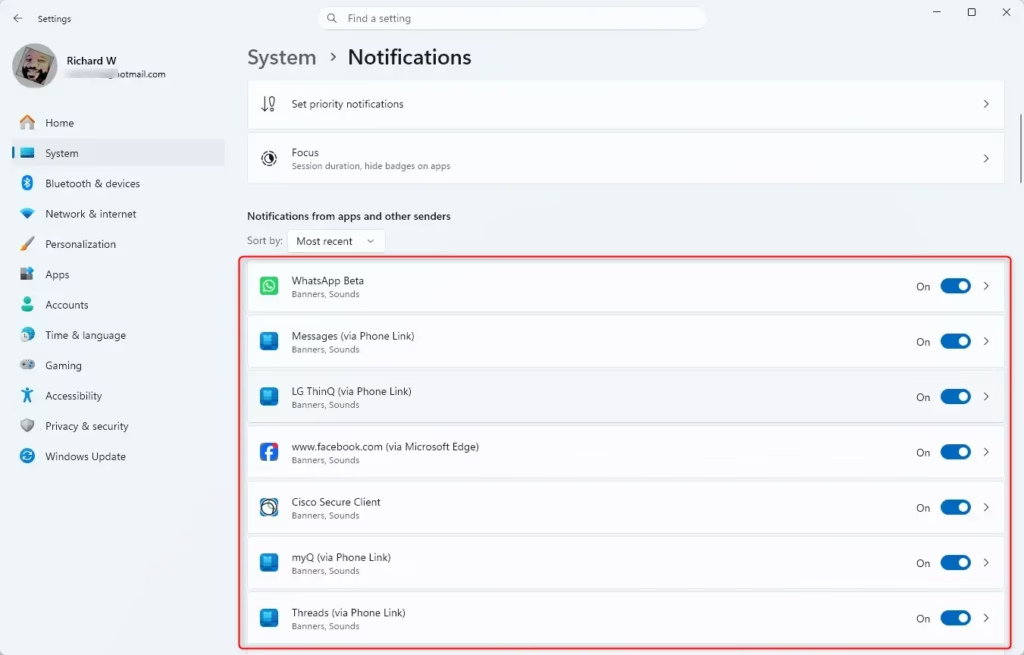
- Switch off the toggle next to the app that is causing the problem.
That app stops showing notifications at all times, not only during a rule. Use this for apps you never want to hear from, and keep Do Not Disturb for times when you want everything quiet.
If the automatic options are missing or greyed out
These are the usual causes, with what you will see for each.
- You see Focus assist, not Do not disturb. Your build is older. Run Windows Update, restart when prompted, then open the Notifications page again.
- The rules are greyed out and a message says some settings are managed by your organization. A work or school policy controls this page. You cannot override it on a managed PC. Ask your IT team if you need a different schedule.
- The main Notifications toggle is off. When all notifications are switched off, there is nothing for Do Not Disturb to hold back. Switch Notifications on at the top of the page.
- A rule seems not to fire. Check that its tick box is still selected. Then test it directly. For example, enter full screen and send yourself a message. Rules apply as soon as the condition starts. No restart is needed after you change a rule.
If a banner still gets through
Do Not Disturb silences notifications that apps send through Windows. Some banners come from elsewhere. A browser tab can show its own pop-up, and an app can draw its own alert window inside its interface. Those do not go through Notification Center, so Do Not Disturb does not hold them back. Turn off the alert in that app or site instead.
Also check the priority list. An app you allowed in Set priority notifications will still show banners while a rule is running.
Turn automatic Do Not Disturb off
You can undo any rule at any time, and nothing is lost when you do.
- Open Settings System Notifications.
- Expand Turn on do not disturb automatically.
- Clear the tick box next to each rule you no longer want.
If Do Not Disturb is on right now, click the bell icon in Notification Center, or switch off the Do not disturb toggle on the same Settings page. Banners and sounds return straight away.
What to do next
If a rule you set still does not fire, confirm your Windows build is current, then check whether a work policy is controlling the page. If you want quiet time that starts when you choose, rather than on a rule, look at focus sessions in the Windows 11 Clock app. Open it from the Start menu and look for Focus sessions. On current builds a session also mutes notifications while it runs.
Frequently asked questions
How to stop notifications from coming through on Do Not Disturb?
Open Settings, go to System Notifications, then turn on Do Not Disturb. You can activate it manually right away, or set automatic rules under "Turn on do not disturb automatically" to trigger it during presentations, games, full-screen videos, or on a schedule you choose.
How do I turn off Do Not Disturb notifications on 🪟 Windows 11?
Open Settings and navigate to System Notifications. Toggle off Do Not Disturb at the top, or disable the specific automatic rules under "Turn on do not disturb automatically" that you no longer want active.
Does do not disturb silence notifications?
Yes. Do Not Disturb mutes notification sounds and hides pop-up banners. Notifications still arrive but go quietly to Notification Center instead, where you can read them later by clicking the date and time on the taskbar.
How do I silence all notifications in 🪟 Windows 11?
Turn on Do Not Disturb in Settings System Notifications, or set automatic rules to silence notifications during presentations, games, full-screen videos, or on a schedule. This blocks banners and mutes sounds without deleting the notifications.
Still have a question?
Answered by AI from this guide. Good questions may be added to this page — please don't include personal details.
Did this guide fix your problem?

About the Author
Richard
Tech Writer, IT Professional
Richard is a writer at Geek Rewind who turns complex IT tasks into clear, step-by-step guides. He draws on years of hands-on experience in system administration and enterprise IT operations, focusing on Windows, Linux and WordPress: the problems people actually run into, and the fixes that work. His server and WordPress guides come from systems he runs himself. Richard builds and maintains the platform behind Geek Rewind, from its Ubuntu servers and Nginx configuration to its custom WordPress plugins. Many new tutorials start with readers' questions, and he's always glad to answer them in the comments.
No comments yet — be the first to share your thoughts!