3 Easy Steps to Disable Windows 11 Tips Notifications

Windows 11 tips notifications are pop-up messages that appear in the bottom-right corner of your screen. They suggest shortcuts and features you might not use. Turning them off stops these sudden interruptions so you can work without distraction.
You can turn off tips and suggestions through the Settings app in under a minute. This guide covers four methods. The first two work for the current user on any edition, including Home. The last two apply the change to every user on the PC. The steps below show you how to clear your screen and keep Windows quiet.
Disable Windows 11 tips notifications by opening Settings, pressing Win+I, selecting System Notifications, scrolling to Additional settings, and unchecking Get tips and suggestions when using Windows. The change applies immediately without restart.
Turning Off Windows Tips and Suggestions
Windows 11 occasionally shows brief hints meant to help you get more out of your computer. They can pop up as notifications while you are in the middle of something else. If these messages break your concentration, you can turn them off.
Each method below can be reversed. Start with the Settings app. It is the safest option, and it is the only one you need on a personal PC.
Option 1Using Windows Settings (The Easy Way!)
Turn off Windows 11 tips notifications through the Settings app in under a minute. Open Settings by pressing the Win plus I, select System, and click Notifications. Scroll to the bottom of the list and expand Additional settings. Clear the checkmark next to Get tips and suggestions when using Windows. This works on both Home and Pro, and it needs no restart.
- Open Settings . Press the Win+I on your keyboard. Or click the Start button and then click the gear icon labeled Settings. The Settings window should open.
- Go to System. Click System in the left-hand menu.
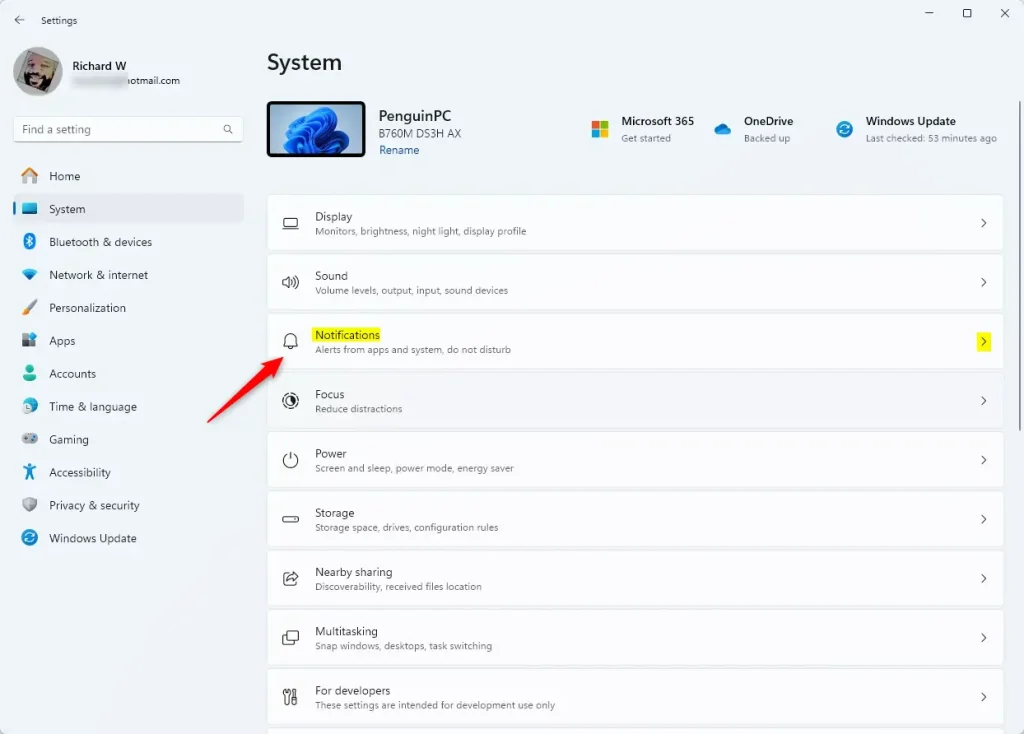
- Open Notifications. On the right side, click Notifications. You will see the list of notification switches and the apps that can send them.
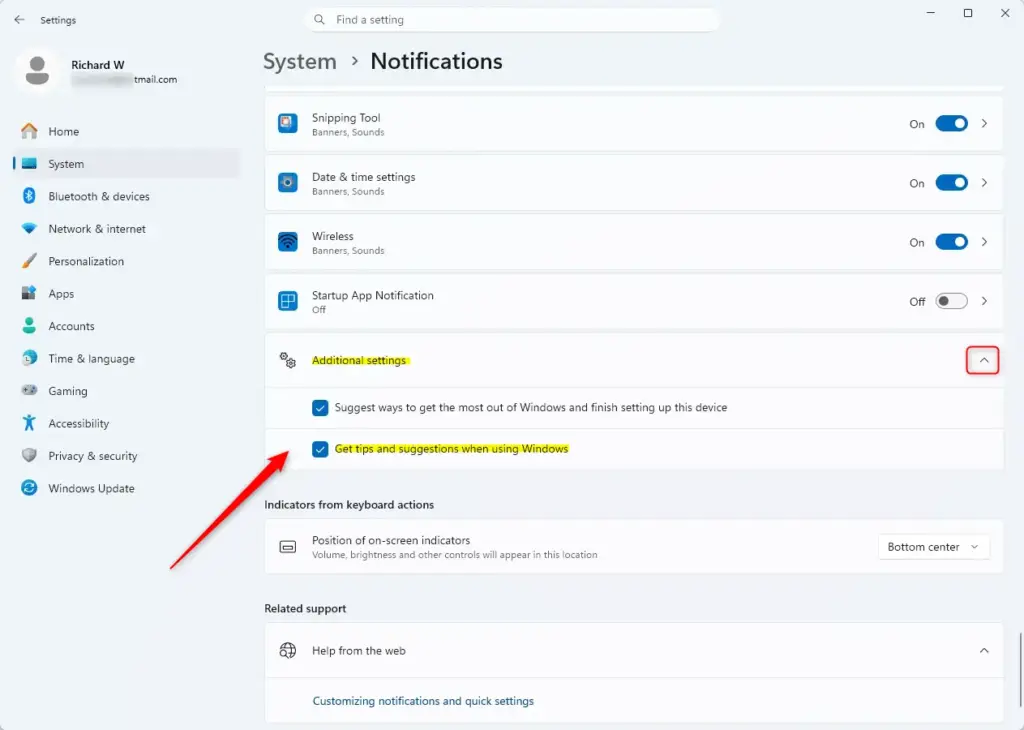
- Expand Additional settings. Scroll to the bottom of the Notifications page and click Additional settings. A few checkboxes should appear below it.
- Find the tips option. Look for Get tips and suggestions when using Windows. You may also see it worded as “when I use Windows”. The exact wording can vary a little between builds, so look for the option about tips and suggestions.
- Turn it off. Clear the checkbox, or move the switch to Off if your build shows a switch. The change applies right away.
- Close Settings. Windows will stop showing these pop-up tips. To turn them back on later, return to the same page and select the checkbox again.
In that case, ask your IT team.
Option 2Using the Registry Editor (For Advanced Users)
You can also turn off Windows 11 tips notifications in the Registry Editor by changing one value. Press the Windows key plus R, type regedit, and press Enter to open the tool. Go to HKEY_CURRENT_USER\SOFTWARE\Microsoft\Windows\CurrentVersion\ContentDeliveryManager. Find the value named SubscribedContent-338389Enabled and change its value data to 0 to turn off the suggestions.
This value belongs to your user account only. Setting it to 0 turns the tips off. To turn them back on, set it to 1 or delete the entry. Before you edit anything, you can back up the registry. In Registry Editor, click File, then Export, and save a copy. Double-clicking that file later restores it.
- Open Run. Press the Windows key + R. A small Run box appears.
- Start Registry Editor. Type
regeditinto the box and press Enter, or click OK. If a User Account Control message asks whether to allow the app to make changes, click Yes. - Go to the right key. The left pane shows a tree of folders (keys). Expand them one by one until you reach this location:
HKEY_CURRENT_USER\SOFTWARE\Microsoft\Windows\CurrentVersion\ContentDeliveryManager. You can also paste the path into the address bar at the top of the window and press Enter. - Look at the right pane. Find an entry called SubscribedContent-338389Enabled. It is a DWORD (32-bit) Value.
- If it exists, double-click it to open it.
- If it does not exist, right-click an empty space on the right side. Select New, then DWORD (32-bit) Value. Name it exactly
SubscribedContent-338389Enabled, then double-click it to open it. - Turn tips off. In the Value data box, type
0and click OK. This tells Windows to stop showing these tips. - To turn tips back on, double-click the same entry, type
1in the Value data box, and click OK. Or go back to the normal Windows setting by deleting the entry. Right-click SubscribedContent-338389Enabled on the right side and choose Delete. - Close Registry Editor. You can now close the window.
- Restart your PC. It is best to restart so the change takes full effect.
Managing Tips for All Users (Advanced & Specific Editions)
The preceding methods change settings for the current user only. If you want the change to apply to every user on a computer, or you run Windows 11 Enterprise or Education, you need one of the methods below.
Option 3Using the Local Group Policy Editor
The Local Group Policy Editor is a tool for managing system settings. It is available in Pro, Enterprise, and Education editions. Using it to disable tips stops the pop-ups for all profiles on your computer. Press the Windows key plus R, type gpedit.msc, and press Enter. Go to Computer Configuration, choose Administrative Templates, select Windows Components, and open Cloud Content. Then enable the policy that blocks the tips. The steps below use the policy named Do not show Windows tips. Cloud Content also holds a related policy, Turn off Windows consumer experiences. Its wording can differ slightly between builds.
Users on the Home edition should refer to Option 1 or Option 2.
- Open Run. Press Windows key + R.
- Start the editor. Type
gpedit.mscand press Enter. If User Account Control asks for permission, click Yes. The Local Group Policy Editor should open. - Browse to the policy folder. In the left pane, click through the folders in this order:
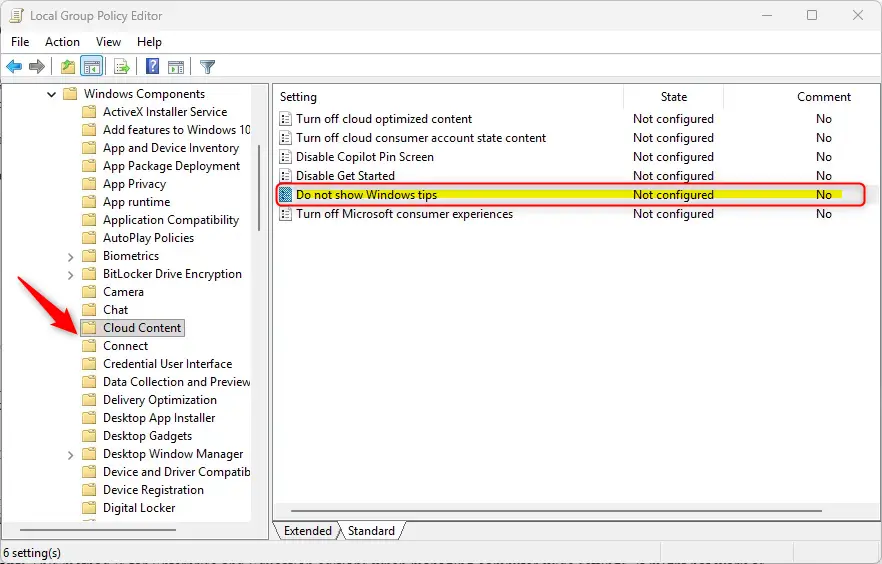
Computer Configuration>Administrative Templates>Windows Components>Cloud Content. - Select Cloud Content. Click Cloud Content. A list of policies appears on the right side.
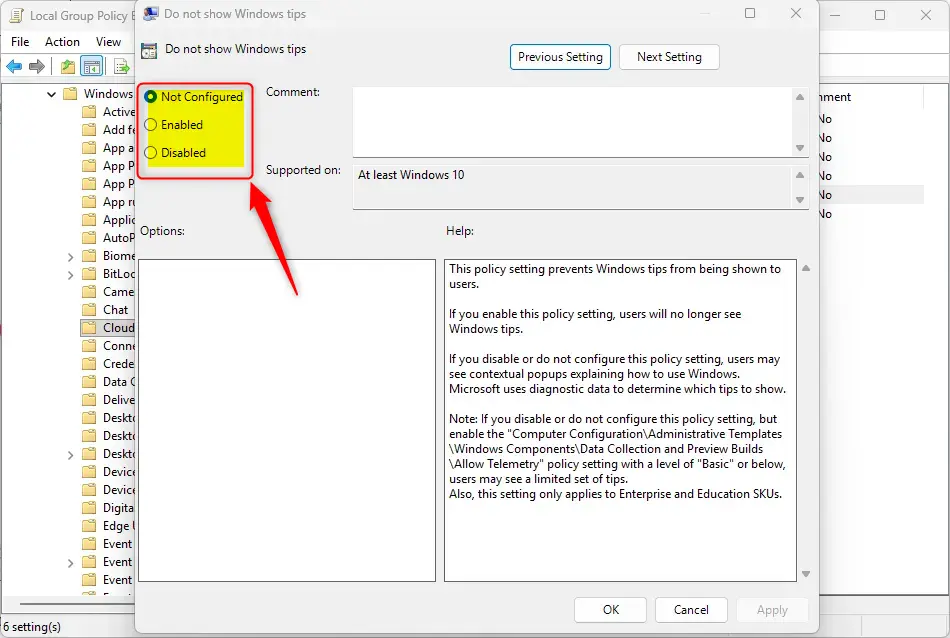
- Open the policy. Find the setting called Do not show Windows tips and double-click it.
- Turn tips off for everyone. Select Enabled. This can look backwards, but enabling a "Do not show" policy is what turns the tips off.
- Or turn tips back on. To return to the normal setting, select Not Configured. This lets Windows manage the setting, which usually means the tips are on by default.
- Apply it. Click OK after you choose.
- Close the editor. You can now close the Local Group Policy Editor.
- Restart or refresh the policy. You might need to restart your computer for the change to work. Or you can try to refresh the policy instead. Open Command Prompt as an administrator, type
gpupdate /force, and press Enter. To open it as an administrator, search for Command Prompt, right-click it, and choose Run as administrator.
Option 4Using the Registry Editor for All Users (Enterprise/Education Editions)
To disable tips for all users on Enterprise or Education editions, you can change a setting in the Registry Editor under the local machine hive. Open the Registry Editor by typing regedit in the Start menu, then go to HKEY_LOCAL_MACHINE\SOFTWARE\Policies\Microsoft\Windows\CloudContent. Create or modify a DWORD value named DisableSoftLanding there. This applies the restriction system-wide, for every user account on that computer.
Important: This approach targets Enterprise and Education editions when you manage computer-wide settings. Its behavior might differ on other Windows versions. Because you are editing the machine-wide hive, export a backup first with File, then Export.
- Open Run. Press Windows key + R.
- Start Registry Editor. Type
regeditand press Enter. Click Yes on the User Account Control message. - Go to the policy location. Browse to this registry key:
HKEY_LOCAL_MACHINE\SOFTWARE\Policies\Microsoft\Windows\CloudContent - Create the key if it is missing. If the
CloudContentkey is not there, you need to create it. Right-click theWindowskey and select New, then Key. Name itCloudContent. Then click the new key so its contents show on the right. - Look for the value. On the right side, look for a DWORD value called DisableSoftLanding.
- If it exists, double-click it to change its value.
- If it does not exist, right-click an empty space on the right side. Select New, then DWORD (32-bit) Value. Name it exactly
DisableSoftLanding, then double-click it. - Turn tips off for everyone. Set the Value data for DisableSoftLanding to
1and click OK. - To turn tips back on for everyone, set the Value data to
0. Or delete the value to go back to the default. Right-click DisableSoftLanding and choose Delete. - Close Registry Editor. Exit the program.
- Restart your PC. A restart is recommended for these system-wide changes to take full effect.
Summary
Feature updates or security patches occasionally restore default notification settings. If the tips come back after an update, repeat the steps above to turn them off again.
Did this guide fix your problem?

About the Author
Richard
Tech Writer, IT Professional
Richard is a writer at Geek Rewind who turns complex IT tasks into clear, step-by-step guides. He draws on years of hands-on experience in system administration and enterprise IT operations, focusing on Windows, Linux and WordPress: the problems people actually run into, and the fixes that work. His server and WordPress guides come from systems he runs himself. Richard builds and maintains the platform behind Geek Rewind, from its Ubuntu servers and Nginx configuration to its custom WordPress plugins. Many new tutorials start with readers' questions, and he's always glad to answer them in the comments.
No comments yet — be the first to share your thoughts!