How to Enable or Disable Notifications in the Settings app on Windows 11

Windows 11 notifications let you control which app alerts pop up on your screen.
These notifications are short messages from apps and Windows itself that inform you about updates or new messages.
In Windows 11, version 22H2, you can easily turn notifications on or off for each app directly within the Settings app.
Too many alerts can be distracting, but turning them all off might cause you to miss important information.
This guide shows you how to manage your Windows 11 notification settings so you only get the alerts you need.
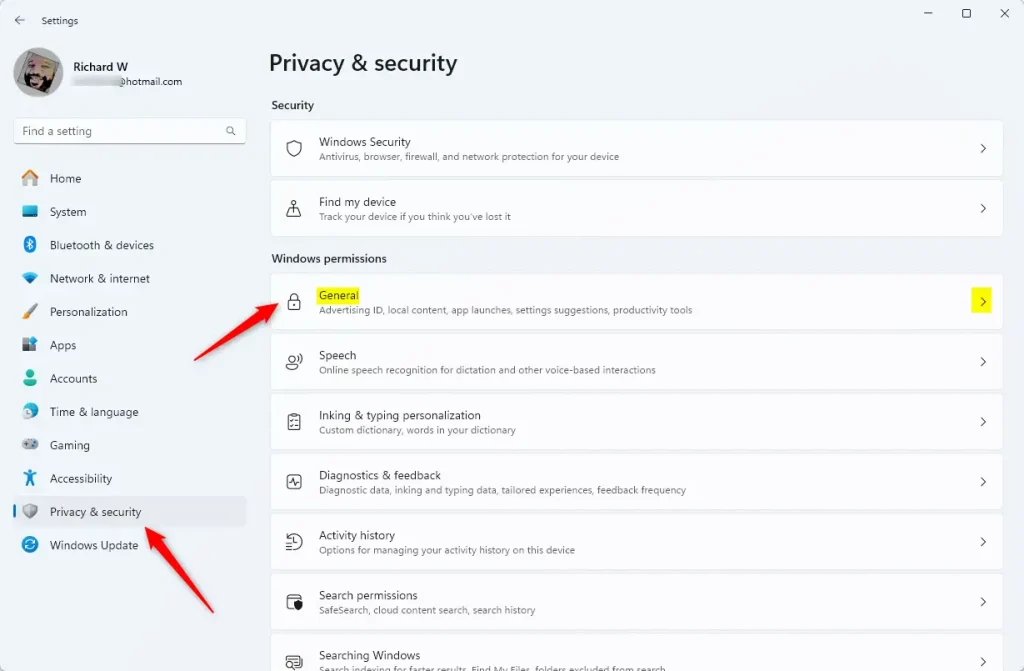
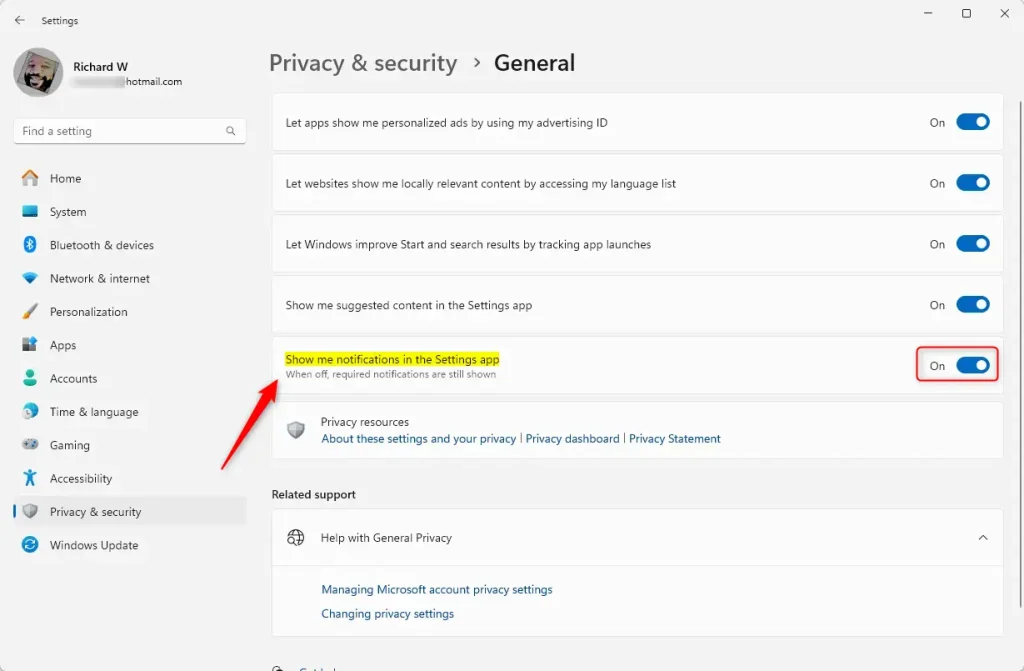
Go to Settings > Privacy & security > General. Use the toggle switch to turn notifications On or Off. This controls whether you see app notifications within the Settings app itself.
Turn Notifications On or Off in 🪟 Windows 11 Settings
Turning Windows 11 notifications on or off is a simple action within the Settings app. This lets you decide if you want to see alerts from apps and the system. Navigate to Settings, then Privacy & security, and finally General to find the main switch for all notifications.
- Open the Settings app: Click the Start button (the Windows icon) at the bottom-left corner, then click the gear icon labeled Settings. Or press
Windows key + Ion your keyboard. - On the left side, click Privacy & security.
- On the right side, find and click the General section to open it.
- Look for the option called Show me notifications in the Settings app.
- Use the toggle switch to turn it On (blue) or Off (gray) depending on what you want.
Once you’re finished, you can close the Settings window.
Change Notification Settings Using the Registry Editor (Advanced)
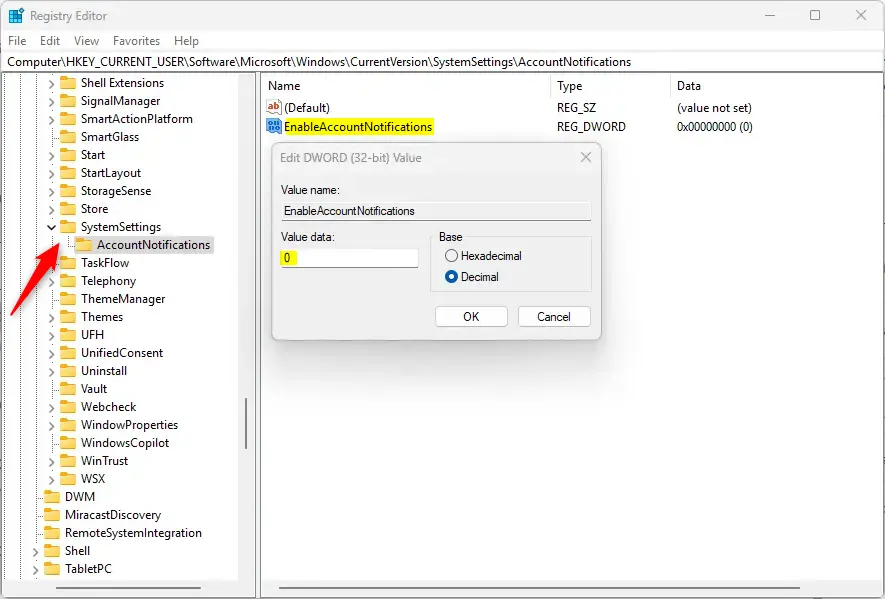
If you’re comfortable with advanced settings, you can change Windows 11 notification settings using the Registry Editor. This tool lets you make more specific adjustments to how notifications behave. Opening the Registry Editor and navigating to a specific location is necessary to make these changes.
- Open Registry Editor as Administrator: %📂%FLAG_ADMIN%%
- Press
Windows key + S, typeregedit, then right-click Registry Editor and choose Run as administrator. - Confirm any prompts that appear.
- Press
- In Registry Editor, go to this location (you can copy-paste it in the address bar at the top):📝Good to Know
Computer\HKEY_CURRENT_USER\Software\Microsoft\Windows\CurrentVersion\SystemSettings\AccountNotifications - On the right side, look for EnableAccountNotifications.
- Double-click EnableAccountNotifications to edit it:
- Type
1to turn notifications ON. - Type
0to turn notifications OFF. - Then click OK.
- Type
- If you don’t see EnableAccountNotifications, right-click on an empty space on the right side, choose New > DWORD (32-bit) Value, and name it EnableAccountNotifications. Then set its value as above.
- Close Registry Editor and restart your computer to apply the changes.
Summary
- You can control how Windows 11 shows notifications by turning them on or off in the Settings app.
- Use the Privacy & Security > General section to find the notification toggle.
- Advanced users can also use the Registry Editor to change notification settings.
- Adjust these settings to reduce distractions or stay informed—whichever suits you best!
Notifications on Windows 11 can be controlled by turning them on or off in the Settings app, usually found under Privacy & Security > General. For more advanced control, the Registry Editor can be used. Adjusting these settings helps you manage distractions or ensure you get important alerts.
Helpful Links:
Why are my notifications not popping up on 🪟 Windows 11?
If your Windows 11 notifications aren’t popping up, first check that ‘Show notification banners’ is turned on in Settings > System > Notifications for each app. Also, ensure Focus Assist is off, as it can block messages.
Was this guide helpful?

About the Author
Richard
Tech Writer, IT Professional
Richard, a writer for Geek Rewind, is a tech enthusiast who loves breaking down complex IT topics into simple, easy-to-understand ideas. With years of hands-on experience in system administration and enterprise IT operations, he’s developed a knack for offering practical tips and solutions. Richard aims to make technology more accessible and actionable. He's deeply committed to the Geek Rewind community, always ready to answer questions and engage in discussions.

No comments yet — be the first to share your thoughts!