How to Submit Feedback Using the Windows 11 Diagnostics and Feedback Hub

The Feedback Hub in Windows 11 lets you send bug reports, feature ideas, and complaints directly to Microsoft. This built-in app gathers system details and screenshots to help engineers fix crashes and performance bugs faster.
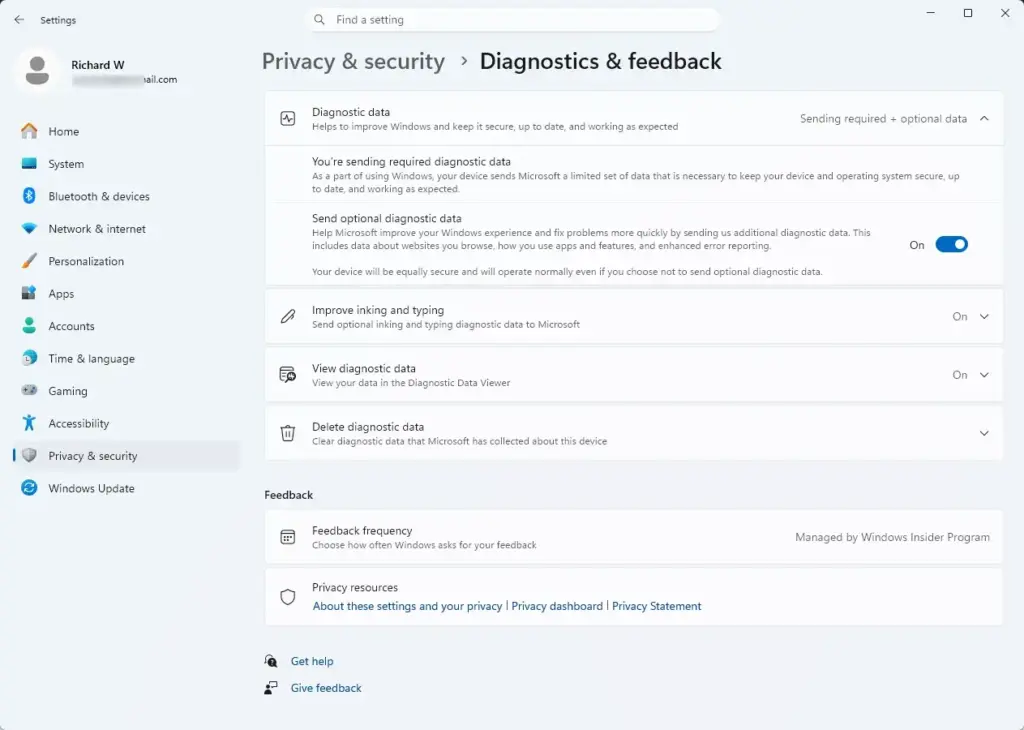
Open the Feedback Hub by pressing Win, typing Feedback Hub, and clicking the app. Click Add new feedback, describe your issue, select the category, and submit. Microsoft’s engineers receive your report directly, especially if you first enable optional diagnostic data in Settings Privacy & security Diagnostics & feedback
You need Windows 11 version 22H2 or newer to get the full set of feedback tools. If you are not sure which version you have, the winver check later in this guide shows it. Turning on diagnostic data sharing also helps Microsoft spot major bugs across millions of PCs. Windows offers two levels:
- Required diagnostic data: This basic level sends information about your device, its settings, and whether it is running correctly. It helps Microsoft spot critical security flaws and stability issues. You cannot turn this level off.
- Optional diagnostic data: This level includes everything in the required data, plus extra details about the websites you visit, how you use apps and features, and enhanced error reports. It gives Microsoft the most helpful information when you are reporting a bug.
You can check or change your diagnostic settings at any time. Follow these steps to review them:
- Click the Start button and open the Settings app (the gear icon). The Settings window opens.

Settings - Click Privacy & security in the left sidebar menu. The privacy options appear in the main panel.
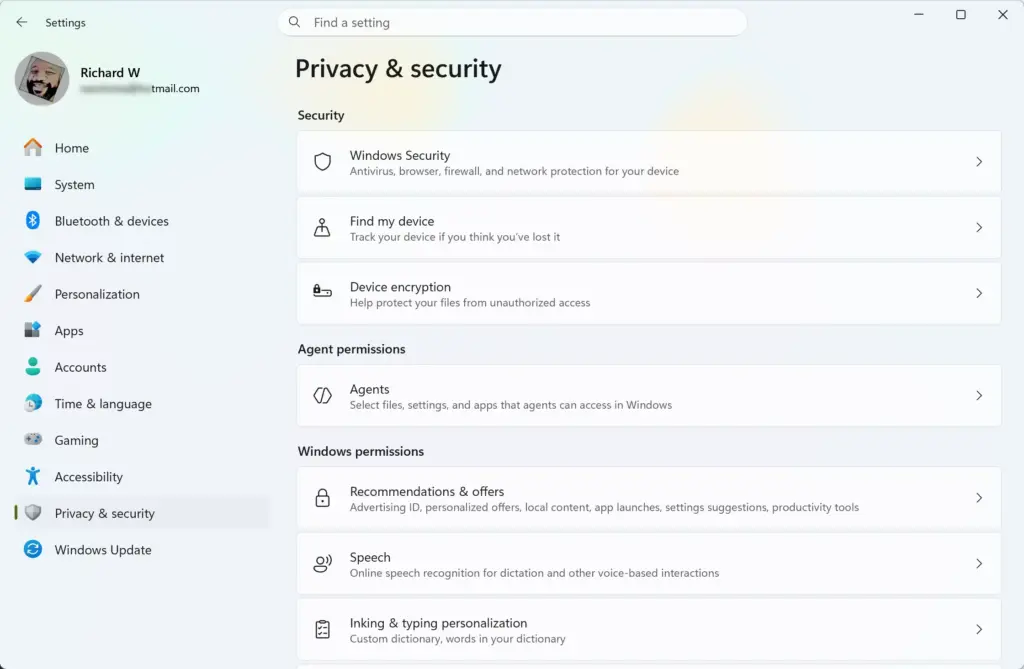
Settings › Privacy & security - Click Diagnostics & feedback in the main panel. This page holds all the diagnostic and feedback options.
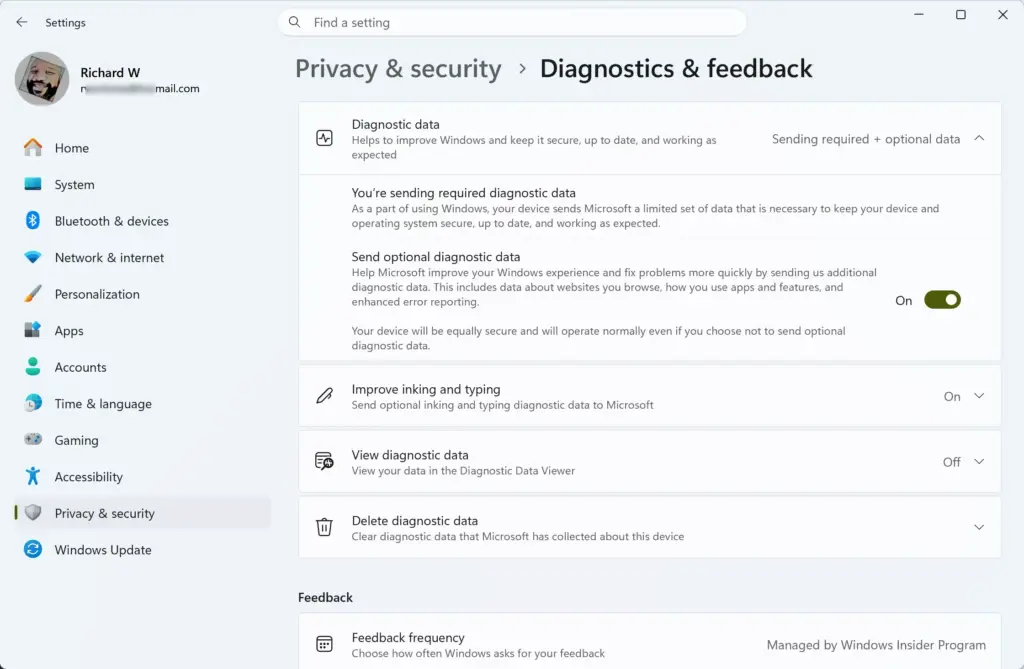
Settings › Privacy & security › Diagnostics & feedback - Look under the Diagnostic data section. Turn on the Send optional diagnostic data switch if you want to share more. Leave it off to send only the required data. The change applies immediately and you do not need to restart.
If these options are greyed out, or you see a message saying some settings are managed by your organization, a work or school policy is controlling them. This is common on Pro editions joined to a company network. Only your administrator can change them.
Sharing optional diagnostic data makes your bug reports much more effective because the Feedback Hub can automatically attach system logs and performance traces related to your problem. If you later want to share less, return to the same page and turn the switch off.
How to Open and Navigate the Feedback Hub
The Feedback Hub is a built-in app for reporting Windows issues to Microsoft. It lets you browse existing bug reports, check for app updates, or start your own feedback submission right from your desktop. If Windows asks you to sign in, use your Microsoft account.
Follow these steps to open the Feedback Hub:
- Press the Windows key on your keyboard to open the Start menu.
- Type Feedback Hub into the search bar. The app appears in the search results.
- Click the Feedback Hub app icon in the results to open it. The home dashboard appears.
If the app does not show up in search, it may have been removed or blocked on your PC. Reinstalling it from the Microsoft Store usually fixes this. On a managed work PC, your administrator may have blocked it on purpose.
Here is what you will find in the main menu:
- Home: Shows popular announcements, trending issues, and recent updates from the Windows team.
- Feedback: Lets you browse reports submitted by other users. You can upvote issues that affect you or leave comments.
- Add new feedback: The most important button in the app. This is where you submit your own bug reports or feature requests.
- Achievements: A section that tracks your contributions and rewards you with digital badges for helping the community.
Searching existing feedback can save you time. If someone else has already flagged the same problem, cast a vote on their report instead of starting a new one.
How to Submit a New Bug Report or Feature Request
You submit a new bug report or feature request from inside the Feedback Hub. Describe your issue in detail and choose the right category. Your notes go directly to the Windows engineering team to help them fix software glitches.
Follow these steps to submit your feedback:
- Open the Feedback Hub app using the steps in the previous section.
- Click the Feedback tab on the left menu.
- Click the blue + Add new feedback button at the top right. The feedback form opens.
- Choose Bug if something is broken or not working right. Choose Suggestion if you want a new feature or a design change.
- In the Summarize your feedback box, type a short, clear sentence describing the issue. For example: "Task bar freezes when clicking the network icon."
- In the Explain in more detail box, describe what you were doing when the problem happened, what you expected to happen, and what actually happened. Mention anything you already tried, such as a restart.
- Click Next. The category screen appears.
Choosing the correct category and subcategory matters. It makes sure the right engineering team reviews your report. Microsoft receives millions of suggestions, and putting yours in the proper bucket keeps it from getting lost and speeds up the review.
- Select a Category and Subcategory from the drop-down menus that best match your problem (such as "Network and Internet" or "Apps").
- Click Next.
Before submitting, the app checks for similar existing reports and lists any matches. If your issue matches an existing report, select it and add your details to it. If nothing matches, choose to create a new feedback item. When the form is complete, click Submit to send it. Your submission then appears under your own feedback in the app, where you can check for replies.
Using the Re-create a Problem Tool for Advanced Troubleshooting
For complex bugs, use the re-create a problem tool in the Feedback Hub. It records your screen and gathers technical logs automatically. It captures the step-by-step actions leading up to a crash, which gives Microsoft engineers the exact diagnostic data they need to solve difficult system errors.
Follow these steps to record and submit a reproduction:
- Start submitting new feedback as described in the previous section.
- When you reach the screen that asks you to attach details, look for the section labeled Re-create my problem.
- Click Start recording. In some builds this button is labeled Start capture. Recording begins.
- Perform the actions on your computer that trigger the bug or error. Take your time and make sure the error occurs clearly while the recorder is running.
- Once the error happens, switch back to the Feedback Hub window and click Stop recording (or Stop capture).
The tool packages a diagnostic trace file with your submission. It contains performance data, error logs, and system states captured during the exact moments your computer misbehaved. This is the single most valuable piece of information you can provide to help developers patch a bug.
If the recording options are missing, check that optional diagnostic data is turned on (see the first section). Without it, the app may not be able to collect the detailed logs.
Attaching Screenshots and Crash Dumps Like a Pro
You can attach screenshots and crash dumps to your report while writing your feedback. This lets engineering teams see visual error messages and the technical memory files tied to app failures. It gives developers the evidence they need to pinpoint the cause of a crash.
Follow these steps to attach files to your feedback:
- While creating your feedback report, scroll down to the Attach a screenshot section.
- Click the Choose a file button to upload an image from your computer. Or press the keyboard shortcut mentioned in the app to capture your current screen instantly. A thumbnail of the image appears in the form.
- If an application has frozen completely, you can provide a memory dump file. Press Ctrl + Shift + Esc to open Task Manager.
- Find the frozen application in the list and right-click it. Select Create memory dump file (the option may read Create dump file in some versions). A confirmation window shows where the file was saved, so note that location.
- Return to the Feedback Hub and scroll to the Attach a file section. Upload the dump file you just created.
Make sure your internet connection is stable before uploading. A weak connection will stop the upload and force you to start the process over again. Once the report is submitted, you can delete the dump file from your PC to free up disk space. Also, check screenshots and dump files for personal information before you send them, because they can contain anything that was on screen or in memory.
Unique Expert Tips: Best Practices for 🪟 Windows 11 Feedback
Most people write a quick complaint and hit submit. If you want your feedback to stand out and actually influence Windows 11 updates, two habits help a lot. Most online guides skip them.
Tip 1Reference Specific Build Numbers
Reference your build number in your feedback. It tells engineers exactly which software version you were running when the bug happened. To find it, follow these steps:
- Press the Windows key, type winver, and press Enter. A dialog opens showing your Windows version and OS build.
- Note the version and build number, then include them in the Explain in more detail box of your report.
Say whether you are on a public release or an Insider preview build. A bug in a preview build is handled differently from one in a public release.
Tip 2Upvote and Comment on Existing Hub Threads
Upvote and comment on existing feedback threads to help Microsoft engineers prioritize widespread bugs by user volume and impact. Instead of creating a duplicate report, follow these steps:
- Search for your issue in the Feedback Hub.
- Open the main thread that best matches your problem and upvote it.
- Leave a comment with your specific error codes and build number to help the team fix the problem faster.
Short, specific comments are more useful than "me too." Say what you saw, what you were doing, and what you tried.
Summary
This guide explained how to share diagnostic data, open the Feedback Hub, submit bug reports or feature requests, record error steps, attach screenshots and dump files, and use two tips: referencing build numbers and upvoting existing threads.
Was this guide helpful?

About the Author
Richard
Tech Writer, IT Professional
Richard is a writer at Geek Rewind who turns complex IT tasks into clear, step-by-step guides. He draws on years of hands-on experience in system administration and enterprise IT operations, focusing on Windows, Linux and WordPress: the problems people actually run into, and the fixes that work. His server and WordPress guides come from systems he runs himself. Richard builds and maintains the platform behind Geek Rewind, from its Ubuntu servers and Nginx configuration to its custom WordPress plugins. Many new tutorials start with readers' questions, and he's always glad to answer them in the comments.


No comments yet — be the first to share your thoughts!