How to Enable or Disable Notification Suggestions in Windows 11


- 12 steps
- Includes a restart or sign-out
Windows 11 notification suggestions prompt you to turn off alerts for apps you rarely use.
These suggestions appear as pop-ups when Windows notices you keep missing or dismissing notifications from a specific app. They ask whether you want to stop getting alerts from that app, which cuts down on notification clutter.
For example, if you keep closing notifications from a game you play, Windows 11 might suggest turning off its alerts. It saves you from digging through the app list yourself, but some people find the pop-ups a nuisance in their own right.
You can turn the suggestions on or off in the Settings app, and there is a Registry Editor method as well. Both are covered below. Either way, you only change the suggestion prompts. Your per-app notification settings stay as they are.
Go to Settings System Notifications. Find the “Notification suggestions” toggle and switch it to your desired position to enable or disable them. This feature helps manage app notification pop-ups you may have missed.
Change settings in the Settings App
The Settings app is the fastest and safest way to switch notification suggestions on or off. It needs no registry editing and works the same on Windows 11 Home and Pro. The steps below take you from opening Settings to the toggle, which sits on the Notifications page under the System category.
- Open the Windows Settings app. Open the Start menu and select it, or press the Windows key + I to launch the Settings app. The Settings window opens with a list of categories down the left side.
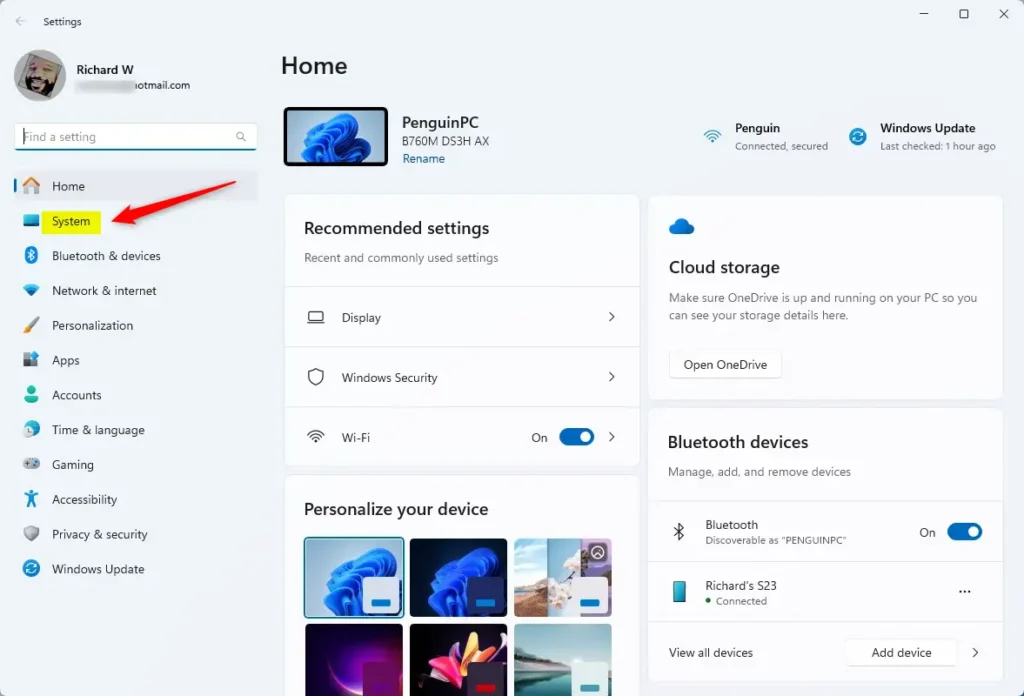
- Click the System button on the left sidebar. The System page opens on the right, showing tiles such as Display, Sound and Notifications.
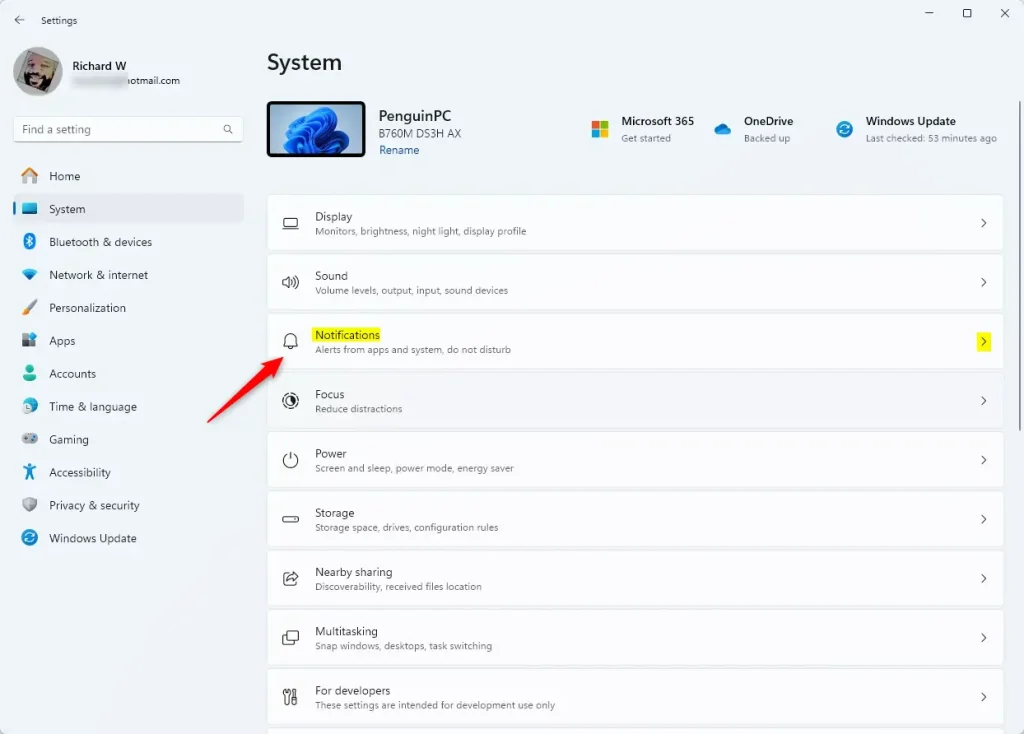
- Select the Notifications tile on the right. The Notifications page opens. You should see the main notifications switch at the top and a list of apps further down.
- Find the section labeled "Notifications from apps and other senders." Scroll down if you can't see it yet. If part of the page is collapsed, expand it. Exact wording and layout can differ slightly between Windows 11 builds.
- Click the toggle switch for Notification Suggestions to turn it on or off. When the switch is on, Windows can show prompts offering to mute apps you ignore. When it is off, those prompts stop. To undo the change, return here and flip the switch back.
- Close the settings window when finished. The change is saved as soon as you flip the switch. You don't need to restart.
Change settings using the Registry Editor
You can also turn off notification suggestions by editing the registry. This is the method to use if you manage several PCs or prefer to set the value directly. Registry Editor changes a specific key so the suggestions stay off for your user account. Because a wrong edit can cause problems, export the key first (File Export in Registry Editor) so you can restore it later. Then open the tool from the Start menu and go to the right path to update the correct value.
- Open the Windows Registry by searching for it in the Start menu. Select the result, and approve the User Account Control prompt if one appears. The Registry Editor window opens with a folder tree on the left.
- Navigate to the following path:
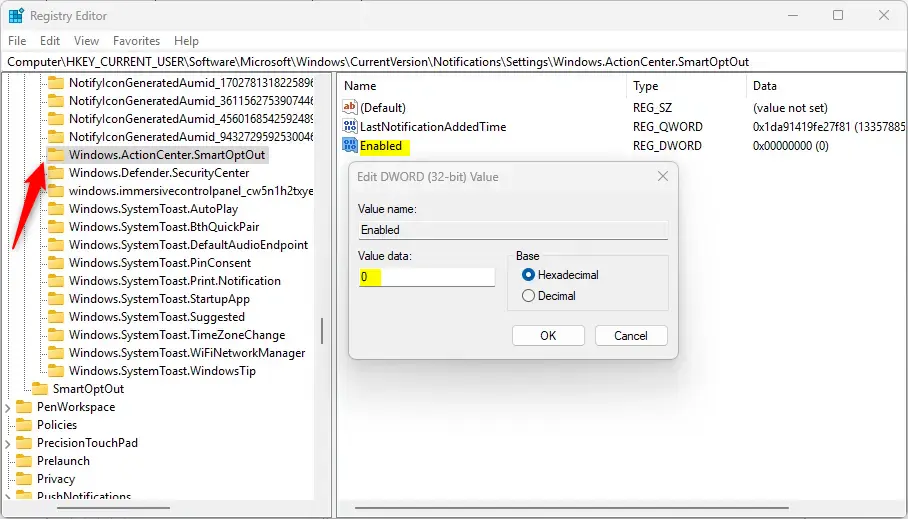
Computer\HKEY_CURRENT_USER\Software\Microsoft\Windows\CurrentVersion\Notifications\Settings\Windows.ActionCenter.SmartOptOut. You can paste it into the address bar at the top of Registry Editor, or expand the folders one by one. The values for that key then appear in the right pane. - Look for the Enabled (REG_DWORD) item in the right pane. If it is not there, right-click a blank space, select New DWORD (32-bit) Value, and name it
Enabled. The new item appears in the list, ready for you to rename it, so type the name exactly as shown and press Enter. - Double-click Enabled and change the value to
0to turn the feature off. Enter the number in the Value data box and click OK. The right pane should now show the new value next to Enabled. - To turn the feature back on in the future, delete the Enabled item you created. Right-click it, select Delete, and confirm. Windows then goes back to its default behavior.
- Restart your computer to apply the changes. Do this after turning the feature off, and again after deleting the item to turn it back on.
Summary
Windows 11 lets you control whether it suggests muting apps you rarely use. For most people the Settings toggle is the right choice. It takes seconds and is easy to reverse. Use the Registry Editor method if you want to set the value directly, and remember to export the key first and restart afterward. Whichever you pick, you decide how many notifications reach your screen.
Have a question about this guide?
Answered by AI from this guide. Good questions may be added to this page — please don't include personal details.
Did this guide fix your problem?

About the Author
Richard
Tech Writer, IT Professional
Richard is a writer at Geek Rewind who turns complex IT tasks into clear, step-by-step guides. He draws on years of hands-on experience in system administration and enterprise IT operations, focusing on Windows, Linux and WordPress: the problems people actually run into, and the fixes that work. His server and WordPress guides come from systems he runs himself. Richard builds and maintains the platform behind Geek Rewind, from its Ubuntu servers and Nginx configuration to its custom WordPress plugins. Many new tutorials start with readers' questions, and he's always glad to answer them in the comments.
No comments yet — be the first to share your thoughts!